
Java 自然语言处理(四)
简单地说,主题建模是一种技术,通过这种技术,计算机程序试图从文本中提取主题。文本通常是非结构化数据,如博客、电子邮件、文章、书中的一章或类似内容。这是一种文本挖掘方法,但不应与基于规则的文本挖掘相混淆。在机器学习场景中,主题建模属于无监督学习的范畴,其中机器或计算机程序试图通过观察最后一组文本中的一串单词来找到主题。当给定“IT 行业”的主题时,一个好的模型应该产生单词“程序”、“程序员”、“IT
九、主题建模
在这一章中,我们将使用包含一些文本的文档来学习主题建模的基础知识。这里的想法是使用某些可用的方法从文本中获取主题。这个过程属于文本挖掘的范畴,在搜索、聚类和组织文本中起着重要的作用。今天,它被许多网站用于推荐目的,例如当新闻网站根据读者当前正在阅读的文章的主题来推荐文章时。本章涵盖主题建模的基础知识,包括潜在狄利克雷分配 ( LDA )的基本概念。它还将向您展示如何使用 MALLET 包进行主题建模。
我们将在本章中讨论以下主题:
- 什么是主题建模?
- LDA 的基础知识
- 用木槌进行主题建模
什么是主题建模?
简单地说,主题建模是一种技术,通过这种技术,计算机程序试图从文本中提取主题。文本通常是非结构化数据,如博客、电子邮件、文章、书中的一章或类似内容。这是一种文本挖掘方法,但不应与基于规则的文本挖掘相混淆。在机器学习场景中,主题建模属于无监督学习的范畴,其中机器或计算机程序试图通过观察最后一组文本中的一串单词来找到主题。当给定“IT 行业”的主题时,一个好的模型应该产生单词“程序”、“程序员”、“IT”、“计算机”、“软件”和“硬件”。它有助于理解大量文本,并在搜索引擎的运行中发挥着至关重要的作用。
主题建模可以与组织、分类、理解和总结大量文本信息的方法一起使用。它使我们能够使用主题发现集合和注释中隐藏的模式。它从文档集合中找到最能代表集合的单词组。
有许多不同的方法来做主题建模,但最流行的是 LDA。下一节将介绍 LDA 的基础知识。
LDA 的基础知识
在不同的主题建模方法中,LDA 是最常用的方法。这是文本数据挖掘和机器学习的一种形式,其中执行回溯来找出文档的主题。它还涉及概率的使用,因为它是一个生成概率模型。
LDA 将文档表示为基于概率给出主题的主题混合物。
任何给定的文档都有或多或少的机会将某个单词作为其潜在主题;例如,给定一个关于体育的文档,单词“cricket”出现的概率高于单词“Android One Phone”出现的概率。如果文档是关于移动技术的,那么“Android One Phone”这个词出现的概率会高于“cricket”这个词。使用抽样方法,以半随机方式使用狄利克雷分布从文档中选择一些词作为主题。这些随机选择的主题可能不是最适合作为文档的潜在主题,因此对于每个文档,需要检查单词并计算单词来自文档的概率。设 *p(主题|文档)是来自文档 d 的一个单词分配给主题 t— 和 p(主题)是来自单词 w 的所有文档的主题 t 的概率。这有助于找到构成主题的每个单词的比例。它查找每个单词在主题中的相关性以及主题在文档中的相关性。现在,给单词 w 重新分配一个新的主题——我们称之为topic’——使用p(topic ’ | document) p(word | topic ')。重复这个过程,直到你完成指定的题目。
为此,LDA 使用文档-术语矩阵,并将其转换为文档-主题矩阵和主题-术语矩阵。LDA 使用采样技术来改进矩阵。假设有标记为 d1、d2、d3 的 N 个文档…dn 。有 M 个项标为 t1、t2、t3…tm ,因此文档-术语矩阵将表示文档中术语的数量,并表示如下:
| | t1 | t2 | t3 | tm |
| d1 | Zero | three | one | Two |
| d2 | Zero | five | four | one |
| d3 | one | Zero | three | Two |
| dn | Zero | one | one | Two |
让 k 成为我们希望 LDA 建议的主题数量。它将文档-术语矩阵分为维度-主题矩阵和主题-术语矩阵:
| | 话题-1 | 话题-2 | 话题-k |
| d1 | one | Zero | one |
| d2 | one | one | Zero |
| d3 | one | Zero | one |
| dn | one | Zero | one |
文档-主题矩阵[ N x k
| | t1 | t2 | t3 | tm |
| 话题-1 | Zero | one | one | Zero |
| 话题-2 | one | one | Zero | Zero |
| 话题-k | one | Zero | one | Zero |
主题–术语矩阵[ k x m
要了解 LDA 是如何工作的,请访问 https://lettier.com/projects/lda-topic-modeling/。这是一个很好的网页,您可以在其中添加文档,决定主题的数量,并调整 alpha 和 beta 参数来获得主题。
用木槌进行主题建模
MALLET 是主题建模方面的知名库。它还支持文档分类和序列标记。更多关于木槌的信息可以在 http://mallet.cs.umass.edu/index.php 的找到。要下载 MALLET,请访问 http://mallet.cs.umass.edu/download.php(最新版本是 2.0.6)。下载完成后,解压目录中的 MALLET。它包含 MALLET 目录的sample-data/web/en路径中的.txt格式的样本数据。
第一步是将文件导入 MALLET 的内部格式。为此,打开命令提示符或终端,移动到mallet目录,并执行以下命令:
mallet-2.0.6$ bin/mallet import-dir --input sample-data/web/en --output tutorial.mallet --keep-sequence --remove-stopwords
该命令将生成tutorial.mallet文件。
培养
下一步是使用train-topics构建主题模型,并使用train-topics命令保存output-state、topic-keys和topics:
mallet-2.0.6$ bin/mallet train-topics --input tutorial.mallet --num-topics 20 --output-state topic-state.gz --output-topic-keys tutorial_keys.txt --output-doc-topics tutorial_compostion.txt
这将针对20主题进行训练,并将为你的材料语料库中的每个单词以及它们所属的主题创建一个 ZIP 文件。所有的topic-keys将被存储在tutorial_key.txt中。文件的主题建议将存储在tutorial_composition.txt中。
估价
A tutorial_key.txt是一个简单的文本文件,内容看起来会类似于下面的截图:
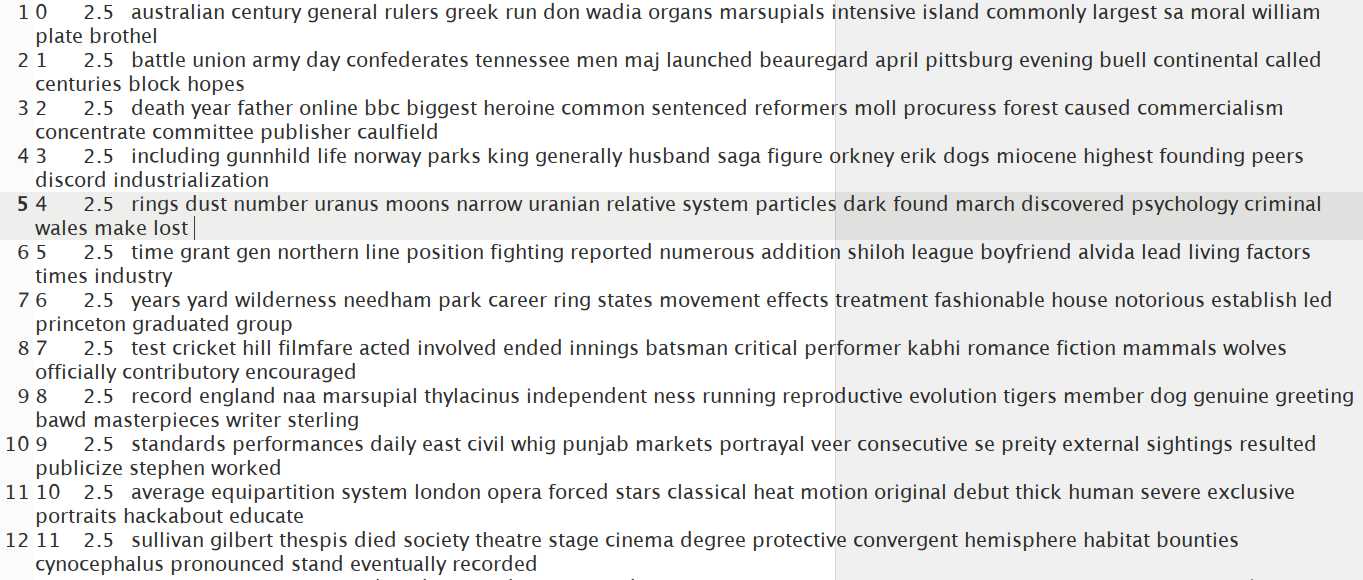
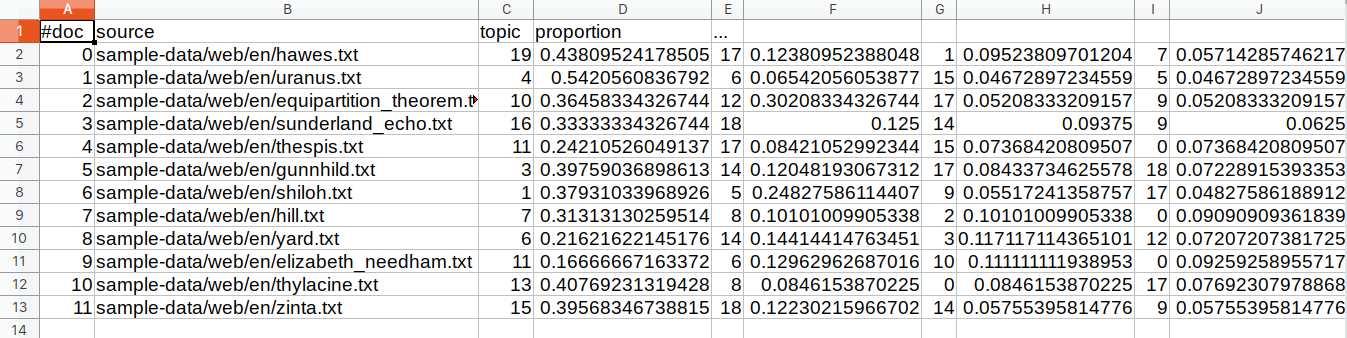
它包含所有的主题,因为我们要求 20 个主题。文件中的行可以从三个方面来看。第一种是使用从0开始的数字,表示主题编号。第二个数字是 Dirichlet 参数,默认值为2.5,第三种方法是查看显示可能主题的段落。tutorial_compostion.txt文件包含每个主题和每个原始文本文件的百分比分解。tutorial_compostion.txt文件可以在 Excel 或 LibreOffice 中打开,以便您更容易理解。它显示主题中所有单词的文件名,后跟topic和proportion:
第一档为hawes.txt,话题19占比 0.438 %。
让我们使用自定义数据来尝试一下。在mallet目录下创建一个mydata文件夹,包含四个文本文件,文件名分别为1.txt、2.txt、3.txt和4.txt。以下是该文件的内容:
| 文件名 | 内容 |
| 1.txt | 我喜欢吃香蕉。 |
| 2.txt | 我有一只狗。他也喜欢吃香蕉。 |
| 3.txt | 香蕉是一种水果,营养丰富。 |
| 4.txt | 早上吃香蕉是一个健康的习惯。 |
让我们对模型进行训练和评估。执行以下两个命令:
mallet-2.0.6$ bin/mallet import-dir --input mydata/ --output mytutorial.mallet --keep-sequence --remove-stopwords

mallet-2.0.6$ bin/mallet train-topics  --input mytutorial.mallet --num-topics 2 --output-state mytopic-state.gz --output-topic-keys mytutorial_keys.txt --output-doc-topics mytutorial_compostion.txt
如前所述,它将创建三个文件,我们现在将详细了解这三个文件。
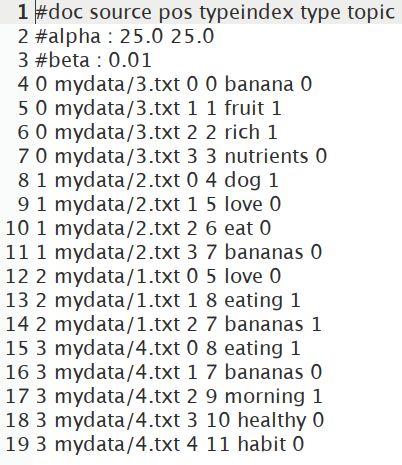
第一档是mytopic-state.gz。提取并打开文件。这将显示使用的所有单词,以及它们设置在哪个主题中:
下一个文件是mytutorial_key.txt,当打开时,将显示主题术语。由于我们要求两个主题,它将有两行:

最后一个文件是mytutorial_composition.txt,我们会在 Excel 或者 LibreOffice 中打开。它将显示doc、topic和proportion:
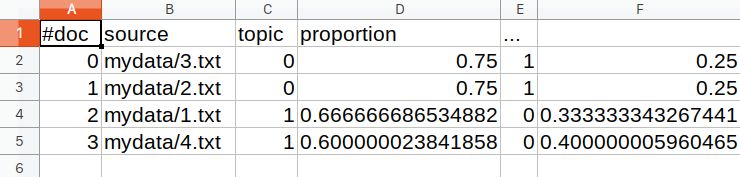
可以看出,对于包含Banana is a fruit, rich in nutrients.的3.txt文件,主题0与主题1的比例更大。从第一个文件中,我们可以看到主题0包含了主题banana、nutrients、love和healthy。
摘要
在这一章中,我们学习了为什么我们应该进行主题建模,以及它在一个数据不断增长的世界中的重要性。我们还研究了 LDA 的概念及其在决定如何从给定的语料库中选择主题中的应用。我们还研究了 MALLET 工具在样本数据主题建模和创建我们自己的定制数据中的应用。我们还了解了生成的不同文件以及如何解释它们。
在下一章第十章、使用解析器提取关系中,我们将看到如何使用解析器提取关系。
十、使用解析器提取关系
解析是为文本单元创建解析树的过程。这个单元可能是一行代码或一个句子。对于计算机语言来说,这很容易做到,因为它们的设计就是为了让这项任务变得简单。然而,这增加了编写代码的难度。自然语言解析要困难得多,这是因为自然语言中存在歧义。这种模糊性使得语言难以学习,但却提供了极大的灵活性和表现力。在这里,我们对解析计算机语言不感兴趣,而是自然语言。
解析树是一种分层的数据结构,表示句子的句法结构。通常,这表现为一个有根的树形图,我们很快就会举例说明。我们将使用解析树来帮助识别树中实体之间的关系。
解析用于许多任务,包括:
- 语言的机器翻译
- 从文本合成语音
- 语音识别
- 语法检查
- 信息提取
共指消解是指文本中两个或两个以上的表达式指代同一个人或事物的情况。以这句话为例:
“特德去参加聚会,在那里他出尽了洋相。”
泰德、何、本人这几个词指的是同一个实体,泰德。这对于确定文本的正确解释和文本各部分的相对重要性是很重要的。我们将演示斯坦福 API 如何解决这个问题。
从文本中提取关系和信息是一项重要的自然语言处理任务。关系可能存在于实体之间,例如句子的主语和它的宾语、其他实体或者它的行为。我们可能还想确定关系,并以结构化的形式呈现它们。我们可以使用这些信息来呈现结果,供人们立即使用,或者格式化关系,以便它们可以更好地用于下游任务。
在这一章中,我们将研究解析过程,看看解析树是如何使用的。我们将检查关系提取过程,研究关系类型,使用提取的关系,并学习使用 NLP APIs。
我们将在本章中讨论以下主题:
- 关系类型
- 理解解析树
- 使用提取的关系
- 提取关系
- 使用 NLP APIs
- 为问答系统提取关系
关系类型
有许多可能的关系类型。下表列出了一些关系类别和示例。一个包含大量关系的有趣网站是 Freebase(www.freebase.com/)。它是一个按类别组织的人、地点和事物的数据库。WordNet 词库(【http://wordnet.princeton.edu/】??)包含许多关系:
| 关系 | 例子 |
| 个人的 | 的父亲,姐妹,女朋友 |
| 组织的 | 附属于,小组委员会 |
| 空间的 | 在…的东北方向,在…之下 |
| 身体的 | 的一部分,由…组成 |
| 相互作用 | 与…结合、交往、反应 |
命名实体识别 ( NER )是自然语言处理分类的一个低级类型,在第四章、寻找人和事物中有所涉及。然而,许多应用程序需要超越这一点,并识别不同类型的关系。例如,当 NER 被应用于识别个人时,那么知道我们正在与一个人打交道可以进一步精炼存在的关系。
一旦识别出这些实体,就可以创建到它们包含的文档的链接,或者用作索引。对于问答应用,命名实体通常用于回答。当文本的情感被确定时,它需要被归因于某个实体。
例如,考虑以下输入:
He was the last person to see Fred.
使用 OpenNLP NER 作为前一句话的输入,正如我们在第四章、寻找人和事中所做的那样,我们得到以下输出:
Span: [7..9) person
Entity: Fred
使用 OpenNLP 解析器,我们得到了更多关于这个句子的信息:
(TOP (S (NP (PRP He)) (VP (VBD was) (NP (NP (DT the) (JJ last) (NN person)) (SBAR (S (VP (TO to) (VP (VB see))))))) (. Fred.)))
考虑以下输入:
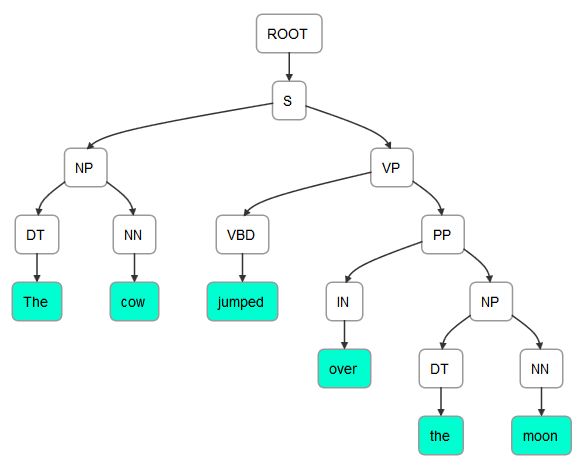
The cow jumped over the moon.
对于前面的句子,解析器返回:
(TOP (S (NP (DT The) (NN cow)) (VP (VBD jumped) (PP (IN over) (NP (DT the) (NN moon))))))
有两种类型的解析:
- 依存关系:关注词与词之间的关系
- 短语结构:这处理短语和它们的递归结构
依存关系可以使用主语、限定词和介词等标签来查找关系。解析技术包括移位归约、生成树和级联分块。我们在这里不关心这些差异,而是将重点放在各种解析器的使用和结果上。
理解解析树
解析树表示文本元素之间的层次关系。例如,依存关系树显示了一个句子的语法元素之间的关系。让我们重新考虑下面这句话:
The cow jumped over the moon.
这里显示了前面句子的解析树。它是使用本章后面的使用词典化解析器类一节中的技术生成的:
    (ROOT
      (S
        (NP (DT The) (NN cow))
        (VP (VBD jumped)
          (PP (IN over)
            (NP (DT the) (NN moon))))
        (. .)))
这句话可以图形化描绘,如下图所示。它是使用在nlpviz.bpodgursky.com/发现的应用程序生成的。另一个允许你以图形化方式检查文本的编辑器是 grammar scope(【http://grammarscope.sourceforge.net/】??)。这是一个斯坦福支持的工具,它使用基于 Swing 的 GUI 来生成解析树、语法结构、类型依赖和文本语义图:
然而,可能有不止一种方法来解析一个句子。解析是困难的,因为它需要处理大量可能存在歧义的文本。下面的输出说明了前一个例句的其他可能的依赖树。该树是使用 OpenNLP 生成的,这将在本章后面的使用 OpenNLP 一节中演示:
    (TOP (S (NP (DT The) (NN cow)) (VP (VBD jumped) (PP (IN over) (NP (DT the) (NN moon))))))
    (TOP (S (NP (DT The) (NN cow)) (VP (VP (VBD jumped) (PRT (RP over))) (NP (DT the) (NN moon)))))
    (TOP (S (NP (DT The) (NNS cow)) (VP (VBD jumped) (PP (IN over) (NP (DT the) (NN moon))))))
每一个都代表了同一个句子的稍微不同的解析。首先显示最有可能的解析。
使用提取的关系
提取的关系可用于多种目的,包括:
- 构建知识库
- 创建目录
- 产品搜索
- 专利分析
- 股票分析
- 情报分析
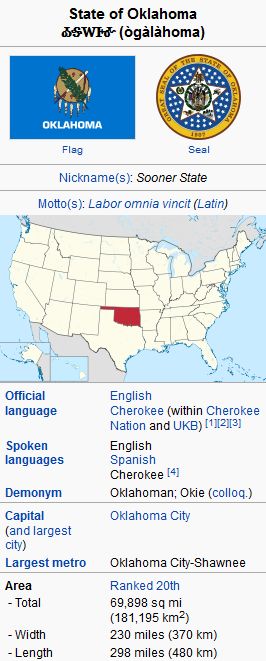
维基百科的信息框展示了一个展示关系的例子,如下图所示。该信息框用于输入 Oklahoma,并包含关系类型,如官方语言、首都及其所在地区的详细信息:
有许多使用维基百科建立的数据库提取关系和信息,例如:
- 资源描述框架 ( RDF ):这使用了像 Yosemite-location-California 这样的三元组,其中位置是关系。这可以在 http://www.w3.org/RDF/的找到。
- DBpedia :它拥有超过 10 亿个三元组,是从维基百科创建的知识库的一个例子。这可以在 https://wiki.dbpedia.org/about 的找到。
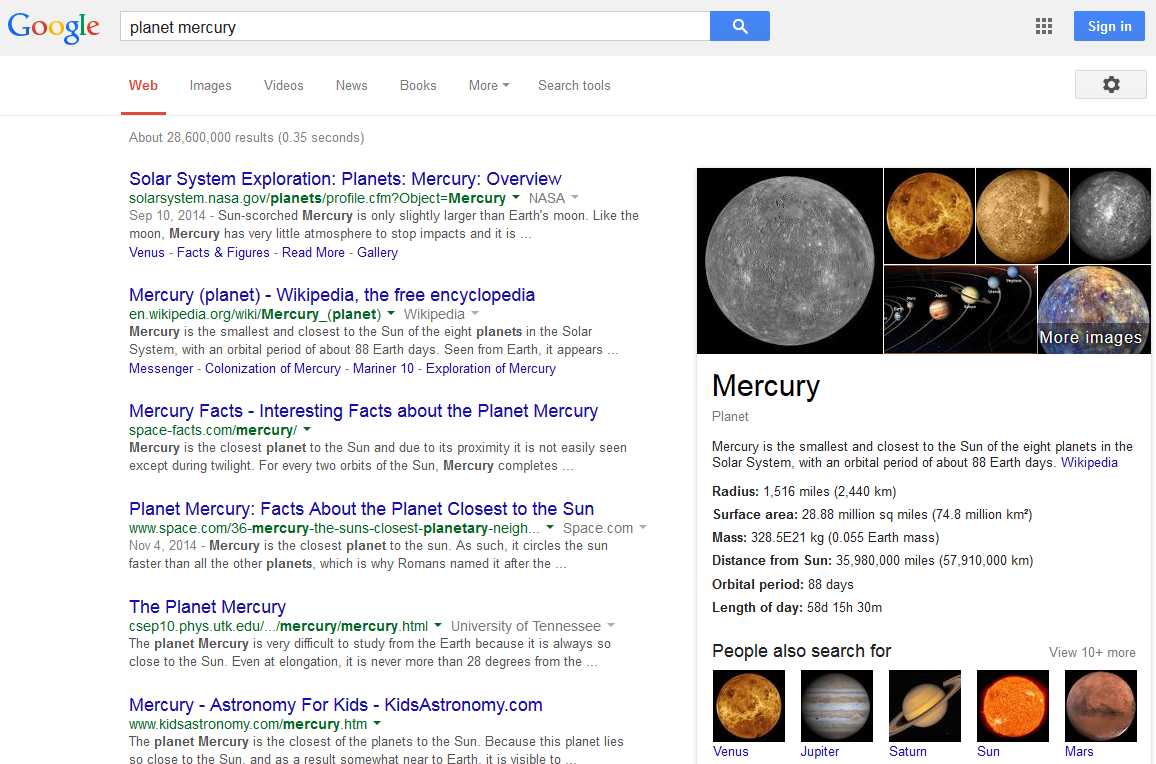
另一个简单但有趣的例子是当谷歌搜索planet mercury时出现的信息框。如下面的屏幕截图所示,我们不仅获得了查询的链接列表,还在页面的右侧看到了 Mercury 的关系和图像列表:
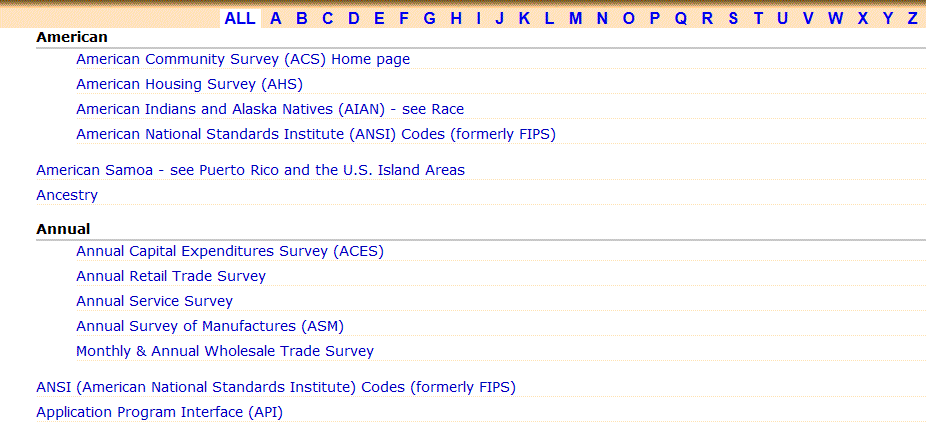
信息抽取也用于创建 web 索引。这些索引是为网站开发的,允许用户在网站中导航。美国人口普查局(www.census.gov/main/www/a2z)的网页索引示例如下图所示:
提取关系
有许多技术可以用来提取关系。这些可以分为以下几类:
- 手工制作的图案
- 监督方法
- 半监督或无监督方法
- 自举方法
- 远程监控方法
- 无监督方法
当我们没有训练数据时,就使用手工构建的模型。这可能发生在新的业务领域或者全新类型的项目中。这些通常需要使用规则。规则可能是:
如果使用了“男演员”或“女演员”一词,而没有使用“电影”或“商业”一词,则该文本应归类为戏剧
然而,这种方法需要花费很多精力,并且需要根据手头的实际文本进行调整。
如果只有很少的训练数据是可亲的,那么朴素贝叶斯分类器是一个很好的选择。当有更多数据可用时,可以使用诸如支持向量机(【SVM】)、正则化逻辑回归和随机森林等技术。
虽然更详细地理解这些技术是有用的,但是我们在这里不会涉及它们,因为我们的重点是这些技术的使用。
使用 NLP APIs
我们将使用 OpenNLP 和 Stanford APIs 来演示关系信息的解析和提取。也可以使用 LingPipe,但这里不讨论。如何使用 LingPipe 解析生物医学文献的示例可以在alias-I . com/LingPipe-3 . 9 . 3/demos/tutorial/MEDLINE/read-me . html找到。
使用 OpenNLP
使用ParserTool类解析文本很简单。它的静态parseLine方法接受三个参数并返回一个Parser实例。这些论点如下:
- 包含要分析的文本的字符串
- 一个实例
- 一个整数,指定要返回多少个分析
Parser实例保存解析的元素。语法分析按概率顺序返回。为了创建一个Parser实例,我们将使用ParserFactory类的create方法。这个方法使用了一个我们将使用en-parser-chunking.bin文件创建的ParserModel实例。
这里显示了这个过程,其中使用 try-with-resources 块创建了模型文件的输入流。创建了一个ParserModel实例,然后是一个Parser实例:
String fileLocation = getModelDir() +
    "/en-parser-chunking.bin";
try (InputStream modelInputStream =
            new FileInputStream(fileLocation);) {
     ParserModel model = new ParserModel(modelInputStream);
    Parser parser = ParserFactory.create(model);
    ...
} catch (IOException ex) {
    // Handle exceptions
}
我们将用一个简单的句子来演示解析过程。在下面的代码序列中,使用第三个参数的值3来调用parseLine方法。这将返回前三个解析:
String sentence = "The cow jumped over the moon";
Parse parses[] = ParserTool.parseLine(sentence, parser, 3);
接下来,将显示这些分析及其概率,如下所示:
for(Parse parse : parses) {
    parse.show();
    System.out.println("Probability: " + parse.getProb());
}
输出如下所示:
    (TOP (S (NP (DT The) (NN cow)) (VP (VBD jumped) (PP (IN over) (NP (DT the) (NN moon))))))
    Probability: -1.043506016751117
    (TOP (S (NP (DT The) (NN cow)) (VP (VP (VBD jumped) (PRT (RP over))) (NP (DT the) (NN moon)))))
    Probability: -4.248553665013661
    (TOP (S (NP (DT The) (NNS cow)) (VP (VBD jumped) (PP (IN over) (NP (DT the) (NN moon))))))
    Probability: -4.761071294573854
注意,每次解析产生的标签顺序和分配略有不同。下面的输出显示了第一个解析的格式,以便于阅读:
    (TOP
          (S
              (NP
                   (DT The)
                   (NN cow)
              )
              (VP
                   (VBD jumped)
                   (PP
                        (IN over)
                        (NP
                             (DT the)
                             (NN moon)
                         )
                   )
               )
         )
    )
可以使用showCodeTree方法来显示父子关系:
parse.showCodeTree();
第一次解析的输出如下所示。每行的第一部分显示了用括号括起来的元素级别。接下来显示标签,后面是由->分隔的两个哈希值。第一个数字代表元素,第二个数字代表其父元素。例如,在第三行中,它显示专有名词The,拥有名词短语The cow的父级:
[0] S -929208263 -> -929208263 TOP The cow jumped over the moon
[0.0] NP -929237012 -> -929208263 S The cow
[0.0.0] DT -929242488 -> -929237012 NP The
[0.0.0.0] TK -929242488 -> -929242488 DT The
[0.0.1] NN -929034400 -> -929237012 NP cow
[0.0.1.0] TK -929034400 -> -929034400 NN cow
[0.1] VP -928803039 -> -929208263 S jumped over the moon
[0.1.0] VBD -928822205 -> -928803039 VP jumped
[0.1.0.0] TK -928822205 -> -928822205 VBD jumped
[0.1.1] PP -928448468 -> -928803039 VP over the moon
[0.1.1.0] IN -928460789 -> -928448468 PP over
[0.1.1.0.0] TK -928460789 -> -928460789 IN over
[0.1.1.1] NP -928195203 -> -928448468 PP the moon
[0.1.1.1.0] DT -928202048 -> -928195203 NP the
[0.1.1.1.0.0] TK -928202048 -> -928202048 DT the
[0.1.1.1.1] NN -927992591 -> -928195203 NP moon
[0.1.1.1.1.0] TK -927992591 -> -927992591 NN moon
访问解析元素的另一种方式是通过getChildren方法。这个方法返回一个Parse对象的数组,每个对象代表解析的一个元素。使用各种Parse方法,我们可以获得每个元素的文本、标记和标签。这里举例说明了这一点:
Parse children[] = parse.getChildren();
for (Parse parseElement : children) {
    System.out.println(parseElement.getText());
    System.out.println(parseElement.getType());
    Parse tags[] = parseElement.getTagNodes();
    System.out.println("Tags");
    for (Parse tag : tags) {
        System.out.println("[" + tag + "]"
            + " type: " + tag.getType()
            + "  Probability: " + tag.getProb()
            + "  Label: " + tag.getLabel());
    }
}
该序列的输出如下:
The cow jumped over the moon
S
Tags
[The] type: DT  Probability: 0.9380626549164167  Label: null
[cow] type: NN  Probability: 0.9574993337971017  Label: null
[jumped] type: VBD  Probability: 0.9652983971550483  Label: S-VP
[over] type: IN  Probability: 0.7990638213315913  Label: S-PP
[the] type: DT  Probability: 0.9848023215770413  Label: null
[moon] type: NN  Probability: 0.9942338356992393  Label: null
使用斯坦福 API
Stanford NLP API 中有几种解析方法。首先,我们将演示一个通用解析器,即LexicalizedParser类。然后,我们将说明如何使用TreePrint类显示解析器的结果。接下来将演示如何使用GrammaticalStructure类来确定单词依赖关系。
使用 LexicalizedParser 类
LexicalizedParser类是一个词汇化的 PCFG 解析器。它可以使用各种模型来执行解析过程。使用apply方法和CoreLabel对象的List实例来创建解析树。
在下面的代码序列中,使用englishPCFG.ser.gz模型实例化解析器:
String parserModel = ".../models/lexparser/englishPCFG.ser.gz";
LexicalizedParser lexicalizedParser =
   LexicalizedParser.loadModel(parserModel);
使用Sentence类的toCoreLabelList方法创建CoreLabel对象的list实例。CoreLabel对象包含一个单词和其他信息。这些单词没有标记或标签。数组中的单词已被有效地标记化:
String[] senetenceArray = {"The", "cow", "jumped", "over",
    "the", "moon", "."};
List<CoreLabel> words =
    Sentence.toCoreLabelList(senetenceArray);
现在可以调用apply方法了:
Tree parseTree = lexicalizedParser.apply(words);
显示解析结果的一个简单方法是使用pennPrint方法,该方法以与 Penn TreeBank 相同的方式显示parseTree(www . SFS . uni-tuebingen . de/~ DM/07/autumn/795.10/pt b-annotation-guide/root . html):
parseTree.pennPrint();
输出如下所示:
    (ROOT
      (S
        (NP (DT The) (NN cow))
        (VP (VBD jumped)
          (PP (IN over)
            (NP (DT the) (NN moon))))
        (. .)))
Tree类提供了许多使用解析树的方法。
使用 TreePrint 类
TreePrint类提供了一种显示树的简单方法。使用描述要使用的显示格式的字符串创建类的实例。使用静态outputTreeFormats变量可以获得一组有效的输出格式,如下表所示:
| | 树形格式字符串 | |
| penn | dependencies | collocations |
| oneline | typedDependencies | semanticGraph |
| rootSymbolOnly | typedDependenciesCollapsed | conllStyleDependencies |
| words | latexTree | conll2007 |
| wordsAndTags | xmlTree | |
斯坦福使用类型依赖来描述句子中存在的语法关系。这些在斯坦福类型依赖手册(【http://nlp.stanford.edu/software/dependencies_manual.pdf】??)中有详细说明。
下面的代码示例说明了如何使用TreePrint类。printTree方法执行实际的显示操作。
在这种情况下,TreePrint对象被创建,显示"typedDependenciesCollapsed":
TreePrint treePrint =
    new TreePrint("typedDependenciesCollapsed");
treePrint.printTree(parseTree);
这个序列的输出如下,其中数字反映了它在句子中的位置:
det(cow-2, The-1)
nsubj(jumped-3, cow-2)
root(ROOT-0, jumped-3)
det(moon-6, the-5)
prep_over(jumped-3, moon-6)
使用penn字符串创建对象会产生以下输出:
(ROOT (S (NP (DT The) (NN cow)) (VP (VBD jumped) (PP (IN over) (NP (DT the) (NN moon)))) (. .)))
dependencies字符串产生一个简单的依赖列表:
    dep(cow-2,The-1)
    dep(jumped-3,cow-2)
    dep(null-0,jumped-3,root)
    dep(jumped-3,over-4)
    dep(moon-6,the-5)
    dep(over-4,moon-6)
这些格式可以用逗号组合。以下示例将导致显示同时使用penn样式和typedDependenciesCollapsed格式:
"penn,typedDependenciesCollapsed"
使用 GrammaticalStructure 类查找单词依赖关系
另一种解析文本的方法是结合使用我们在上一节中创建的LexicalizedParser对象和TreebankLanguagePack接口。树库是已经用句法或语义信息注释的文本语料库,提供关于句子结构的信息。第一个主要的树银行是宾夕法尼亚树银行(【http://www.cis.upenn.edu/~treebank/】)))。可以手动或半自动创建树库。
下面的例子说明了如何使用解析器格式化一个简单的字符串。一个TokenizerFactory创建一个记号赋予器。
我们在中使用词汇化解析器类一节中讨论的CoreLabel类在这里使用:
String sentence = "The cow jumped over the moon.";
TokenizerFactory<CoreLabel> tokenizerFactory =
    PTBTokenizer.factory(new CoreLabelTokenFactory(), "");
Tokenizer<CoreLabel> tokenizer =
    tokenizerFactory.getTokenizer(new StringReader(sentence));
List<CoreLabel> wordList = tokenizer.tokenize();
parseTree = lexicalizedParser.apply(wordList);
TreebankLanguagePack接口指定了使用树库的方法。在下面的代码中,创建了一系列对象,最终创建了一个TypedDependency实例,用于获取句子元素的依赖信息。一个GrammaticalStructureFactory对象的实例被创建并用于创建一个GrammaticalStructure类的实例。
正如这个类的名字所暗示的,它存储了树中元素之间的语法信息:
TreebankLanguagePack tlp =
    lexicalizedParser.treebankLanguagePack;
GrammaticalStructureFactory gsf =
    tlp.grammaticalStructureFactory();
GrammaticalStructure gs =
    gsf.newGrammaticalStructure(parseTree);
List<TypedDependency> tdl = gs.typedDependenciesCCprocessed();
我们可以简单地显示列表,如下所示:
System.out.println(tdl);
输出如下所示:
[det(cow-2, The-1), nsubj(jumped-3, cow-2), root(ROOT-0, jumped-3), det(moon-6, the-5), prep_over(jumped-3, moon-6)]
也可以使用gov、reln和dep方法
提取这些信息,这些方法分别返回调控字、关系和依赖元素,如下所示:
for(TypedDependency dependency : tdl) {
    System.out.println("Governor Word: [" + dependency.gov()
        + "] Relation: [" + dependency.reln().getLongName()
        + "] Dependent Word: [" + dependency.dep() + "]");
}
输出如下所示:
    Governor Word: [cow/NN] Relation: [determiner] Dependent Word: [The/DT]
    Governor Word: [jumped/VBD] Relation: [nominal subject] Dependent Word: [cow/NN]
    Governor Word: [ROOT] Relation: [root] Dependent Word: [jumped/VBD]
    Governor Word: [moon/NN] Relation: [determiner] Dependent Word: [the/DT]
    Governor Word: [jumped/VBD] Relation: [prep_collapsed] Dependent Word: [moon/NN]
由此,我们可以看出一个句子中的关系以及这种关系的要素。
查找共指消解实体
共指消解指的是在文本中出现两个或多个指代同一个人或实体的表达式。考虑下面的句子:
“他拿了他的现金,她拿了她的零钱,他们一起买了午餐。”
这个句子中有几个指代。字他的指的是他字她指的是她。另外,他们既指他又指她。
一个内指是一个在它之前或之后的表达式的共指。内照应可以分为回指和照应。在下面的句子中,单词 It 是指代其先行词地震的回指词:
”玛丽感觉到了地震。它震动了整栋大楼。”
在下一个句子中, she 是一个后转代词,因为它指向后置的玛丽:
“当玛丽坐在那里时,她感觉到了地震。”
斯坦福 API 支持使用dcoref注释的StanfordCoreNLP类的共指解析。我们将用前面的句子演示这个类的用法。
我们将从创建管道和使用annotate方法开始,如下所示:
String sentence = "He took his cash and she took her change "
    + "and together they bought their lunch.";
Properties props = new Properties();
props.put("annotators",
    "tokenize, ssplit, pos, lemma, ner, parse, dcoref");
StanfordCoreNLP pipeline = new StanfordCoreNLP(props);
Annotation annotation = new Annotation(sentence);
pipeline.annotate(annotation);
Annotation class’ get方法,当与CorefChainAnnotation.class参数一起使用时,将返回CorefChain对象的Map实例,如下所示。这些对象包含关于在句子中找到的共指的信息:
Map<Integer, CorefChain> corefChainMap =
    annotation.get(CorefChainAnnotation.class);
使用整数对一组CorefChain对象进行索引。我们可以迭代这些对象,如下面的代码所示。获取密钥集,然后显示每个CorefChain对象:
Set<Integer> set = corefChainMap.keySet();
Iterator<Integer> setIterator = set.iterator();
while(setIterator.hasNext()) {
    CorefChain corefChain =
        corefChainMap.get(setIterator.next());
    System.out.println("CorefChain: " + corefChain);
}
将生成以下输出:
CorefChain: CHAIN1-["He" in sentence 1, "his" in sentence 1]
CorefChain: CHAIN2-["his cash" in sentence 1]
CorefChain: CHAIN4-["she" in sentence 1, "her" in sentence 1]
CorefChain: CHAIN5-["her change" in sentence 1]
CorefChain: CHAIN7-["they" in sentence 1, "their" in sentence 1]
CorefChain: CHAIN8-["their lunch" in sentence 1]
我们使用CorefChain和CorefMention类的方法获得更详细的信息。后一类包含关于在句子中找到的特定共指的信息。
将以下代码序列添加到前面的while循环体中,以获取并显示该信息。该类的startIndex和endIndex字段是指单词在句子中的位置:
System.out.print("ClusterId: " + corefChain.getChainID());
CorefMention mention = corefChain.getRepresentativeMention();
System.out.println(" CorefMention: " + mention
    + " Span: [" + mention.mentionSpan + "]");

List<CorefMention> mentionList =
    corefChain.getMentionsInTextualOrder();
Iterator<CorefMention> mentionIterator =
    mentionList.iterator();
while(mentionIterator.hasNext()) {
    CorefMention cfm = mentionIterator.next();
    System.out.println("\tMention: " + cfm
        + " Span: [" + mention.mentionSpan + "]");
    System.out.print("\tMention Mention Type: "
        + cfm.mentionType + " Gender: " + cfm.gender);
    System.out.println(" Start: " + cfm.startIndex
        + " End: " + cfm.endIndex);
}
System.out.println();
输出如下。为了节省空间,只显示第一次和最后一次提及:
    CorefChain: CHAIN1-["He" in sentence 1, "his" in sentence 1]
    ClusterId: 1 CorefMention: "He" in sentence 1 Span: [He]
      Mention: "He" in sentence 1 Span: [He]
      Mention Type: PRONOMINAL Gender: MALE Start: 1 End: 2
      Mention: "his" in sentence 1 Span: [He]
      Mention Type: PRONOMINAL Gender: MALE Start: 3 End: 4
    ...
    CorefChain: CHAIN8-["their lunch" in sentence 1]
    ClusterId: 8 CorefMention: "their lunch" in sentence 1 Span: [their lunch]
      Mention: "their lunch" in sentence 1 Span: [their lunch]
      Mention Type: NOMINAL Gender: UNKNOWN Start: 14 End: 16
为问答系统提取关系
在这一节中,我们将研究一种提取关系的方法,这种方法对于回答查询很有用。可能/候选查询包括以下内容:
- 谁是/曾经是美国第 14 任总统?
- 第一任总统的家乡是哪里?
- 赫伯特·胡佛是什么时候的总统?
回答这类问题的过程并不容易。我们将演示一种方法来回答某些类型的问题,但是我们将简化这个过程的许多方面。即使有这些限制,我们也会发现系统对查询的响应很好。
这个过程包括几个步骤:
- 查找单词依赖关系
- 确定问题的类型
- 提取其相关成分
- 寻找答案
- 给出答案
我们将展示识别一个问题是否属于何人、何事、何时或何地类型的一般框架。接下来,我们将调查回答谁类型问题所需的一些问题。
为了使这个例子简单,我们将把问题限制在与美国总统有关的问题上。将使用一个简单的总统事实数据库来查找问题的答案。
查找单词依赖关系
问题存储为简单的字符串:
String question =
    "Who is the 32nd president of the United States?";
我们将使用LexicalizedParser类,正如在使用语法结构类查找单词依赖部分中开发的。为方便起见,此处复制了相关代码:
String parserModel = ".../englishPCFG.ser.gz";
LexicalizedParser lexicalizedParser =
    LexicalizedParser.loadModel(parserModel);

TokenizerFactory<CoreLabel> tokenizerFactory =
    PTBTokenizer.factory(new CoreLabelTokenFactory(), "");
Tokenizer<CoreLabel> tokenizer =
    tokenizerFactory.getTokenizer(new StringReader(question));
List<CoreLabel> wordList = tokenizer.tokenize();
Tree parseTree = lexicalizedParser.apply(wordList);

TreebankLanguagePack tlp =
    lexicalizedParser.treebankLanguagePack();
GrammaticalStructureFactory gsf =
    tlp.grammaticalStructureFactory();
GrammaticalStructure gs =
    gsf.newGrammaticalStructure(parseTree);
List<TypedDependency> tdl = gs.typedDependenciesCCprocessed();
System.out.println(tdl);
for (TypedDependency dependency : tdl) {
    System.out.println("Governor Word: [" + dependency.gov()
        + "] Relation: [" + dependency.reln().getLongName()
        + "] Dependent Word: [" + dependency.dep() + "]");
}
当执行该问题时,我们得到以下输出:
    [root(ROOT-0, Who-1), cop(Who-1, is-2), det(president-5, the-3), amod(president-5, 32nd-4), nsubj(Who-1, president-5), det(States-9, the-7), nn(States-9, United-8), prep_of(president-5, States-9)]
    Governor Word: [ROOT] Relation: [root] Dependent Word: [Who/WP]
    Governor Word: [Who/WP] Relation: [copula] Dependent Word: [is/VBZ]
    Governor Word: [president/NN] Relation: [determiner] Dependent Word: [the/DT]
    Governor Word: [president/NN] Relation: [adjectival modifier] Dependent Word: [32nd/JJ]
    Governor Word: [Who/WP] Relation: [nominal subject] Dependent Word: [president/NN]
    Governor Word: [States/NNPS] Relation: [determiner] Dependent Word: [the/DT]
    Governor Word: [States/NNPS] Relation: [nn modifier] Dependent Word: [United/NNP]
    Governor Word: [president/NN] Relation: [prep_collapsed] Dependent Word: [States/NNPS]
这些信息为确定问题的类型提供了基础。
确定问题类型
检测到的关系提出了检测不同类型问题的方法。例如,要确定它是否是一个 who 类型的问题,我们可以检查关系是否是一个nominal subject和总督是否是who。
在下面的代码中,我们迭代问题类型依赖项,以确定它是否匹配该组合,如果匹配,则调用processWhoQuestion方法来处理问题:
for (TypedDependency dependency : tdl) {
    if ("nominal subject".equals( dependency.reln().getLongName())
        && "who".equalsIgnoreCase( dependency.gov().originalText())) {
        processWhoQuestion(tdl);
    }
}
这种简单的区分相当有效。它将正确识别同一问题的所有下列变体:
    Who is the 32nd president of the United States?
    Who was the 32nd president of the United States?
    The 32nd president of the United States was who?
    The 32nd president is who of the United States?
我们还可以使用不同的选择标准来确定其他问题类型。以下问题代表了其他问题类型:
    What was the 3rd President's party?
    When was the 12th president inaugurated?
    Where is the 30th president's home town?
我们可以使用下表中建议的关系来确定问题类型:
| 题型 | 关系 | 总督 | 依赖 |
| 什么 | 名词性主语 | 什么 | 钠 |
| 当…的时候 | 状语 | 钠 | 当…的时候 |
| 在哪里 | 状语 | 钠 | 在哪里 |
这种方法确实需要硬编码relationships.createPresidentList。
寻找答案
一旦我们知道了问题的类型,我们就可以利用课文中的关系来回答问题。为了说明这个过程,我们将开发processWhoQuestion方法。这种方法使用TypedDependency列表来收集回答谁类型的关于总统的问题所需的信息。具体来说,我们需要知道他们对哪个总统感兴趣,基于总统的序数排名。
我们还需要一份主席名单来搜索相关信息。开发了createPresidentList方法来执行这项任务。它读取一个文件,PresidentList,包含总统的名字,就职年份,以及任职的最后一年。该文件使用以下格式,可以从github . com/packt publishing/Natural-Language-Processing-with-Java-Second-Edition下载:
George Washington (1789-1797)
下面的createPresidentList方法演示了如何使用 OpenNLP 的SimpleTokenizer类来标记每一行。总统的名字由不同数量的符号组成。一旦确定了这一点,就很容易提取日期:
public List<President> createPresidentList() {
    ArrayList<President> list = new ArrayList<>();
    String line = null;
    try (FileReader reader = new FileReader("PresidentList");
            BufferedReader br = new BufferedReader(reader)) {
        while ((line = br.readLine()) != null) {
            SimpleTokenizer simpleTokenizer =
                SimpleTokenizer.INSTANCE;
            String tokens[] = simpleTokenizer.tokenize(line);
            String name = "";
            String start = "";
            String end = "";
            int i = 0;
            while (!"(".equals(tokens[i])) {
                name += tokens[i] + " ";
                i++;
            }
            start = tokens[i + 1];
            end = tokens[i + 3];
            if (end.equalsIgnoreCase("present")) {
                end = start;
            }
            list.add(new President(name,
                Integer.parseInt(start),
                Integer.parseInt(end)));
        }
     } catch (IOException ex) {
        // Handle exceptions
    }
    return list;
}
President类保存总统信息,如下所示。getter 方法已经被省略了:
public class President {
    private String name;
    private int start;
    private int end;

    public President(String name, int start, int end) {
        this.name = name;
        this.start = start;
        this.end = end;
    }
    ...
}
下面是processWhoQuestion方法。我们再次使用类型依赖来提取问题的序数值。如果管理者是president,adjectival modifier是关系,那么从属词就是序数。
这个字符串被传递给getOrder方法,该方法返回一个整数形式的序数。我们在上面加 1,因为总统的名单也是从 1 开始的:
public void processWhoQuestion(List<TypedDependency> tdl) {
    List<President> list = createPresidentList();
    for (TypedDependency dependency : tdl) {
        if ("president".equalsIgnoreCase(
                dependency.gov().originalText())
                && "adjectival modifier".equals(
                  dependency.reln().getLongName())) {
            String positionText =
                dependency.dep().originalText();
            int position = getOrder(positionText)-1;
            System.out.println("The president is "
                + list.get(position).getName());
        }
    }
}
getOrder方法如下,简单地获取第一个数字字符并将它们转换成整数。一个更复杂的版本会考虑其他变体,包括“第一”和“第十六”这样的词:
private static int getOrder(String position) {
    String tmp = "";
    int i = 0;
    while (Character.isDigit(position.charAt(i))) {
        tmp += position.charAt(i++);
    }
    return Integer.parseInt(tmp);
}
执行时,我们得到以下输出:
The president is Franklin D . Roosevelt
这个实现是一个简单的例子,说明如何从句子中提取信息并用来回答问题。其他类型的问题可以以类似的方式实现,留给读者作为练习。
摘要
我们已经讨论了解析过程以及如何使用它从文本中提取关系。它可以用于许多目的,包括语法检查和文本的机器翻译。有许多可能的文本关系。这些关系包括“父亲”、“亲近”和“下级”。他们关心的是文本元素之间的关系。
解析文本将返回文本中存在的关系。这些关系可用于提取感兴趣的信息。我们演示了许多使用 OpenNLP 和 Stanford APIs 解析文本的技术。
我们还解释了如何使用 Stanford API 来查找文本中的共指解析。当两个或两个以上的表达,如他或他们指同一个人时,就会出现这种情况。
最后,我们用一个例子来说明如何使用解析器从句子中提取关系。这些关系被用来提取信息,以回答关于美国总统的简单查询。
在下一章中,第十一章,*联合管道,*我们将探讨在这一章和前几章中开发的技术如何用于解决更复杂的问题。
十一、组合管道
在这一章中,我们将讨论几个关于使用技术组合来解决 NLP 问题的问题。我们将从简单介绍准备数据的过程开始。接下来是关于管道及其构造的讨论。管道只不过是为解决某些问题而集成的一系列任务。管道的主要优点是能够插入和移除管道的各种元素,以稍微不同的方式解决问题。
斯坦福 API 支持一个很好的管道架构,这一点我们在本书中已经反复使用过。我们将详述这种方法的细节,然后展示如何使用 OpenNLP 来构建管道。为处理准备数据是解决许多 NLP 问题的重要的第一步。我们在第一章、自然语言处理简介中介绍了数据准备过程,然后在第二章、查找部分文本中讨论了归一化过程。在这一章中,我们将着重于从不同的数据源中提取文本,例如 HTML、Word 和 PDF 文档。Stanford StanfordCoreNLP类是易于使用的管道的一个很好的例子。从某种意义上说,它是预构的。实际执行的任务取决于添加的注释。这适用于许多类型的问题。但是,其他 NLP APIs 不像斯坦福 API 那样直接支持管道架构;虽然构建起来更加困难,但是这些方法对于许多应用来说更加灵活。我们将使用 OpenNLP 演示这个构建过程。
我们将在本章中讨论以下主题:
- 准备数据
- 使用样板文件从 HTML 中提取文本
- 使用兴趣点从 Word 文档中提取文本
- 使用 PDFBox 从 PDF 文档中提取文本
- 使用 Apache Tika 进行内容分析和提取
- 管道
- 利用斯坦福管道
- 在斯坦福管道中使用多核
- 创建搜索文本的管道
准备数据
文本提取是你想要进行的任何 NLP 任务的主要阶段。如果给定一篇博客文章,我们希望提取博客的内容,并希望找到文章的标题、文章的作者、文章发布的日期、文章的文本或内容、类似媒体的图像、文章中的视频以及其他文章的链接(如果有的话)。文本提取包括以下内容:
- 结构化,以便识别不同的字段、内容块等
- 确定文档的语言
- 寻找句子、段落、短语和引语
- 将文本分解成标记,以便进一步处理
- 标准化和标记
- 词汇化和词干化,以减少变化并接近词根
这也有助于主题建模,我们已经在第九章、主题建模中讨论过。在这里,我们将快速介绍如何对 HTML、Word 和 PDF 文档执行文本提取。虽然有几个 API 支持这些任务,但我们将使用以下 API:
- HTML 的样板文件(
code.google.com/p/boilerpipe/) - Apache POI(
poi.apache.org/index.html)for Word - Apache PDF box(
pdfbox.apache.org/)for PDF
一些 API 支持使用 XML 进行输入和输出。例如,Stanford XMLUtils类提供了对读取 XML 文件和操作 XML 数据的支持。LingPipe 的XMLParser类将解析 XML 文本。组织以多种形式存储数据,通常不是简单的文本文件。演示文稿存储在 PowerPoint 幻灯片中,规范使用 Word 文档创建,公司提供 PDF 文档形式的营销和其他材料。大多数组织都有互联网,这意味着许多有用的信息都可以在 HTML 文档中找到。由于这些数据源的广泛性,我们需要使用工具来提取它们的文本进行处理。
使用样板文件从 HTML 中提取文本
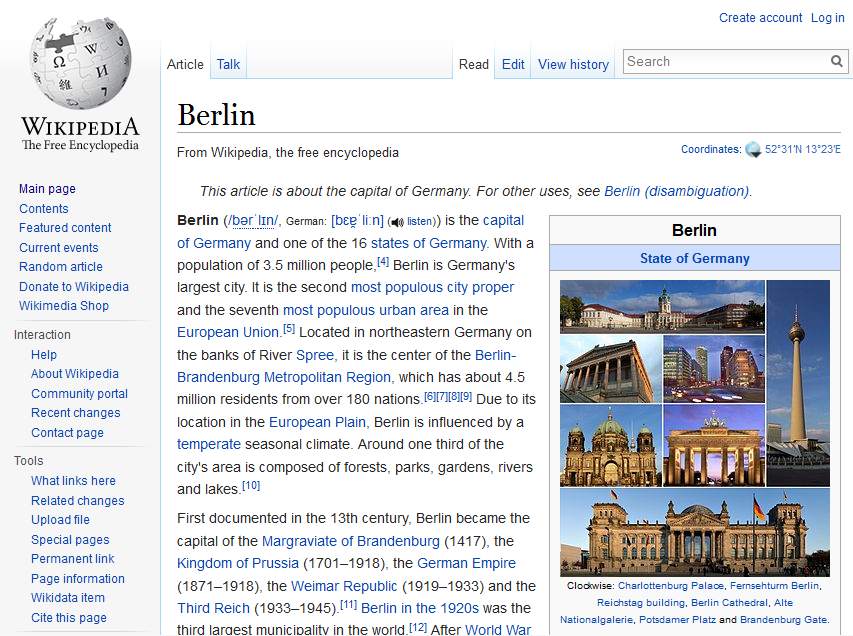
有几个库可用于从 HTML 文档中提取文本。我们将演示如何使用样板管(code.google.com/p/boilerpipe/)来执行这个操作。这是一个灵活的 API,不仅可以提取 HTML 文档的整个文本,还可以提取 HTML 文档的选定部分,如标题和单个文本块。我们将使用 http://en.wikipedia.org/wiki/Berlin的 HTML 页面来说明样板文件的使用。该页面的一部分如下面的截图所示:
为了使用 boilerpipe,您需要下载 Xerces 解析器的二进制文件,可以在xerces.apache.org/index.html找到。
我们首先创建一个表示这个页面的 URL 对象。我们将使用两个类来提取文本。第一个是代表 HTML 文档的HTMLDocument类。第二个是代表 HTML 文档中文本的TextDocument类。它由一个或多个TextBlock对象组成,如果需要,可以单独访问这些对象。我们将为柏林页面创建一个HTMLDocument实例。BoilerpipeSAXInput类使用这个输入源创建一个TextDocument实例。然后,它使用TextDocument class’ getText方法来检索文本。此方法使用两个参数。第一个参数指定是否包含标记为内容的TextBlock实例。第二个参数指定是否应该包含非内容的TextBlock实例。在这个例子中,两种类型的TextBlock实例都包括在内。以下是工作代码:
try{
            URL url = new URL("https://en.wikipedia.org/wiki/Berlin");
            HTMLDocument htmldoc = HTMLFetcher.fetch(url);
            InputSource is = htmldoc.toInputSource();
            TextDocument document = new BoilerpipeSAXInput(is).getTextDocument();
            System.out.println(document.getText(true, true));
        } catch (MalformedURLException ex) {
            System.out.println(ex);
        } catch (IOException ex) {
            System.out.println(ex);
        } catch (SAXException | BoilerpipeProcessingException ex) {
            System.out.println(ex);
        }
输出很长,但这里显示了几行:
Berlin
From Wikipedia, the free encyclopedia
Jump to navigation Jump to search
This article is about the capital of Germany. For other uses, see Berlin (disambiguation) .
State of Germany in Germany
Berlin
State of Germany
From top: Skyline including the TV Tower ,
City West skyline with Kaiser Wilhelm Memorial Church , Brandenburg Gate ,
East Side Gallery ( Berlin Wall ),
Oberbaum Bridge over the Spree ,
Reichstag building ( Bundestag )
.......
This page was last edited on 18 June 2018, at 11:18 (UTC).
Text is available under the Creative Commons Attribution-ShareAlike License ; additional terms may apply.  By using this site, you agree to the Terms of Use and Privacy Policy . Wikipedia® is a registered trademark of the Wikimedia Foundation, Inc. , a non-profit organization.
Privacy policy
About Wikipedia
Disclaimers
Contact Wikipedia
Developers
Cookie statement
Mobile view
使用兴趣点从 Word 文档中提取文本
Apache POI 项目(poi.apache.org/index.html)是一个用于从微软 Office 产品中提取信息的 API。这是一个庞大的库,允许从 Word 文档和其他办公产品(如 Excel 和 Outlook)中提取信息。下载 POI 的 API 时,还需要使用 XMLBeans(【http://xmlbeans.apache.org/】)支持 POI。XMLBeans 的二进制文件可以从 http://www.java2s.com/Code/Jar/x/Downloadxmlbeans524jar.htm 的下载。我们的兴趣是演示如何使用 POI 从 word 文档中提取文本。
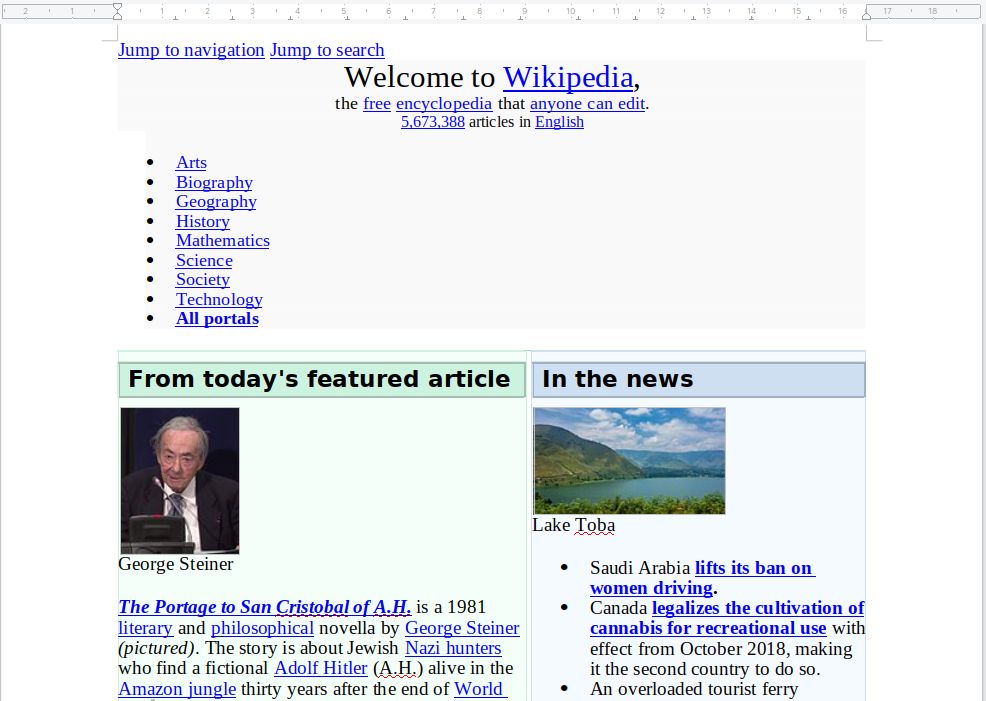
为了演示这一点,我们将使用一个名为TestDocument.docx的文件,其中包含一些文本、表格和其他内容,如下面的截图所示(我们已经获取了维基百科的英文主页):
不同版本的 Word 使用几种不同的文件格式。为了简化选择使用哪个文本提取类,我们将使用ExtractorFactory工厂类。尽管 POI 的功能相当强大,但提取文本的过程却很简单。如此处所示,代表文件TestDocument.docx的FileInputStream对象被ExtractorFactory类的createExtractor方法用来选择适当的POITextExtractor实例。这是几个不同提取器的基类。将getText方法应用于提取器以获取文本:
private static String getResourcePath(){
        File currDir = new File(".");
        String path = currDir .getAbsolutePath();
        path = path.substring(0, path.length()-2);
        String resourcePath = path + File.separator  + "src/chapter11/TestDocument.docx";
        return resourcePath;
    }
    public static void main(String args[]){
        try {
            FileInputStream fis = new FileInputStream(getResourcePath());
            POITextExtractor textExtractor = ExtractorFactory.createExtractor(fis);
            System.out.println(textExtractor.getText());
        } catch (FileNotFoundException ex) {
            Logger.getLogger(WordDocExtractor.class.getName()).log(Level.SEVERE, null, ex);
        } catch (IOException ex) {
            System.out.println(ex);
        } catch (OpenXML4JException ex) {
            System.out.println(ex);
        } catch (XmlException ex) {
            System.out.println(ex);
        }
    }
输出如下所示:
Jump to navigation Jump to search
Welcome to Wikipedia,
the free encyclopedia that anyone can edit.
5,673,388 articles in English
Arts
Biography
Geography
History
Mathematics
Science
Society
Technology
All portals
From today's featured article George Steiner The Portage to San Cristobal of A.H. is a 1981 literary and philosophical novella by George Steiner (pictured). The story is about Jewish Nazi hunters who find a fictional Adolf Hitler (A.H.) alive in the Amazon jungle thirty years after the end of World War II. The book was controversial, particularly among reviewers and Jewish scholars, because the author allows Hitler to defend himself when he is put on trial in the jungle by his captors. There Hitler maintains that Israel owes its existence to the Holocaust and that he is the "benefactor of the Jews". A central theme of The Portage is the nature of language, and revolves around Steiner's lifelong work on the subject and his fascination in the power and terror of human speech. Other themes include the philosophical and moral analysis of history, justice, guilt and revenge. Despite the controversy, it was a 1983 finalist in the PEN/Faulkner Award for Fiction. It was adapted for the theatre by British playwright Christopher Hampton. (Full article...) Recently featured: Monroe Edwards C. R. M. F. Cruttwell Russulaceae Archive By email More featured articles Did you know... Maria Bengtsson ... that a reviewer found Maria Bengtsson (pictured) believable and expressive when she first performed the title role of Arabella by Strauss? ... that the 2018 Osaka earthquake disrupted train services during the morning rush hour, forcing passengers to walk between the tracks? ... that funding for Celia Brackenridge's research into child protection in football was ended because the sport "was not ready for a gay former lacrosse international rummaging through its dirty linen"? ... that the multi-armed Heliaster helianthus sheds several of its arms when attacked by the six-armed predatory starfish Meyenaster gelatinosus? ... that if elected, Democratic candidate Deb Haaland would be the first Native American woman to become a member of the United States House of Representatives? ... that 145 Vietnamese civilians were killed during the 1967 Thuy Bo massacre? ... that Velvl Greene, a University of Minnesota professor of public health, taught more than 30,000 students? ... that a group of Fijians placed a newspaper ad to recruit skiers for Fiji at the 2002 Olympic Games after discussing it at a New Year's Eve party? Archive Start a new article Nominate an article In the news Lake Toba Saudi Arabia lifts its ban on women driving. Canada legalizes the cultivation of cannabis for recreational use with effect from October 2018, making it the second country to do so. An overloaded tourist ferry capsizes in Lake Toba (pictured), Indonesia, killing at least 3 people and leaving 193 others missing. In golf, Brooks Koepka wins the U.S. Open at the Shinnecock Hills Golf Club. Ongoing: FIFA World Cup Recent deaths: Joe Jackson Richard Harrison Yan Jizhou John Mack Nominate an article On this day June 28: Vidovdan in Serbia Anna Pavlova as Giselle 1776 – American Revolutionary War: South Carolina militia repelled a British attack on Charleston. 1841 – Giselle (Anna Pavlova pictured in the title role), a ballet by French composer Adolphe Adam, was first performed at the Théâtre de l'Académie Royale de Musique in Paris. 1911 – The first meteorite to suggest signs of aqueous processes on Mars fell to Earth in Abu Hummus, Egypt. 1978 – In Regents of the Univ. of Cal. v. Bakke, the U.S. Supreme Court barred quota systems in college admissions but declared that affirmative action programs giving advantage to minorities are constitutional. 2016 – Gunmen attacked Istanbul's Atatürk Airport, killing 45 people and injuring more than 230 others. Primož Trubar (d. 1586) · Paul Broca (b. 1824) · Yvonne Sylvain (b. 1907) More anniversaries: June 27 June 28 June 29 Archive By email List of historical anniversaries

Today's featured picture
    Henry VIII of England (1491–1547) was King of England from 1509 until his death. Henry was the second Tudor monarch, succeeding his father, Henry VII. Perhaps best known for his six marriages, his disagreement with the Pope on the question of annulment led Henry to initiate the English Reformation, separating the Church of England from papal authority and making the English monarch the Supreme Head of the Church of England. He also instituted radical changes to the English Constitution, expanded royal power, dissolved monasteries, and united England and Wales. In this, he spent lavishly and frequently quelled unrest using charges of treason and heresy. Painting: Workshop of Hans Holbein the Younger Recently featured: Lion of Al-lāt Sagittarius Japanese destroyer Yamakaze (1936) Archive More featured pictures

Other areas of Wikipedia
Community portal – Bulletin board, projects, resources and activities covering a wide range of Wikipedia areas.
Help desk – Ask questions about using Wikipedia.
此外,还可以使用metaExtractor提取关于文档的元数据,如下面的代码所示:
POITextExtractor metaExtractor = textExtractor.getMetadataTextExtractor();
            System.out.println(metaExtractor.getText());
它将生成以下输出:
Created = Thu Jun 28 06:36:00 UTC 2018
CreatedString = 2018-06-28T06:36:00Z
Creator = Ashish
LastModifiedBy = Ashish
LastPrintedString =
Modified = Thu Jun 28 06:37:00 UTC 2018
ModifiedString = 2018-06-28T06:37:00Z
Revision = 1
Application = Microsoft Office Word
AppVersion = 12.0000
Characters = 26588
CharactersWithSpaces = 31190
Company =
HyperlinksChanged = false
Lines = 221
LinksUpToDate = false
Pages = 8
Paragraphs = 62
Template = Normal.dotm
TotalTime = 1
另一种方法是使用XWPFDocument创建一个POIXMLPropertiesTextExtractor类的实例,它可用于CoreProperties和ExtendedProperties,如下面的代码所示:
fis = new FileInputStream(getResourcePath());
            POIXMLPropertiesTextExtractor properties = new POIXMLPropertiesTextExtractor(new XWPFDocument(fis));
            CoreProperties coreProperties = properties.getCoreProperties();
            System.out.println(properties.getCorePropertiesText());

            ExtendedProperties extendedProperties = properties.getExtendedProperties();
            System.out.println(properties.getExtendedPropertiesText());
输出如下所示:
Created = Thu Jun 28 06:36:00 UTC 2018
CreatedString = 2018-06-28T06:36:00Z
Creator = Ashish
LastModifiedBy = Ashish
LastPrintedString =
Modified = Thu Jun 28 06:37:00 UTC 2018
ModifiedString = 2018-06-28T06:37:00Z
Revision = 1

Application = Microsoft Office Word
AppVersion = 12.0000
Characters = 26588
CharactersWithSpaces = 31190
Company =
HyperlinksChanged = false
Lines = 221
LinksUpToDate = false
Pages = 8
Paragraphs = 62
Template = Normal.dotm
TotalTime = 1
使用 PDFBox 从 PDF 文档中提取文本
Apache PDF box(pdfbox.apache.org/)项目是一个处理 PDF 文档的 API。它支持文本提取和其他任务,如文档合并、表单填充和 PDF 创建。我们将只说明文本提取过程。为了演示 POI 的使用,我们将使用一个名为TestDocument.pdf的文件。该文件使用TestDocument.docx文件保存为 PDF 文档,如使用 POI 从 Word 文档中提取文本部分所示。这个过程很简单。为 PDF 文档创建一个File对象。PDDocument类表示文档,PDFTextStripper类使用getText方法执行实际的文本提取,如下所示:
File file = new File(getResourcePath());
PDDocument pd = PDDocument.load(file);
PDFTextStripper stripper = new PDFTextStripper();
String text= stripper.getText(pd);
System.out.println(text);
输出如下所示:
Jump to navigation Jump to search
Welcome to Wikipedia,
the free encyclopedia that anyone can edit.
5,673,388 articles in English
 Arts
 Biography
 Geography
 History
 Mathematics
 Science
 Society
 Technology
 All portals
From today's featured article

George Steiner
The Portage to San Cristobal of A.H. is a 1981
literary and philosophical novella by George Steiner
(pictured). The story is about Jewish Nazi hunters
who find a fictional Adolf Hitler (A.H.) alive in the
Amazon jungle thirty years after the end of World
War II. The book was controversial, particularly
among reviewers and Jewish scholars, because the
author allows Hitler to defend himself when he is
put on trial in the jungle by his captors. There Hitler
maintains that Israel owes its existence to the
Holocaust and that he is the "benefactor of the
Jews". A central theme of The Portage is the nature
of language, and revolves around Steiner's lifelong
work on the subject and his fascination in the power
and terror of human speech. Other themes include
the philosophical and moral analysis of history,
justice, guilt and revenge. Despite the controversy, it
was a 1983 finalist in the PEN/Faulkner Award for
Fiction. It was adapted for the theatre by British

In the news

Lake Toba
 Saudi Arabia lifts its ban on
women driving.
 Canada legalizes the cultivation of
cannabis for recreational use
with effect from October 2018,
making it the second country to do
so.
 An overloaded tourist ferry
capsizes in Lake Toba (pictured),
Indonesia, killing at least 3 people
and leaving 193 others missing.
 In golf, Brooks Koepka wins the
U.S. Open at the Shinnecock Hills
Golf Club.
Ongoing:
 FIFA World Cup
.....
使用 Apache Tika 进行内容分析和提取
Apache Tika 能够从数千个不同类型的文件中检测和提取元数据和文本,如.doc、.docx、.ppt、.pdf、.xls等。它可以用于各种文件格式,这使得它对于搜索引擎、索引、内容分析、翻译等等非常有用。可以从tika.apache.org/download.html下载。本节将探讨 Tika 如何用于各种格式的文本提取。我们将只使用Testdocument.docx和TestDocument.pdf。
使用 Tika 非常简单,如以下代码所示:
File file = new File("TestDocument.pdf");
Tika tika = new Tika();
String filetype = tika.detect(file);

System.out.println(filetype);
System.out.println(tika.parseToString(file));
只需创建一个Tika的实例,并使用detect和parseToString方法获得以下输出:
application/pdf
Jump to navigation Jump to search

Welcome to Wikipedia,
the free encyclopedia that anyone can edit.

5,673,388 articles in English

 Arts

 Biography

 Geography

 History

 Mathematics

 Science

 Society

 Technology

 All portals

From today's featured article

George Steiner

The Portage to San Cristobal of A.H. is a 1981

literary and philosophical novella by George Steiner

(pictured). The story is about Jewish Nazi hunters

who find a fictional Adolf Hitler (A.H.) alive in the

Amazon jungle thirty years after the end of World

War II. The book was controversial, particularly
....
在内部,Tika 将首先检测文档的类型,选择合适的解析器,然后从文档中提取文本。Tika 还提供了解析器接口和类来解析文档。我们也可以使用 Tika 的AutoDetectParser或CompositeParser来实现同样的事情。使用解析器,可以获得文档的元数据。更多关于 Tika 的信息可以在 https://tika.apache.org/的找到。
管道
管道只不过是一系列操作,其中一个操作的输出被用作另一个操作的输入。我们在前几章的几个例子中看到了它的使用,但是它们都相对较短。特别是,我们看到了 Stanford StanfordCoreNLP类如何通过使用注释器对象很好地支持管道的概念。我们将在下一节讨论这种方法。如果结构合理,管道的一个优点是可以轻松添加和删除处理元素。例如,如果管道的一个步骤将一个令牌转换为小写,那么很容易删除这个步骤,而管道的其余元素保持不变。然而,有些管道并不总是如此灵活。一个步骤可能需要前一个步骤才能正常工作。在一个管道中,比如由StanfordCoreNLP类支持的管道,需要下面一组注释器来支持 POS 处理:
props.put("annotators", "tokenize, ssplit, pos");
如果我们忽略了ssplit注释器,就会产生下面的异常:
*java.lang.IllegalArgumentException: annotator "pos" requires annotator "ssplit"*
虽然斯坦福管道不需要花费很多精力来建立,但其他管道可能需要。我们将在本章后面的创建搜索文本的管道一节中演示后一种方法。
利用斯坦福管道
在本节中,我们将更详细地讨论斯坦福管道。虽然我们在本书的几个例子中使用了它,但是我们还没有完全探索它的能力。您以前使用过这个管道,现在能够更好地理解如何使用它。阅读本节后,您将能够更好地评估其功能和对您需求的适用性。edu.stanford.nlp.pipeline包保存了 StanfordCoreNLP 和注释器类。一般方法使用下面的代码序列来处理文本字符串。Properties类保存注释名称,而注释类表示要处理的文本。 StanfordCoreNLP 类的 Annotate 方法将应用属性列表中指定的注释。 CoreMap 接口是所有可注释对象的基本接口。它使用键和值对。下图显示了类和接口的层次结构:
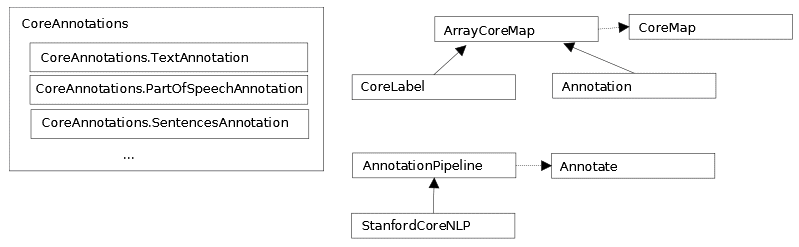
它是类和接口之间关系的简化版本。 CoreLabel 类实现了 CoreMap 接口。它代表一个附有注释信息的单词。附加的信息取决于创建管线时设置的属性。然而,总是有位置信息可用,比如它的开始和结束位置或者实体前后的空白。用于 CoreMap 或 CoreLabel 的get方法返回特定于其参数的信息。get方法被重载并返回一个依赖于其参数类型的值。CoreLabel 类已经被用来访问句子中的单个单词。
我们将使用keyset方法,该方法返回一组当前由Annotation对象持有的所有注释键。在应用annotate方法之前和之后都会显示按键。完整的工作代码如下所示:
String text = "The robber took the cash and ran";
        Properties props = new Properties();
        props.put("annotators", "tokenize, ssplit, pos, lemma, ner, parse, dcoref");
        StanfordCoreNLP pipeline = new StanfordCoreNLP(props);
        Annotation annotation = new Annotation(text);

        System.out.println("Before annotate method executed ");
        Set<Class<?>> annotationSet = annotation.keySet();
        for(Class c : annotationSet) {
            System.out.println("\tClass: " + c.getName());
        }

        pipeline.annotate(annotation);

        System.out.println("After annotate method executed ");
        annotationSet = annotation.keySet();
        for(Class c : annotationSet) {
            System.out.println("\tClass: " + c.getName());
        }
        List<CoreMap> sentences = annotation.get(SentencesAnnotation.class);
        for (CoreMap sentence : sentences) {
            for (CoreLabel token: sentence.get(TokensAnnotation.class)) {
                String word = token.get(TextAnnotation.class);
                String pos = token.get(PartOfSpeechAnnotation.class);
                System.out.println(word);
                System.out.println(pos);
            }
        }
以下输出显示了调用前后以及单词和位置:
Before annotate method executed
    Class: edu.stanford.nlp.ling.CoreAnnotations$TextAnnotation
After annotate method executed
    Class: edu.stanford.nlp.ling.CoreAnnotations$TextAnnotation
    Class: edu.stanford.nlp.ling.CoreAnnotations$TokensAnnotation
    Class: edu.stanford.nlp.ling.CoreAnnotations$SentencesAnnotation
    Class: edu.stanford.nlp.ling.CoreAnnotations$MentionsAnnotation
    Class: edu.stanford.nlp.coref.CorefCoreAnnotations$CorefMentionsAnnotation
    Class: edu.stanford.nlp.ling.CoreAnnotations$CorefMentionToEntityMentionMappingAnnotation
    Class: edu.stanford.nlp.ling.CoreAnnotations$EntityMentionToCorefMentionMappingAnnotation
    Class: edu.stanford.nlp.coref.CorefCoreAnnotations$CorefChainAnnotation
The
DT
robber
NN
took
VBD
the
DT
cash
NN
and
CC
ran
VBD
在斯坦福管道中使用多核
annotate方法也可以利用多个内核。它是一个重载方法,其中一个版本使用一个Iterable<Annotation>的实例作为它的参数。它将使用可用的处理器处理每个Annotation实例。
我们将使用之前定义的pipeline对象来演示这个版本的annotate方法。
首先,我们基于四个短句创建四个Annotation对象,如下所示。为了充分利用这项技术,最好使用更大的数据集。以下是工作代码片段:
Annotation annotation1 = new Annotation("The robber took the cash and ran.");
Annotation annotation2 = new Annotation("The policeman chased him down the street.");
Annotation annotation3 = new Annotation("A passerby, watching the action, tripped the thief "
            + "as he passed by.");
Annotation annotation4 = new Annotation("They all lived happily ever after, except for the thief "
            + "of course.");

ArrayList<Annotation> list = new ArrayList();
list.add(annotation1);
list.add(annotation2);
list.add(annotation3);
list.add(annotation4);
Iterable<Annotation> iterable = list;
pipeline.annotate(iterable);
List<CoreMap> sentences1 = annotation2.get(SentencesAnnotation.class);

for (CoreMap sentence : sentences1) {
    for (CoreLabel token : sentence.get(TokensAnnotation.class)) {
                String word = token.get(TextAnnotation.class);
                String pos = token.get(PartOfSpeechAnnotation.class);
                System.out.println("Word: " + word + " POS Tag: " + pos);
            }
        }
输出如下所示:
Word: The POS Tag: DT
Word: policeman POS Tag: NN
Word: chased POS Tag: VBD
Word: him POS Tag: PRP
Word: down POS Tag: RP
Word: the POS Tag: DT
Word: street POS Tag: NN
Word: . POS Tag:
创建搜索文本的管道
搜索是一个丰富而复杂的主题。有许多不同类型的搜索和执行搜索的方法。这里的目的是演示如何应用各种 NLP 技术来支持这项工作。在大多数机器上,可以在合理的时间内一次处理一个文本文档。然而,当需要搜索多个大型文档时,创建索引是支持搜索的常用方法。这导致搜索过程在合理的时间内完成。我们将演示一种创建索引的方法,然后使用该索引进行搜索。虽然我们将使用的文本不是很大,但它足以演示这个过程。
我们需要做到以下几点:
- 从文件中读取文本
- 标记和查找句子边界
- 删除停用词
- 累积索引统计数据
- 写出索引文件
有几个因素会影响索引文件的内容,包括:
- 停用词的删除
- 区分大小写的搜索
- 查找同义词
- 使用词干化和词汇化
- 允许跨句子边界搜索
我们将使用 OpenNLP 来演示这个过程。这个例子的目的是演示如何在流水线过程中结合 NLP 技术来解决搜索类型的问题。这不是一个全面的解决方案,我们将忽略一些技术,如词干。此外,不会介绍索引文件的实际创建,而是留给读者作为练习。在这里,我们将集中讨论如何使用 NLP 技术。具体来说,我们将执行以下操作:
- 把这本书分成句子
- 将句子转换成小写
- 删除停用词
- 创建内部索引数据结构
我们将开发两个类来支持索引数据结构:Word和Positions。我们还将扩充在第二章、中开发的StopWords类,以支持removeStopWords方法的重载版本。新版本将提供一种更方便的删除停用词的方法。我们从一个 try-with-resources 块开始,打开句子模型en-sent.bin的流,以及一个包含儒勒·凡尔纳的海底两万里内容的文件。这本书是从 http://www.gutenberg.org/ebooks/164 下载的。以下代码显示了搜索的一个工作示例:
try {
            InputStream is = new FileInputStream(new File(getResourcePath() + "en-sent.bin"));
            FileReader fr = new FileReader(getResourcePath() + "pg164.txt");
            BufferedReader br = new BufferedReader(fr);
            System.out.println(getResourcePath() + "en-sent.bin");
            SentenceModel model = new SentenceModel(is);
            SentenceDetectorME detector = new SentenceDetectorME(model);

            String line;
            StringBuilder sb = new StringBuilder();
            while((line = br.readLine())!=null){
                sb.append(line + " ");
            }
            String sentences[] = detector.sentDetect(sb.toString());
            for (int i = 0; i < sentences.length; i++) {
                sentences[i] = sentences[i].toLowerCase();
            }

//            StopWords stopWords = new StopWords("stop-words_english_2_en.txt");
//            for (int i = 0; i < sentences.length; i++) {
//                sentences[i] = stopWords.removeStopWords(sentences[i]);
//            }

            HashMap<String, Word> wordMap = new HashMap();
            for (int sentenceIndex = 0; sentenceIndex < sentences.length; sentenceIndex++) {
            String words[] = WhitespaceTokenizer.INSTANCE.tokenize(sentences[sentenceIndex]);
            Word word;
            for (int wordIndex = 0;
                    wordIndex < words.length; wordIndex++) {
                String newWord = words[wordIndex];
                if (wordMap.containsKey(newWord)) {
                     word = wordMap.remove(newWord);
                } else {
                    word = new Word();
                }
                word.addWord(newWord, sentenceIndex, wordIndex);
                wordMap.put(newWord, word);
            }

            Word sword = wordMap.get("sea");
            ArrayList<Positions> positions = sword.getPositions();
            for (Positions position : positions) {
                System.out.println(sword.getWord() + " is found at line "
                    + position.sentence + ", word "
                    + position.position);
            }
        }

        } catch (FileNotFoundException ex) {
            Logger.getLogger(SearchText.class.getName()).log(Level.SEVERE, null, ex);
        } catch (IOException ex) {
            Logger.getLogger(SearchText.class.getName()).log(Level.SEVERE, null, ex);
        }
class Positions {
    int sentence;
    int position;

    Positions(int sentence, int position) {
        this.sentence = sentence;
        this.position = position;
    }
}

public class Word {
    private String word;
    private final ArrayList<Positions> positions;

    public Word() {
        this.positions = new ArrayList();
    }

    public void addWord(String word, int sentence,
            int position) {
        this.word = word;
        Positions counts = new Positions(sentence, position);
        positions.add(counts);
    }

    public ArrayList<Positions> getPositions() {
        return positions;
    }

    public String getWord() {
        return word;
    }
}
让我们分解代码来理解它。SentenceModel用于创建SentenceDetectorME类的实例,如下所示:
SentenceModel model = new SentenceModel(is);
SentenceDetectorME detector = new SentenceDetectorME(model);
接下来,我们将使用一个StringBuilder实例创建一个字符串来支持句子边界的检测。该书的文件被读取并添加到StringBuilder实例中。然后应用sentDetect方法创建一个句子数组,我们使用toLowerCase方法将文本转换成小写。这样做是为了确保当停用词被删除时,该方法将捕获所有停用词,如下所示:
String line;
StringBuilder sb = new StringBuilder();
while((line = br.readLine())!=null){
    sb.append(line + " ");
}
String sentences[] = detector.sentDetect(sb.toString());
for (int i = 0; i < sentences.length; i++) {
    sentences[i] = sentences[i].toLowerCase();
}
下一步是基于处理后的文本创建一个类似索引的数据结构。这个结构将使用Word和Positions类。Word类由单词字段和Positions对象的ArrayList组成。因为一个单词可能在文档中出现不止一次,所以列表用于维护它在文档中的位置。Positions类包含一个字段,用于表示句子编号sentence,以及单词在句子中的位置position。这两个类的定义如下:
class Positions {
    int sentence;
    int position;

    Positions(int sentence, int position) {
        this.sentence = sentence;
        this.position = position;
    }
}

public class Word {
    private String word;
    private final ArrayList<Positions> positions;

    public Word() {
        this.positions = new ArrayList();
    }

    public void addWord(String word, int sentence,
            int position) {
        this.word = word;
        Positions counts = new Positions(sentence, position);
        positions.add(counts);
    }

    public ArrayList<Positions> getPositions() {
        return positions;
    }

    public String getWord() {
        return word;
    }
}
为了使用这些类,我们创建一个HashMap实例来保存文件中每个单词的位置信息。在 map 中创建单词条目的过程如下面的代码所示。每个句子都被标记化,然后检查每个标记,看它是否存在于映射中。该单词被用作哈希映射的关键字。containsKey方法确定单词是否已经被添加。如果有,那么删除Word实例。如果之前没有添加过这个单词,那么就会创建一个新的Word实例。不管怎样,新的位置信息被添加到Word实例中,然后被添加到地图中,如下所示:
HashMap<String, Word> wordMap = new HashMap();
            for (int sentenceIndex = 0; sentenceIndex < sentences.length; sentenceIndex++) {
            String words[] = WhitespaceTokenizer.INSTANCE.tokenize(sentences[sentenceIndex]);
            Word word;
            for (int wordIndex = 0;
                    wordIndex < words.length; wordIndex++) {
                String newWord = words[wordIndex];
                if (wordMap.containsKey(newWord)) {
                     word = wordMap.remove(newWord);
                } else {
                    word = new Word();
                }
                word.addWord(newWord, sentenceIndex, wordIndex);
                wordMap.put(newWord, word);
            }
为了演示实际的查找过程,我们使用get方法返回单词“reef”的Word对象的一个实例。用getPositions方法返回位置列表,然后显示每个位置,如下所示:
Word sword = wordMap.get("sea");
            ArrayList<Positions> positions = sword.getPositions();
            for (Positions position : positions) {
                System.out.println(sword.getWord() + " is found at line "
                    + position.sentence + ", word "
                    + position.position);
            }
输出如下所示:
sea is found at line 0, word 7
sea is found at line 2, word 6
sea is found at line 2, word 37
sea is found at line 3, word 5
sea is found at line 20, word 11
sea is found at line 39, word 3
sea is found at line 46, word 6
sea is found at line 57, word 4
sea is found at line 133, word 2
sea is found at line 229, word 3
sea is found at line 281, word 14
sea is found at line 292, word 12
sea is found at line 320, word 22
sea is found at line 328, word 21
sea is found at line 355, word 22
sea is found at line 363, word 1
sea is found at line 391, word 13
sea is found at line 395, word 6
sea is found at line 450, word 12
sea is found at line 460, word 6
.....
这个实现相对简单,但是演示了如何组合各种 NLP 技术来创建和使用可以保存为索引文件的索引数据结构。其他增强功能也是可能的,包括以下内容:
- 其他过滤操作
- 将文档信息存储在
Positions类中 - 将章节信息存储在
Positions类中 - 提供搜索选项,例如:
- 区分大小写的搜索
- 精确文本搜索
- 更好的异常处理
这些是留给读者的练习。
摘要
在本章中,我们讨论了准备数据的过程,并讨论了管道。我们展示了几种从 HTML、Word 和 PDF 文档中提取文本的技术。我们还看到了 Apache Tika 如何轻松地用于任何类型的文档提取。我们证明了流水线只不过是为解决某个问题而集成的一系列任务。我们可以根据需要插入和移除管道中的各种元素。详细讨论了斯坦福管道体系结构。我们研究了可以使用的各种注释器。探索了该流水线的细节,以及它如何与多个处理器一起使用。在下一章,第十二章,创建聊天机器人我们将致力于创建一个简单的聊天机器人来演示我们到目前为止看到的 NLP 的使用。
十二、创建聊天机器人
聊天机器人在过去几年中变得很流行,许多企业使用它来帮助客户通过网络执行日常任务。社交媒体和信使平台是聊天机器人发展的最大推动力。最近,脸书信使在其信使平台上攻击了 10 万个机器人。除了聊天机器人,语音机器人如今也获得了很大的吸引力,亚马逊的 Alexa 就是语音机器人的一个主要例子。聊天机器人现在已经深入到客户市场,这样客户可以得到及时的回复,而不必等待信息。随着时间的推移,机器学习的发展已经使聊天机器人从简单的对话发展到以行动为导向,现在它们可以帮助客户预约、获取产品细节,甚至接受用户的输入、预订和预定以及在线订单。医疗保健行业正在看到聊天机器人的使用可以帮助越来越多的患者。
你也可以理解聊天机器人的重要性和预期增长,因为许多大公司的负责人已经大量投资聊天机器人或购买基于聊天机器人的公司。你可以说出任何一个大型组织——比如谷歌、微软、脸书或 IBM——都在积极提供聊天机器人平台和 API。我们都用过 Siri,或者 Google Assistant,或者 Alexa,都不过是机器人。
下图是 2017 年聊天机器人的版图:
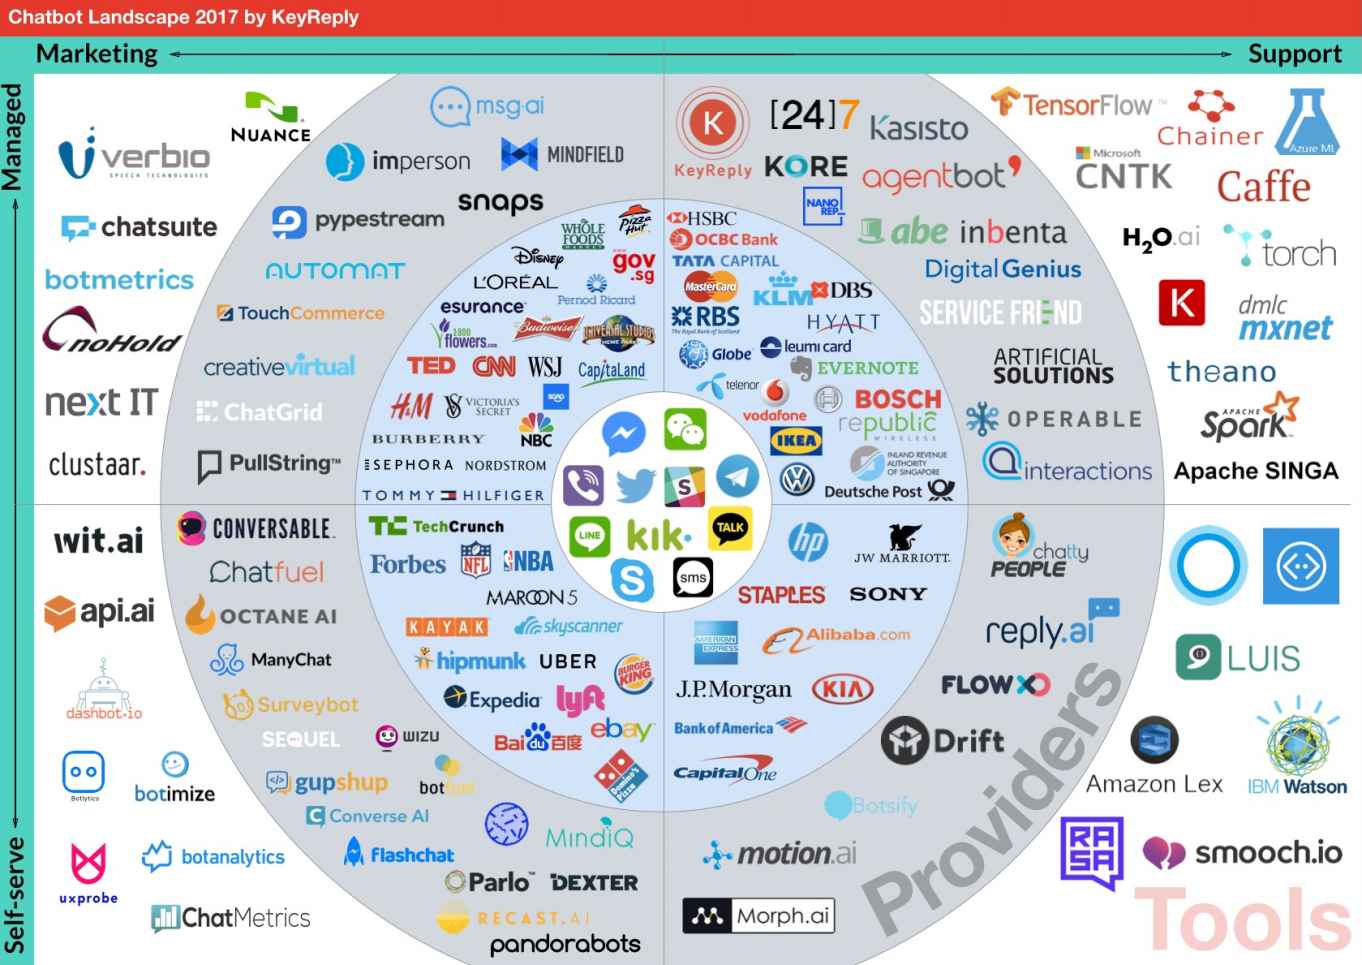
来源–https://blog . key reply . com/the-chatbot-landscape-2017-edition-ff 2 e 3d 2 a 0 BDB
同心圆从内圈开始,显示平台、品牌、提供商和工具。
在这一章中,我们将会看到不同类型的聊天机器人,我们也将会开发一个简单的预约聊天机器人。
本章将涵盖以下主题:
- 聊天机器人架构
- 人工语言互联网计算机实体
聊天机器人架构
聊天机器人只不过是一个可以与用户聊天并代表用户执行特定级别任务的计算机程序。聊天机器人似乎在用户的问题和解决方案之间有着直接的联系。聊天机器人的主要方面如下:
- 简单聊天机器人 : 关于这种类型的聊天机器人,用户会键入一些文本,大多是以问题的形式,机器人会以文本的形式做出适当的回复。
- 对话聊天机器人:这种聊天机器人知道对话的上下文并保持状态。根据用户,对用户文本的响应是以对话的形式。
- 人工智能聊天机器人(AI chatbot):这种聊天机器人从提供给它的训练数据中学习,这些数据是从许多不同的场景或过去的一长串对话中准备的。
聊天机器人的主要方面是使用一些预定义的库或数据库,或使用机器学习模型来生成对用户文本的正确或适当的响应。机器学习算法允许用大量数据或对话的例子训练机器人选择模式。它使用意图分类和实体来生成响应。为了找到意图和实体,它使用了自然语言理解的概念**(**)😗***
****
为聊天机器人使用机器学习需要对机器学习算法有很好的理解,这超出了本书的范围。
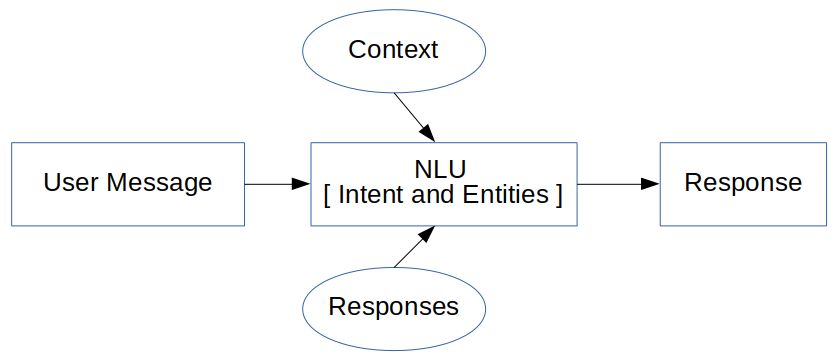
我们将研究一个不涉及机器学习的选项,这样的模型被称为基于检索的模型,其中响应是从一些预定义的逻辑和上下文中生成的。它易于构建且可靠,但在响应生成方面并不是 100%准确。它被广泛使用,有几个 API 和算法可用于这样的模型。它基于if...else条件生成响应,这被称为基于模式的响应生成:
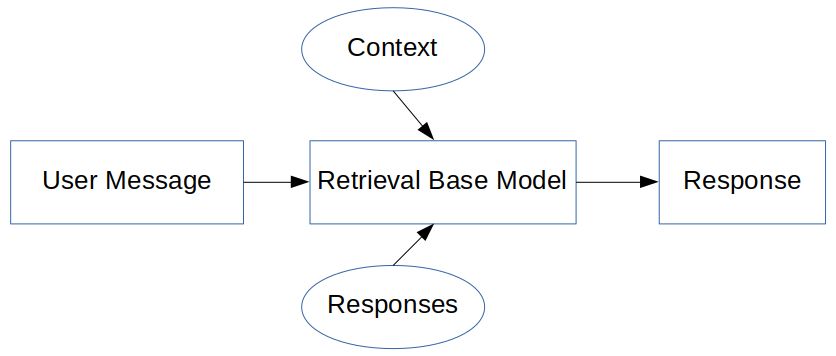
它依靠人工智能标记语言 ( AIML )来记录模式和反应。这将在下一节讨论。
人工语言互联网计算机实体
人工语言互联网计算机实体 ( 爱丽丝)是一个由 AIML 创建的免费聊天机器人软件。这是一个 NLP 聊天机器人,它可以使用一些启发式模式匹配规则与人类进行对话。它已经三次获得罗布纳奖,该奖授予有成就的会说话的机器人。它没有通过图灵测试,但仍然可以用于正常聊天,并且可以定制。
了解 AIML
在本节中,我们将使用 AIML。AIML 是一种基于 XML 的标记语言,用于开发人工智能应用程序,尤其是软件代理。它包含用户请求的规则或响应,供 NLU 单位内部使用。简单来说,我们在 AIML 中添加的规则越多,我们的聊天机器人就会越智能,越准确。
因为 AIML 是基于 XML 的标记语言;它以根标签<aiml>开始,所以一个典型的 AIML 文件看起来像这样:
<?xml version="1.0" encoding="UTF-8"?>
<aiml>
</aiml>
为了添加问题和答案或对可能的查询的响应,使用了<category>标签。它是聊天机器人知识库的基本单元。简单地说,<category>接受输入并返回输出。所有 AIML 元素必须包含在<category>元素中。<pattern>标签用于匹配用户的输入,<template>标签是对用户输入的响应。将它添加到前面的代码中,代码现在应该如下所示:
<?xml version="1.0" encoding="UTF-8"?>
<aiml>
    <category>
        <pattern>Hello</pattern>
        <template> Hello, How are you ? </template>
    </category>
</aiml>
所以,每当用户输入单词Hello,机器人就会用Hello, How are you ?来回应。
在<pattern>标签中使用一个*作为通配符来指定任何内容都可以代替星号,在<template>标签中使用一个<star>标签来形成响应,如下所示:
<?xml version="1.0" encoding="UTF-8"?>
<aiml>
    <category>
        <pattern>I like *.</pattern>
        <template>Ok, so you like <star/></template>
    </category>
</aiml>
现在,当用户说“I like Mangoes”时,机器人的响应将是“Ok so you like mangoes”。我们也可以使用多个*,如下所示:
<?xml version="1.0" encoding="UTF-8"?>
<aiml>
    <category>
    <pattern>I like * and *</pattern>
        <template> Ok, so you like <star index="1"/> and <star index="2"/></template>
    </category>
</aiml>
现在,当用户说“I like Mangoes and Bananas”时,机器人的响应将是“Ok so you like mangoes and bananas”。
接下来是<srai>标签,用于不同的模式以生成相同的模板,如下:
<?xml version="1.0" encoding="UTF-8"?>
<aiml>
    <category>
        <pattern>I WANT TO BOOK AN APPOINTMENT</pattern>
        <template>Are you sure</template>
    </category>
    <category>
        <pattern>Can I *</pattern>
        <template><srai>I want to <star/></srai></template>
    </category>
    <category>
        <pattern>May I * </pattern>
        <template>
            <srai>I want to <star/></srai>
        </template>
    </category>
</aiml>
第一个类别具有“I WANT TO BOOK AN APPOINTMENT”的模式,其响应为“Are you sure”。在下一个类别中,如果用户询问“Can I book an appointment或“”),得到的响应将是相同的:“Are you sure”。
正如我们在这里看到的,<srai>标签有许多用途,它也可以用于同义词和关键字解析。
更多标签请参考call mom . Pandora bots . com/static/reference/# aiml-2-0-reference。
使用 ALICE 和 AIML 开发聊天机器人
要开发聊天机器人,我们需要一个 AIML 解释器或 AIML 的参考实现。一个这样的工具是 AB 程序,它可以在 https://code.google.com/archive/p/program-ab/找到。在下载部分,程序 AB 有这个 ZIP 文件。提取文件,该文件将包含以下目录:
bots:包含super文件夹以显示机器人的名称data:包含样本文本lib:包含Ab.jarout:包含一个类文件
在bots目录的super子目录中,我们可以看到目录名aiml、aimlf、config、data、maps、sets。这些是使用 AIML 和 ALICE 创建聊天机器人所需的标准目录。让我们测试一下聊天机器人。打开一个新的终端,移动到我们提取的program-ab文件夹,并执行以下命令:
program-ab-0.0.4.3$ java -cp lib/Ab.jar Main bot = test action=chat trace=false
它将加载所有文件,并向您显示一个提示,如下所示:
Human :
试着用一些文本聊天,你很快就会意识到它是有效的,但并不总是有效,也不是对所有的查询都有效。以下是聊天演示:
现在,让我们创建自己的聊天机器人来安排约会。第一步是创建一个 AIML 文件。
在新的 NetBeans 项目中创建以下文件夹结构,并将Ab.jar添加到项目库中:
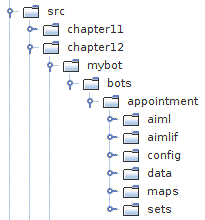
在aiml目录中,我们创建一个 AIML 文件,内容如下:
<?xml version="1.0" encoding="UTF-8"?>
<aiml>
<!--  -->
<category><pattern>I WANT TO BOOK AN APPOINTMENT</pattern>
<template>Are you sure you want to book an appointment</template>
</category>
<category><pattern>YES</pattern><that>ARE YOU SURE YOU WANT TO BOOK AN APPOINTMENT</that>
<template>Can you tell me date and time</template>
</category>
<category><pattern>NO</pattern><that>ARE YOU SURE YOU WANT TO BOOK AN APPOINTMENT</that>
<template>No Worries.</template>
</category>
<category><pattern>DATE * TIME *</pattern><that>CAN YOU TELL ME DATE AND TIME</that>
<template>You want appointment on <set name="udate"><star index="1"/> </set> and time <set name="utime"><star index="2"/></set>. Should i confirm.</template>
</category>
<category><pattern>YES</pattern><that>SHOULD I CONFIRM</that>
<template><get name="username"/>, your appointment is confirmed for <get name="udate"/> : <get name="utime"/></template>
</category>
<category><pattern>I AM *</pattern>
<template>Hello <set name="username"> <star/>! </set></template>
</category>
<category><pattern>BYE</pattern>
<template>Bye <get name="username"/> Thanks for the conversation!</template>
</category>
</aiml>
让我们研究一下 AIML 文件。使用set和get标签,可以将上下文保存在变量中,并在需要时进行检索:
<category><pattern>I AM *</pattern>
<template>Hello <set name="username"> <star/>! </set></template>
</category>
这展示了set属性的使用,所以当用户输入“I am ashish”时,它被保存在变量name中,响应为“Hello Ashish !”。现在,通过使用get打印用户名,这可以在 AIML 的任何地方使用。因此,这意味着可以保持使用set和get标签上下文。
下一步是创建一个约会。当用户要求预约时,响应将要求确认,如下所示:
<category><pattern>I WANT TO BOOK AN APPOINTMENT</pattern>
<template>Are you sure you want to book an appointment</template>
</category>
现在,来自用户的预期请求将是 yes 或 no,根据它们生成下一个响应。为了在最后一个问题的上下文中继续对话,使用标签,如下所示:
<category><pattern>YES</pattern><that>ARE YOU SURE YOU WANT TO BOOK AN APPOINTMENT</that>
<template>Can you tell me date and time</template>
</category>
<category><pattern>NO</pattern><that>ARE YOU SURE YOU WANT TO BOOK AN APPOINTMENT</that>
<template>No Worries.</template>
</category>
如果用户说“YES”,聊天机器人将询问日期和时间,该日期和时间再次被保存,并且询问确认用户是否想要在规定的日期和时间预约,如下所示:
<category><pattern>DATE * TIME *</pattern><that>CAN YOU TELL ME DATE AND TIME</that>
<template>You want appointment on <set name="udate"><star index="1"/> </set> and time <set name="utime"><star index="2"/></set>. Should i confirm.</template>
</category>
<category><pattern>YES</pattern><that>SHOULD I CONFIRM</that>
<template><get name="username"/>, your appointment is confirmed for <get name="udate"/> : <get name="utime"/></template>
</category>
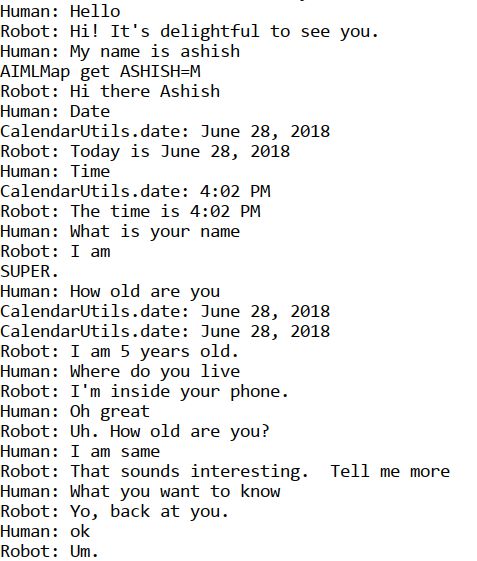
示例聊天输出如下:
Robot : Hello, I am your appointment scheduler May i know your name
Human :
I am ashish
Robot : Hello ashish!
Human :
I want to book an appointment
Robot : Are you sure you want to book an appointment
Human :
yes
Robot : Can you tell me date and time
Human :
Date 24/06/2018 time 4 pm
Robot : You want appointment on 24/06/2018 and time 4 pm. Should i confirm.
Human :
yes
Robot : ashish!, your appointment is confirmed for 24/06/2018 : 4 pm
将此 AIML 文件作为myaiml.aiml保存在aiml目录中。下一步是创建 AIML 中间格式 CSV 文件。创建一个名为GenerateAIML.java的 Java 文件,并添加以下代码:
public class GenerateAIML {

        private static final boolean TRACE_MODE = false;
        static String botName = "appointment";

    public static void main(String[] args) {
        try {

            String resourcesPath = getResourcesPath();
            System.out.println(resourcesPath);
            MagicBooleans.trace_mode = TRACE_MODE;
            Bot bot = new Bot("appointment", resourcesPath);

            bot.writeAIMLFiles();

        } catch (Exception e) {
            e.printStackTrace();
        }
    }

    private static String getResourcesPath(){
        File currDir = new File(".");
        String path = currDir .getAbsolutePath();
        path = path.substring(0, path.length()-2);
        System.out.println(path);
        String resourcePath = path + File.separator  + "src/chapter12/mybot";
        return resourcePath;
    }
}
执行这个文件。它会在aimlif目录下生成myaiml.aiml.csv。
根据您在 NetBeans 中的软件包更改ResourcePath变量。在本例中,chapter12是包名,mybot是包内的目录。
创建另一个 Java 文件来测试 bot,如下所示:
public class Mychatbotdemo {
private static final boolean TRACE_MODE = false;
static String botName = "appointment";
private static String getResourcePath(){
File currDir = new File(".");
String path = currDir .getAbsolutePath();
path = path.substring(0, path.length()-2);
System.out.println(path);
String resourcePath = path + File.separator + "src/chapter12/mybot";
return resourcePath;
}
public static void main(String args[]){
try
{
String resourcePath = getResourcePath();
System.out.println(resourcePath);
MagicBooleans.trace_mode = TRACE_MODE;
Bot bot = new Bot(botName, resourcePath);
Chat chatSession = new Chat(bot);
bot.brain.nodeStats();
String textLine = "";
System.out.println("Robot : Hello, I am your appointment scheduler May i know your name");
while(true){
System.out.println("Human : ");
textLine = IOUtils.readInputTextLine();
if ((textLine==null) || (textLine.length()<1)){
textLine = MagicStrings.null_input;
}
if(textLine.equals("q")){
System.exit(0);
} else if (textLine.equals("wq")){
bot.writeQuit();
} else {
String request = textLine;
if(MagicBooleans.trace_mode)
System.out.println("STATE=" + request + ":THAT" + ((History)chatSession.thatHistory.get(0)).get(0) + ": Topic" + chatSession.predicates.get("topic"));
String response = chatSession.multisentenceRespond(request);
while(response.contains("<"))
response = response.replace("<", "<");
while(response.contains(">"))
response = response.replace(">", ">");
System.out.println("Robot : " + response);
}
}
}
catch(Exception e){
e.printStackTrace();
}
}
}
执行 Java 代码,您将看到提示说Human:,它将等待输入。按下 Q 将结束程序。根据我们的 AIML 文件,我们的对话是有限的,因为我们只要求基本信息。我们可以将它与super文件夹集成在一起,并将我们的 AIML 文件添加到super目录中,这样我们就可以使用默认的所有可用对话和我们的定制约会对话。
摘要
在这一章中,我们看到了聊天机器人的重要性以及它们的发展方向。我们还向您展示了不同的聊天机器人架构。我们从了解 ALICE 和 AIML 开始,使用 AIML,我们创建了一个用于约会安排的演示聊天机器人,以展示使用 ALICE 和 AIML 的聊天机器人的概念。****

在这里,我们一起交流AI,学习AI,用AI改变世界。如有AI产品需求,可访问讯飞开放平台,www.xfyun.cn。
更多推荐


 12
12 0
0- 0


 已为社区贡献54条内容

所有评论(0)