
物联网——一个简单完整的物联网系统实现(大作业)
物联网大作业——物联网系统的简单完整实现
物联网是热得久了,久到现在已经不怎么使用这个词汇了,但是对于应用来说,还是非常普遍。
但是现在有的帮助文章,其实很多都是几年之前的,很多配置无法适配。
这篇文章,我们实现一个简单但是完整的物联网系统,简单概括:麻雀虽小,五脏俱全。
相信看过这篇文章之后,你已经可以自己写一个正常运行的物联网系统了。
注意,本项目是在windows11单一系统上模拟发布、订阅、结果显示、数据库,不涉及最终部署。
架构视图
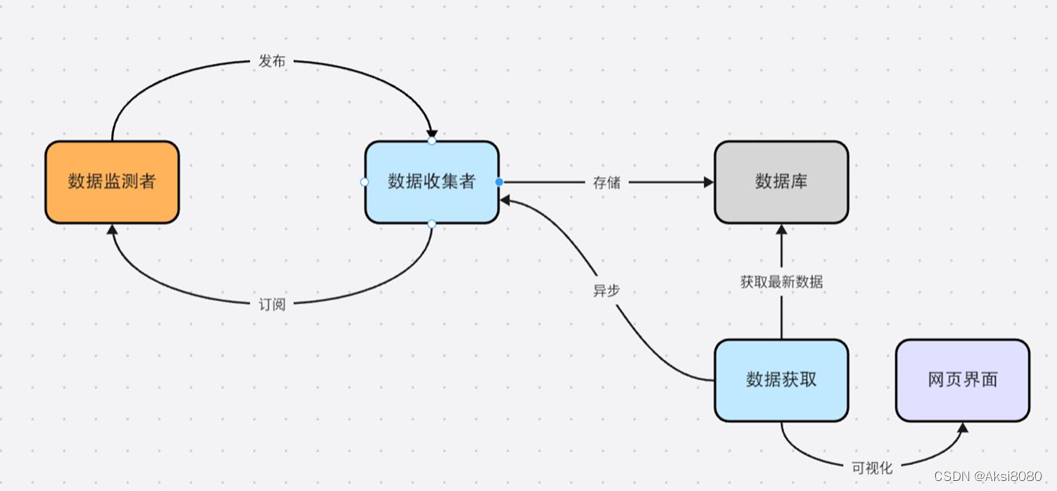
主要功能
1) 使用Java Spring Boot框架,在Java中创建传感器类,每种传感 器拥有数据生成和发送功能。使用定时器定期生成数据。
1. 设备运行速度
2. 设备温度
3. 设备停机次数(发送间隔更长)
2) MQTT通信:使用MQTT客户端库实现数据的接收与发送。
3) 数据处理
1. 使用mysql存储数据
2. 设计合适的数据表,来存储信息
3. 使用合理的索引来提高查询效率
4. 连接MySQL数据库,实现数据的插入和更新
5. 实现查询接口,前端可以根据需要查询和获取数据
4) 消息中间件:topic型中间件(解耦、异步、削峰)
5) 使用HTML和JavaScript创建用户界面,可以显示图表来展示数据。
编写代码之前
我用的是IDEA2023.2.3专业版,请耐心跟着步骤配置好前置环境
我的电脑上运行着rabbitmq(用来运行消息中间件mqtt)
在IDEA中,根据自己的需要填写名称和存储位置
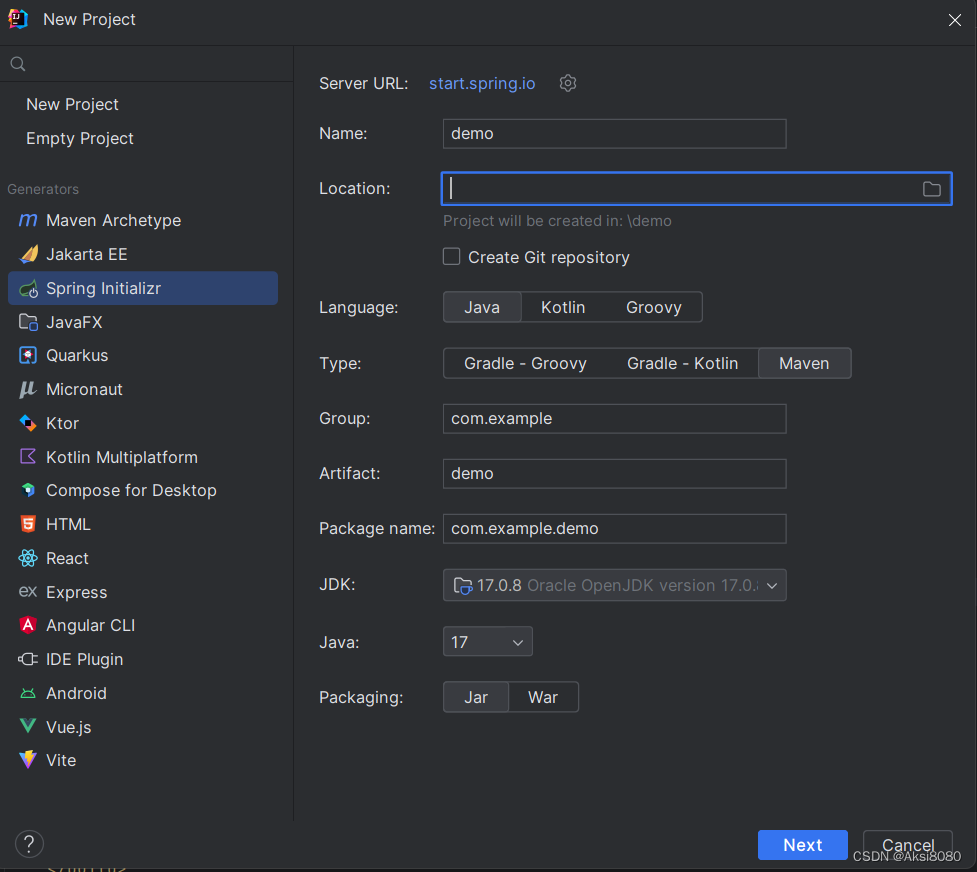
在正式编写代码之前,需要先配置好pom.xml文件
保证你代码当中的相应部分没有缺少,版本只要能够正常编写就可以,不用完全一致
 <dependencies>
        <dependency>
            <groupId>org.springframework.boot</groupId>
            <artifactId>spring-boot-starter-data-jpa</artifactId>
        </dependency>
        <dependency>
            <groupId>org.springframework.boot</groupId>
            <artifactId>spring-boot-starter-web</artifactId>
        </dependency>
        <dependency>
            <groupId>com.mysql</groupId>
            <artifactId>mysql-connector-j</artifactId>
            <scope>runtime</scope>
        </dependency>
        <dependency>
            <groupId>org.projectlombok</groupId>
            <artifactId>lombok</artifactId>
            <optional>true</optional>
        </dependency>
        <dependency>
            <groupId>org.springframework.boot</groupId>
            <artifactId>spring-boot-starter-test</artifactId>
            <scope>test</scope>
        </dependency>
        <dependency>
            <groupId>org.eclipse.paho</groupId>
            <artifactId>org.eclipse.paho.client.mqttv3</artifactId>
            <version>1.2.5</version>
        </dependency>
        <dependency>
            <groupId>jakarta.persistence</groupId>
            <artifactId>jakarta.persistence-api</artifactId>
            <version>3.1.0</version>
        </dependency>
    </dependencies>

    <build>
        <plugins>
            <plugin>
                <groupId>org.springframework.boot</groupId>
                <artifactId>spring-boot-maven-plugin</artifactId>
                <configuration>
                    <excludes>
                        <exclude>
                            <groupId>org.projectlombok</groupId>
                            <artifactId>lombok</artifactId>
                        </exclude>
                    </excludes>
                </configuration>
            </plugin>
        </plugins>
    </build>
在这个项目当中,我们还使用了数据库
因此需要一点点配置来搞定数据存储的问题,这里我用的是Navicat,这个用起来比较简单,下载然后新建数据库即可,要记得自己写的密码(your password),注意在你运行IDEA里面的程序的时候,一定要确保数据库连接正常(其实就是建好之后记得双击激活,否则肯定会运行失败)
回到IDEA,找到main-resources-application.properties
保证你已经把数据库的接口给确认好
spring.application.name=demo
# Database Configuration
spring.datasource.url=jdbc:mysql://localhost:3306/sensor_data?useSSL=false&serverTimezone=UTC
spring.datasource.username=root//一般默认是root,如果你改了,就要响应修改
spring.datasource.password=your password//刚刚提到的,你自己设置的
# Hibernate Configuration
spring.jpa.hibernate.ddl-auto=update
spring.jpa.show-sql=true
spring.jpa.properties.hibernate.dialect=org.hibernate.dialect.MySQL8Dialect

# MQTT Configuration
mqtt.broker.url=tcp://localhost:1883

logging.level.org.springframework=DEBUG
编写代码
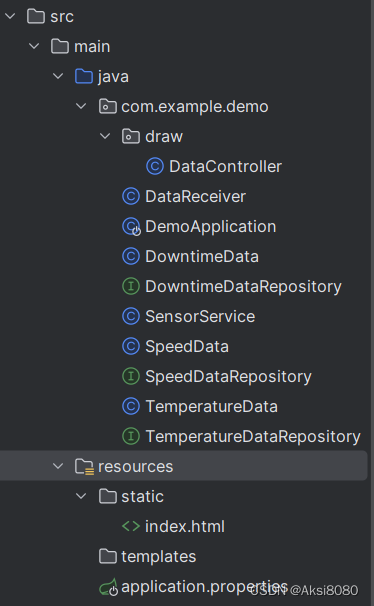
下面就要开始代码的编写了
项目比较简单,因此我没有给出太复杂的文件结构,具体的文件结构如下所示
下面大段代码来袭~
准备数据
package com.example.demo;

import org.springframework.data.jpa.repository.JpaRepository;

public interface TemperatureDataRepository extends JpaRepository<TemperatureData, Long> {
}
package com.example.demo;

import jakarta.persistence.*;
import java.util.Date;

@Entity
public class TemperatureData {
    @Id
    @GeneratedValue(strategy = GenerationType.IDENTITY)
    private Long id;
    private double temperature;
    private Date timestamp = new Date();

    // Getters and setters
    public void setTemperature(double temperature) {
        this.temperature = temperature;
    }

    public double getTemperature() {
        return temperature;
    }

    public Long getId() {
        return id;
    }

    public Date getTimestamp() {
        return timestamp;
    }

    public void setId(Long id) {
        this.id = id;
    }

    public void setTimestamp(Date timestamp) {
        this.timestamp = timestamp;
    }
}
package com.example.demo;

import org.springframework.data.jpa.repository.JpaRepository;

public interface SpeedDataRepository extends JpaRepository<SpeedData, Long> {
}
package com.example.demo;

import jakarta.persistence.*;
import java.util.Date;

@Entity
public class SpeedData {
    @Id
    @GeneratedValue(strategy = GenerationType.IDENTITY)
    private Long id;
    private double speed;
    @Temporal(TemporalType.TIMESTAMP)
    private Date timestamp = new Date();

    // Getters and setters
    public SpeedData() {
    }

    public Long getId() {
        return id;
    }

    public void setId(Long id) {
        this.id = id;
    }

    public double getSpeed() {
        return speed;
    }

    public void setSpeed(double speed) {
        this.speed = speed;
    }

    public Date getTimestamp() {
        return timestamp;
    }

    public void setTimestamp(Date timestamp) {
        this.timestamp = timestamp;
    }
}
package com.example.demo;

import org.springframework.data.jpa.repository.JpaRepository;

public interface DowntimeDataRepository extends JpaRepository<DowntimeData, Long> {
}
package com.example.demo;

import jakarta.persistence.*;
import java.util.Date;

@Entity
public class DowntimeData {
    @Id
    @GeneratedValue(strategy = GenerationType.IDENTITY)
    private Long id;
    private int downtimeCount;
    private Date timestamp = new Date();

    // Getters and setters
    public void setDowntimeCount(int downtimeCount) {
        this.downtimeCount = downtimeCount;
    }

    public int getDowntimeCount() {
        return downtimeCount;
    }
}
发送数据
package com.example.demo;
import org.eclipse.paho.client.mqttv3.MqttClient;
import org.eclipse.paho.client.mqttv3.MqttException;
import org.eclipse.paho.client.mqttv3.MqttMessage;
import org.springframework.scheduling.annotation.Scheduled;
import org.springframework.stereotype.Service;
import jakarta.annotation.PostConstruct;
@Service // 标记为Spring服务,让Spring容器管理其生命周期
public class SensorService {
private MqttClient client; // MQTT客户端实例,用于发送消息
// 为每种数据类型定义一个独立的topic
private final String speedTopic = "sensor/speed";
private final String temperatureTopic = "sensor/temperature";
private final String downtimeTopic = "sensor/downtime";
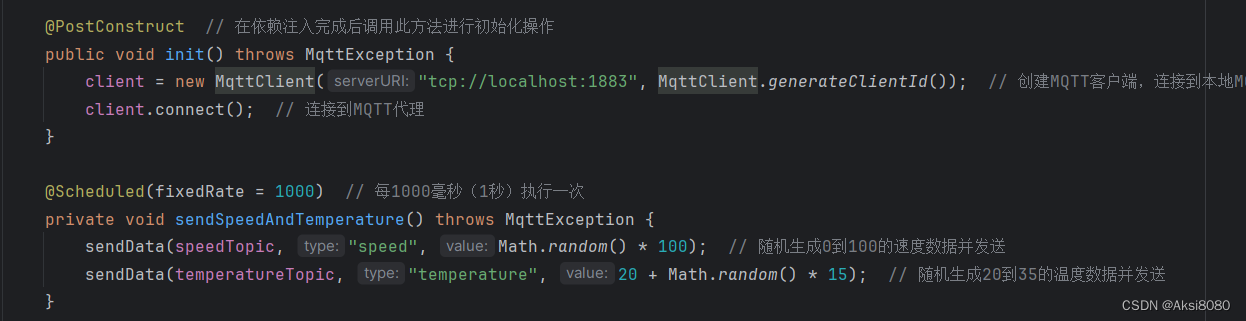
@PostConstruct // 在依赖注入完成后调用此方法进行初始化操作
public void init() throws MqttException {
client = new MqttClient("tcp://localhost:1883", MqttClient.generateClientId()); // 创建MQTT客户端,连接到本地MQTT代理
client.connect(); // 连接到MQTT代理
}
@Scheduled(fixedRate = 1000) // 每1000毫秒(1秒)执行一次
private void sendSpeedAndTemperature() throws MqttException {
sendData(speedTopic, "speed", Math.random() * 100); // 随机生成0到100的速度数据并发送
sendData(temperatureTopic, "temperature", 20 + Math.random() * 15); // 随机生成20到35的温度数据并发送
}
@Scheduled(fixedRate = 43200000) // 每43200000毫秒(12小时)执行一次
private void sendDowntime() throws MqttException {
sendData(downtimeTopic, "downtime", Math.random() * 10); // 随机生成0到10的停机次数数据并发送
}
// 通用的数据发送方法,接受topic、类型和值作为参数
private void sendData(String topic, String type, double value) throws MqttException {
String payload = String.format("%s,%f", type, value); // 格式化要发送的消息
MqttMessage message = new MqttMessage(payload.getBytes()); // 创建MQTT消息
client.publish(topic, message); // 发布消息到指定的MQTT主题
System.out.println("Data sent: " + type + " " + value); // 控制台输出发送的数据
}
}
接收数据
package com.example.demo;
import org.eclipse.paho.client.mqttv3.*;
import org.springframework.beans.factory.annotation.Autowired;
import org.springframework.stereotype.Component;
import jakarta.annotation.PostConstruct;
@Component // 标记为Spring组件,让Spring容器管理其生命周期
public class DataReceiver implements MqttCallback {
@Autowired
private SpeedDataRepository speedDataRepository; // 自动注入处理速度数据的JPA仓库
@Autowired
private TemperatureDataRepository temperatureDataRepository; // 自动注入处理温度数据的JPA仓库
@Autowired
private DowntimeDataRepository downtimeDataRepository; // 自动注入处理停机次数数据的JPA仓库
private MqttClient client; // MQTT客户端实例
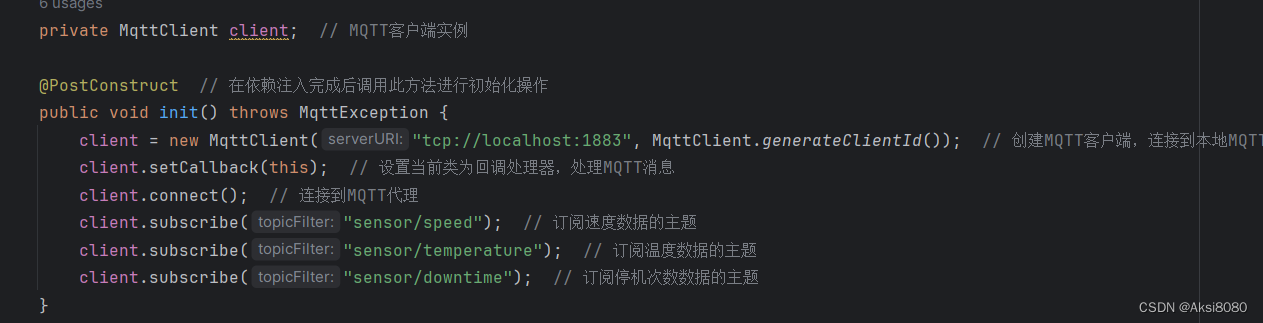
@PostConstruct // 在依赖注入完成后调用此方法进行初始化操作
public void init() throws MqttException {
client = new MqttClient("tcp://localhost:1883", MqttClient.generateClientId()); // 创建MQTT客户端,连接到本地MQTT代理
client.setCallback(this); // 设置当前类为回调处理器,处理MQTT消息
client.connect(); // 连接到MQTT代理
client.subscribe("sensor/speed"); // 订阅速度数据的主题
client.subscribe("sensor/temperature"); // 订阅温度数据的主题
client.subscribe("sensor/downtime"); // 订阅停机次数数据的主题
}
@Override
public void connectionLost(Throwable cause) {
System.out.println("Connection lost: " + cause.getMessage()); // 在连接丢失时打印消息
}
@Override
public void messageArrived(String topic, MqttMessage message) throws Exception {
String[] data = new String(message.getPayload()).split(","); // 将接收到的消息按逗号分割
if (data.length == 2) {
String type = data[0];
double value = Double.parseDouble(data[1]); // 解析传感器数据的数值
switch (topic) { // 根据主题将数据存储到相应的表
case "sensor/speed":
SpeedData speedData = new SpeedData();
speedData.setSpeed(value); // 设置速度数据
speedDataRepository.save(speedData); // 保存到数据库
break;
case "sensor/temperature":
TemperatureData temperatureData = new TemperatureData();
temperatureData.setTemperature(value); // 设置温度数据
temperatureDataRepository.save(temperatureData); // 保存到数据库
break;
case "sensor/downtime":
DowntimeData downtimeData = new DowntimeData();
downtimeData.setDowntimeCount((int) value); // 设置停机次数数据
downtimeDataRepository.save(downtimeData); // 保存到数据库
break;
}
System.out.println("Received and saved: " + type + " " + value); // 打印接收和存储的数据
}
}
@Override
public void deliveryComplete(IMqttDeliveryToken token) {
System.out.println("Delivery complete for token: " + token.getResponse()); // 消息成功发送到代理后的回调
}
}获取数据,画图
package com.example.demo.draw;

import com.example.demo.*;
import org.springframework.beans.factory.annotation.Autowired;
import org.springframework.web.bind.annotation.GetMapping;
import org.springframework.web.bind.annotation.RestController;

import java.util.List;

@RestController
public class DataController {//获取数据库中的最新数据

    @Autowired
    private SpeedDataRepository speedDataRepository;

    @Autowired
    private TemperatureDataRepository temperatureDataRepository;

    @Autowired
    private DowntimeDataRepository downtimeDataRepository;

    @GetMapping("/api/speed-data")
    public List<SpeedData> getSpeedData() {
        return speedDataRepository.findAll();
    }

    @GetMapping("/api/temperature-data")
    public List<TemperatureData> getTemperatureData() {
        return temperatureDataRepository.findAll();
    }

    @GetMapping("/api/downtime-data")
    public List<DowntimeData> getDowntimeData() {
        return downtimeDataRepository.findAll();
    }
}
网页显示
<!DOCTYPE html>
<html>
<head>
    <meta charset="UTF-8">
    <title>Device Data Dashboard</title>
    <script src="https://cdn.jsdelivr.net/npm/echarts/dist/echarts.min.js"></script>
    <script src="https://ajax.googleapis.com/ajax/libs/jquery/3.5.1/jquery.min.js"></script>
    <style>
        body {
            display: flex;
            justify-content: center;
            align-items: center;
            height: 100vh;
            margin: 0;
            background-color: #f5f5f5;
        }
        #container {
            position: relative;
            width: 800px;
            height: 600px;
        }
        #main {
            width: 100%;
            height: 100%;
        }
        #controls {
            position: absolute;
            top: 20px;
            right: 20px;
        }
        #toggleButton {
            font-size: 18px;
            padding: 10px 20px;
            background-color: #007bff;
            color: white;
            border: none;
            border-radius: 5px;
            cursor: pointer;
        }
        #toggleButton:hover {
            background-color: #0056b3;
        }
    </style>
</head>
<body>
<div id="container">
    <div id="main"></div>
    <div id="controls">
        <button id="toggleButton" onclick="toggleDisplay()">暂停显示</button>
    </div>
</div>
<script type="text/javascript">
    var chart = echarts.init(document.getElementById('main'));

    var option = {
        title: {
            text: 'Device Data'
        },
        tooltip: {},
        legend: {
            data: ['Speed', 'Temperature', 'Downtime']
        },
        xAxis: {
            type: 'category',
            data: []
        },
        yAxis: {},
        series: [{
            name: 'Speed',
            type: 'line',
            data: [],
            itemStyle: {
                color: 'blue'
            },
            markLine: {
                data: [{
                    yAxis: 70,
                    name: 'Speed Threshold',
                    lineStyle: {
                        color: 'red',
                        width: 2,
                        type: 'solid'
                    },
                    label: {
                        show: true,
                        position: 'end',
                        formatter: 'Speed Threshold'
                    }
                }]
            }
        }, {
            name: 'Temperature',
            type: 'line',
            data: [],
            itemStyle: {
                color: 'green'
            },
            markLine: {
                data: [{
                    yAxis: 30,
                    name: 'Temperature Threshold',
                    lineStyle: {
                        color: 'red',
                        width: 2,
                        type: 'solid'
                    },
                    label: {
                        show: true,
                        position: 'end',
                        formatter: 'Temperature Threshold'
                    }
                }]
            }
        }, {
            name: 'Downtime',
            type: 'line',
            data: [],
            itemStyle: {
                color: 'orange'
            },
            markLine: {
                data: [{
                    yAxis: 5,
                    name: 'Downtime Threshold',
                    lineStyle: {
                        color: 'red',
                        width: 2,
                        type: 'solid'
                    },
                    label: {
                        show: true,
                        position: 'end',
                        formatter: 'Downtime Threshold'
                    }
                }]
            }
        }]
    };

    chart.setOption(option);

    var fetchDataInterval;
    var isDisplaying = true;

    function fetchData() {
        $.get('/api/speed-data', function(speedData) {
            var xAxisData = speedData.map(function(item) { return item.timestamp; });
            var speedSeriesData = speedData.map(function(item) { return item.speed; });

            $.get('/api/temperature-data', function(temperatureData) {
                var temperatureSeriesData = temperatureData.map(function(item) { return item.temperature; });

                $.get('/api/downtime-data', function(downtimeData) {
                    var downtimeSeriesData = downtimeData.map(function(item) { return item.downtimeCount; });

                    chart.setOption({
                        xAxis: {
                            data: xAxisData
                        },
                        series: [{
                            name: 'Speed',
                            data: speedSeriesData
                        }, {
                            name: 'Temperature',
                            data: temperatureSeriesData
                        }, {
                            name: 'Downtime',
                            data: downtimeSeriesData
                        }]
                    });
                });
            });
        });
    }

    function toggleDisplay() {
        if (isDisplaying) {
            clearInterval(fetchDataInterval);
            document.getElementById('toggleButton').innerText = '开始显示';
        } else {
            fetchDataInterval = setInterval(fetchData, 1000);
            document.getElementById('toggleButton').innerText = '暂停显示';
        }
        isDisplaying = !isDisplaying;
    }

    fetchDataInterval = setInterval(fetchData, 1000); // 每秒获取一次数据
</script>
</body>
</html>
OK,运行!
package com.example.demo;

import org.springframework.boot.SpringApplication;
import org.springframework.boot.autoconfigure.SpringBootApplication;
import org.springframework.scheduling.annotation.EnableScheduling;

@SpringBootApplication
@EnableScheduling
public class DemoApplication {

    public static void main(String[] args) {
        SpringApplication.run(DemoApplication.class, args);
    }

}
结果展示
打开localhost:8080
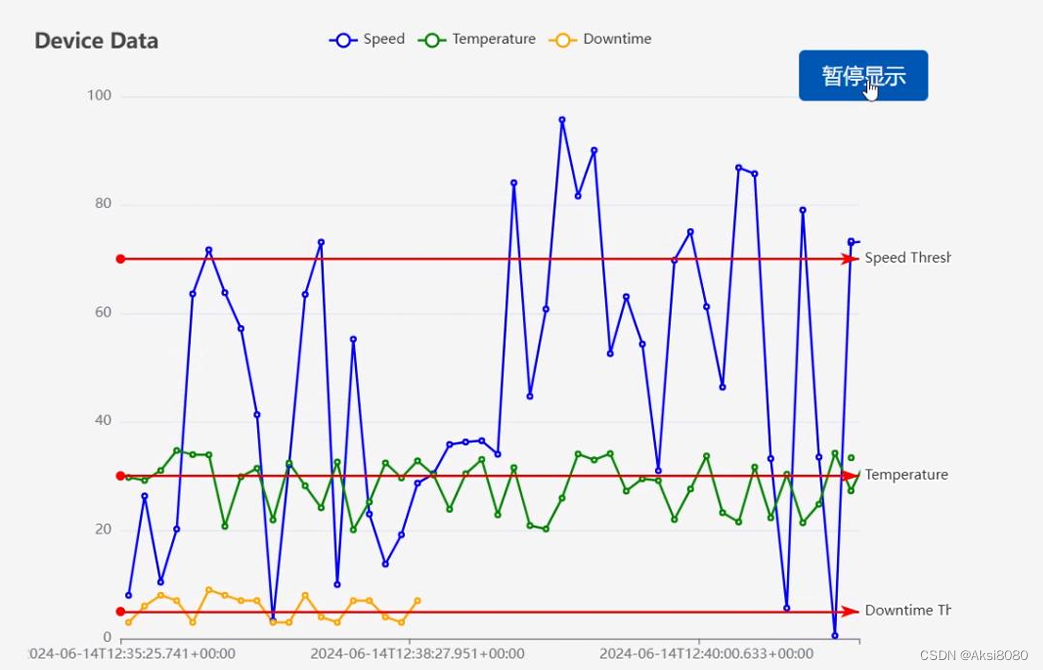
当然了,数据都是瞎编的,如果你有具体的要求,只需要自行修改数据源或者自行修改数据生成方法即可。
技术细节说明
我知道有爱好学习的小朋友一定对刚刚豪放不拘直接贴代码的行为不理解,并表示:不能随便吃路边的怪蜀黍给的来历不明的食物!
我是为了急性子的朋友们直接干出来一个能用的系统,不在前面啰嗦,下面我还是对一些细节做一下说明,显示一下我真诚的心。
JPA
JPA(Java Persistence API, Java 持久化API)是SUN公司提出的Java持久化规范,它提供了一种对象/关系映射的管理工具来管理Java中的关系型数据库,这种规范可以私下通过注解或者XML描述“对象-关系表”之间的映射关系,并将实体对象持久化到数据库中,从而极大地简化现有的持久化开发工作。
对应在application.properties文件中进行的相关配置。
JPA相关的注解
@Entity 这个注解是使用JPA时必须的注解,代表这个类对应了一个数据库表
@Id 代表对应的主键
IDENTITY:主键由数据库自动生成,即采用数据库ID自增长的方式
注意,自动建表的命名规则是加下划线_
在Spring Data JPA中使用JpaRepository接口类完成对数据库的操作。
JpaRepository提供了30多个默认方法,基本能满足项目中的数据库操作功能。
发布/订阅机制
之前提到的mqtt,可以用rabbitmq运行,下载Installing on Windows | RabbitMQ并启动。
然后打开mqtt,进入prompt,命令如下:
![]()
OK,那么对于代码方面来说就是publisher-subscriber
对于发布端:
定义好topic,比如

然后发布数据,比如
对于订阅端
 Spring Boot
你可能发现了,这些代码都没有类似于start,run等等来启动,总共只有一个main来运行所有,这就是全篇到处注解的作用了,加上注解之后,就有人帮你按时做事了。
别的多余的话,这里就不多说了,如果你感兴趣,可以前往搜索,或者关注我持续更新~

技术共进,成长同行——讯飞AI开发者社区
更多推荐


 1
1 0
0- 0


 已为社区贡献1条内容

所有评论(0)