
随笔-目标检测数据合成
随笔-检测数据合成介绍在深度学习中,做目标检测或文字检测的时候,检测数据可能不充足,这时,我们想对检测数据集做扩充的话,可以将要检测的目标图片合成到不同的背景图像上,同时计算得到目标图像在合成后的图像上的坐标,以便生成相应的检测需要的标签。具体来说:现在有150张裁剪后的文字图片,(保存在crop_imgs目录)类似于这种:并且有这150张文字图片的标签,类似于这种:# 图片路径 图片内容crop
随笔-目标检测数据合成
介绍
在深度学习中,做目标检测或文字检测的时候,检测数据可能不充足,这时,我们想对检测数据集做扩充的话,可以将要检测的目标图片合成到不同的背景图像上,同时计算得到目标图像在合成后的图像上的坐标,以便生成相应的检测需要的标签。
具体来说:
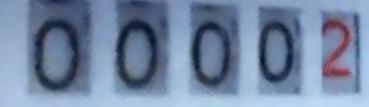
- 现在有150张裁剪后的文字图片,(保存在crop_imgs目录)类似于这种:
- 并且有这150张文字图片的标签,类似于这种:
# 图片路径 图片内容
crop_imgs/20200521104812_crop_0.jpg	00002
crop_imgs/20200521104904_crop_0.jpg	00002
crop_imgs/20200521104928_crop_0.jpg	00002
....
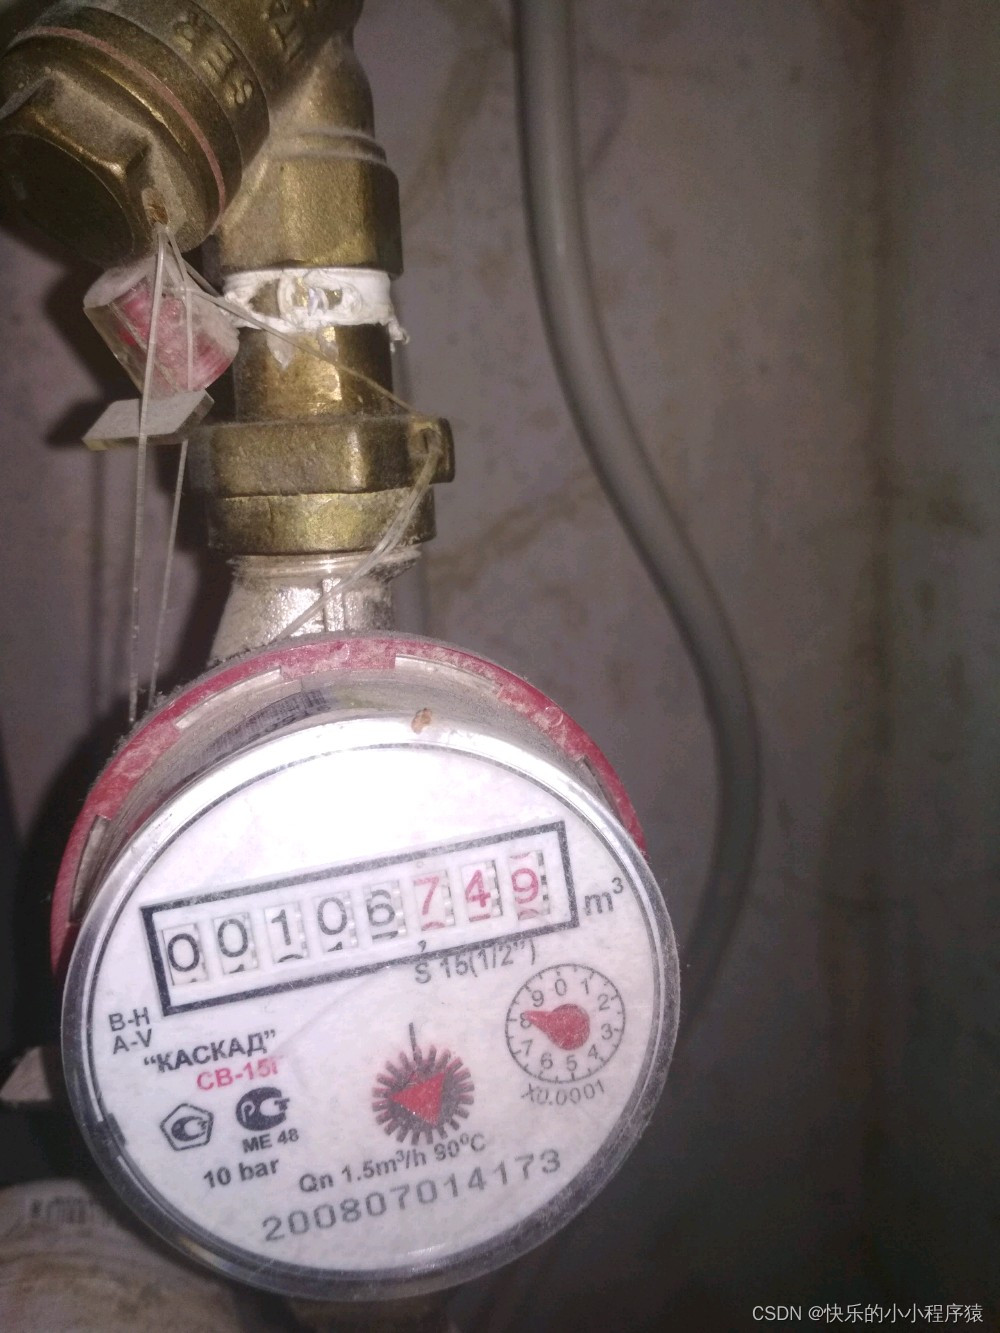
- 有1000多张背景图片,(保存在background_imgs目录)类似于这种:
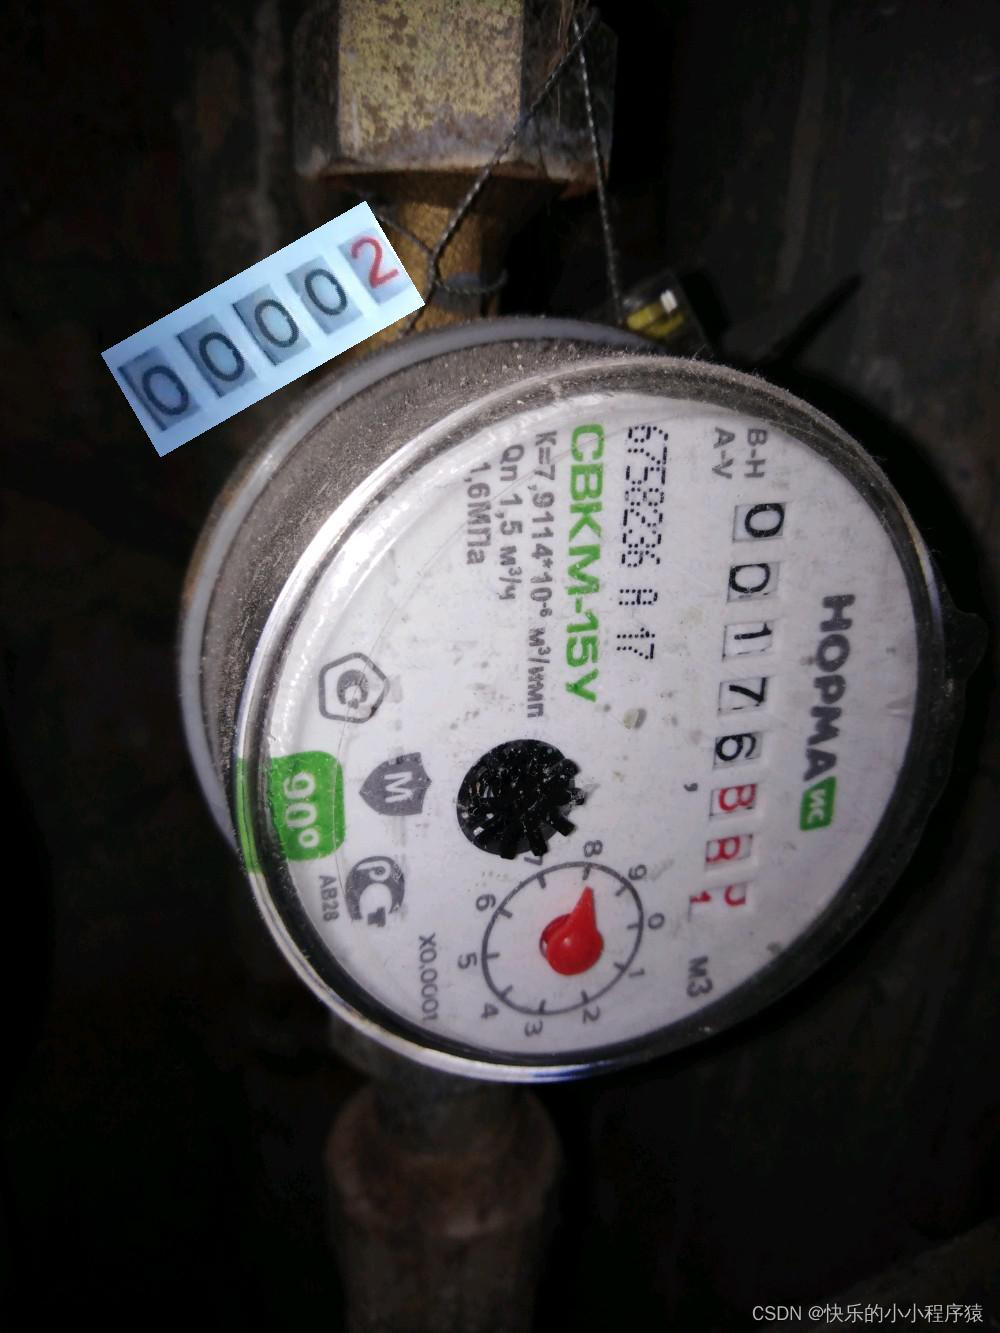
- 将这150张裁剪图片,合成到随机挑选的一张背景图片的一个随机位置,并顺时针和逆时针旋转随机角度,并得到这个裁剪图片在背景图片中的4个顶点的坐标。(合成后的图片保存在synthesis_imgs)合成后的效果类似于:
5. 生成合成图像中的检测标签。需要计算裁剪图片旋转后在背景图像中的坐标。这里的检测标签文件是用于PaddleOCR文字检测算法训练的格式。(保存在det_label.txt)类似于:
# 图片路径 文字区域的四个顶点坐标
./synthesis_imgs/1634980418403824.jpg	[{"transcription": "00002", "points": [[377.7200673595015, 857.6697562401171], [683.7200673595015, 857.6697562401171], [683.7200673595015, 977.6697562401171], [377.7200673595015, 977.6697562401171]], "difficult": false}]
./synthesis_imgs/1634980418495209.jpg	[{"transcription": "00002", "points": [[794.650135969265, 139.1676723954298], [1059.6539095273033, 292.16767239542986], [999.6539095273033, 396.0907208495625], [734.650135969265, 243.09072084956244]], "difficult": false}]
...
实现
实现一张图片合成到另一张图片的效果
具体函数及参数的使用可查询文档:https://pillow.readthedocs.io/en/stable/reference/Image.html
def test():
    a = Image.open(
        './background_imgs/id_1000_value_176_881.jpg').convert('RGBA')
    water = Image.open('./crop_imgs/20200521104812_crop_0.jpg').convert('RGBA')
    # 将图片旋转30度
    water = water.rotate(30, expand=True)
    b = Image.new('RGBA', a.size, (0, 0, 0, 0))
    b.paste(a, (0, 0))
    # 粘贴到背景图片的(100, 200)这个点
    b.paste(water, (100, 200), mask=water)
    b = b.convert('RGB')
    b.save('aaa.jpg')
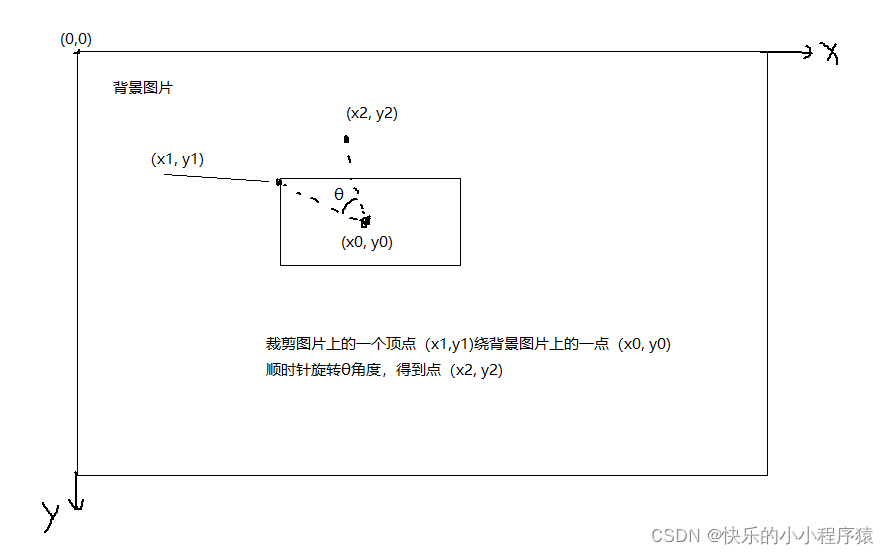
计算图片上任意点(x1, y1)绕图片上任意点(x0, y0)顺时针旋转theta角度后的坐标
这个不太好理解,画个简单的示意图
对裁剪图片的四个顶点,每个顶点按照公式计算一次,就可以得到4个顶点旋转后的坐标
def compute_rotated_coordinate(x0, y0, x1, y1, theta):
    """
    计算图片上任意点(x1, y1)绕图片上任意点(x0, y0)顺时针旋转theta角度后的坐标

    参数:
        x0:旋转中心点横坐标
        y0:旋转中心点纵坐标
        x1: 绕中心点旋转的任意点横坐标
        y1: 绕中心点旋转的任意点纵坐标
        theta: 顺时针旋转角度,数值表示度数

    返回:
        元组形式表示的旋转后的坐标(x2, y2)
    """
    theta = radians(theta)
    x2 = (x1 - x0) * cos(theta) - (y1 - y0) * sin(theta) + x0
    y2 = (x1 - x0) * sin(theta) + (y1 - y0) * cos(theta) + y0
    return (x2, y2)
根据图片中心点(x, y)和宽高计算四个边界点(左上角,右上角,右下角,左下角)的坐标
这个不太好理解,画个简单的示意图
对于旋转后的图片的粘贴,为了方便计算旋转后的坐标,这里的做法(代码见完整代码)是:先将裁剪图片水平放置到到背景图片上的一个随机点,然后将裁剪图片绕该点旋转,得到一个包含旋转后的图片的最小矩形的图片,计算这个图片的左上角顶点坐标,将这个图片粘贴到该坐标。
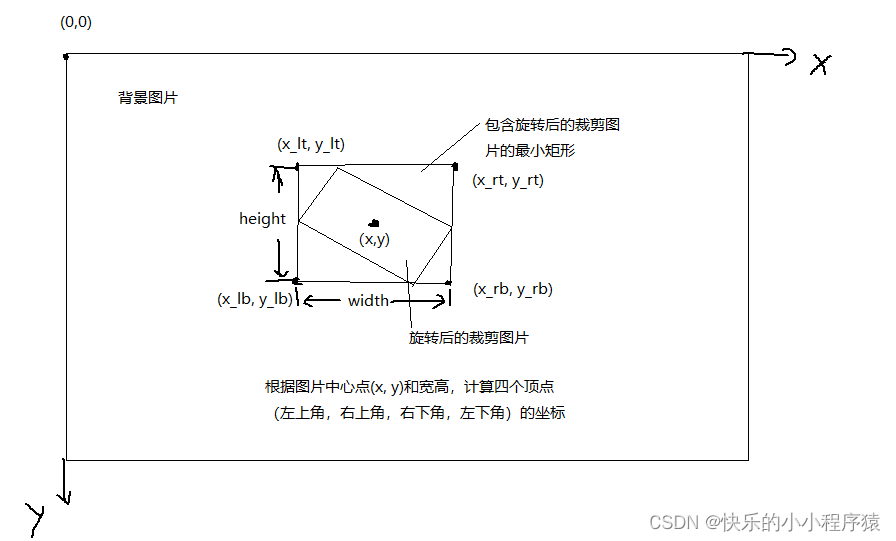
def compute_coordinate_by_wh(x, y, width, height):
    """
    根据图片中心点(x, y)和宽高计算四个边界点(左上角,右上角,右下角,左下角)的坐标

    参数:
        x:中心点横坐标,向右为正方向
        y:中心店纵坐标,向上为正方向
        width:图片的宽
        height:图片的高

    返回:
        元组形式的坐标(横坐标, 纵坐标),依次为左上角,右上角,右下角,左下角的坐标
    """
    x_lt, y_lt = x - width/2, y - height/2
    x_rt, y_rt = x + width/2, y_lt
    x_rb, y_rb = x_rt, y + height/2
    x_lb, y_lb = x_lt, y_rb
    return (x_lt, y_lt), (x_rt, y_rt), (x_rb, y_rb), (x_lb, y_lb)
完整代码
我这里的做法是:对每一张裁剪图片,分别以水平粘贴,顺时针旋转随机角度(0°<theta<30°)后,逆时针旋转随机角度(0°<theta<30°)后,再贴到背景图上。也就是说,对每一张图片进行了3次变换。比如,150张裁剪图片,合成之后,会生成450张合成图片(这450张合成图片的背景都是随机选择的),
import os
import random
from math import cos, sin, radians

from PIL import Image, ImageDraw
import json
import time


def compute_rotated_coordinate(x0, y0, x1, y1, theta):
    """
    计算图片上任意点(x1, y1)绕图片上任意点(x0, y0)顺时针旋转theta角度后的坐标

    参数:
        x0:旋转中心点横坐标
        y0:旋转中心点纵坐标
        x1: 绕中心点旋转的任意点横坐标
        y1: 绕中心点旋转的任意点纵坐标
        theta: 顺时针旋转角度,数值表示度数

    返回:
        元祖形式表示的旋转后的坐标(x2, y2)
    """
    theta = radians(theta)
    x2 = (x1 - x0) * cos(theta) - (y1 - y0) * sin(theta) + x0
    y2 = (x1 - x0) * sin(theta) + (y1 - y0) * cos(theta) + y0
    return (x2, y2)


def compute_coordinate_by_wh(x, y, width, height):
    """
    根据图片中心点(x, y)和宽高计算四个边界点(左上角,右上角,右下角,左下角)的坐标

    参数:
        x:中心点横坐标,向右为正方向
        y:中心店纵坐标,向上为正方向
        width:图片的宽
        height:图片的高

    返回:
        元组形式的坐标(横坐标, 纵坐标),依次为左上角,右上角,右下角,左下角的坐标
    """
    x_lt, y_lt = x - width/2, y - height/2
    x_rt, y_rt = x + width/2, y_lt
    x_rb, y_rb = x_rt, y + height/2
    x_lb, y_lb = x_lt, y_rb
    return (x_lt, y_lt), (x_rt, y_rt), (x_rb, y_rb), (x_lb, y_lb)


def test():
    a = Image.open(
        './background_imgs/id_1000_value_176_881.jpg').convert('RGBA')
    water = Image.open('./crop_imgs/20200521104812_crop_0.jpg').convert('RGBA')
    water = water.rotate(30, expand=True)
    b = Image.new('RGBA', a.size, (0, 0, 0, 0))
    b.paste(a, (0, 0))
    b.paste(water, (100, 200), mask=water)
    b = b.convert('RGB')
    b.save('aaa.jpg')


def get_rec_label(label_path, img_name):
    with open(label_path, 'r') as f:
        for line in f:
            if line.find(img_name) > 0:
                # print(line)
                tmp = line.strip('\n').split('\t')
                return tmp[-1]


if __name__ == "__main__":
    bg_img_lists = os.listdir('./background_imgs/')
    crop_img_lists = os.listdir('./crop_imgs/')
    # random.seed(2021)
    for im in crop_img_lists:
        crop_img = Image.open('./crop_imgs/' + im)
        crop_img_w, crop_img_h = crop_img.width, crop_img.height

        """ 1. 将裁剪图片水平粘贴到背景图上 """
        # 随机选取一张背景图
        random_index = random.randint(0, len(bg_img_lists) - 1)
        bg_img = Image.open('./background_imgs/' + bg_img_lists[random_index])
        bg_img_w, bg_img_h = bg_img.width, bg_img.height

        # 在背景图上选择一个随机点,用来粘贴图片
        assert bg_img_w - crop_img_w > 0, "背景图片的宽度小于裁剪的图片宽度,无法粘贴!"
        x = random.uniform(crop_img_w, bg_img_w - crop_img_w)
        assert bg_img_h - crop_img_h > 0, "背景图片的高度小于裁剪的图片高度,无法粘贴!"
        y = random.uniform(crop_img_h, bg_img_h - crop_img_h)

        # 水平粘贴图片,使裁剪图片的中心点和背景图中随机选择的点重合
        (x_lt, y_lt), (x_rt, y_rt), (x_rb, y_rb), (x_lb,
                                                   y_lb) = compute_coordinate_by_wh(x, y, crop_img_w, crop_img_h)
        bg_img.paste(crop_img, (int(x_lt), int(y_lt)))
        save_name = str(int(round(time.time() * 1000*1000))) + '.jpg'
        bg_img.save('./synthesis_imgs/' + save_name)
        # 生成标签
        with open('./det_label.txt', 'a') as out_file:
            s = get_rec_label('./crop_imgs_label.txt', im)
            # print(s)
            points = []
            points.append([x_lt, y_lt])
            points.append([x_rt, y_rt])
            points.append([x_rb, y_rb])
            points.append([x_lb, y_lb])
            result = {"transcription": s, "points": points, "difficult": False}
            out_file.write('./synthesis_imgs/' + save_name + '\t' + json.dumps(
                [result], ensure_ascii=False) + '\n')
        print(f'将裁剪图片{im}水平合成到背景图片{bg_img_lists[random_index]}成功!')

        """ 2. 将剪裁图片顺时针旋转随机角度后,再贴到背景图上 """
        # 随机选取一张背景图
        random_index = random.randint(0, len(bg_img_lists) - 1)
        bg_img = Image.open('./background_imgs/' + bg_img_lists[random_index])
        bg_img_w, bg_img_h = bg_img.width, bg_img.height

        # 随机选择粘贴点
        assert bg_img_w - crop_img_w > 0, "背景图片的宽度小于裁剪的图片宽度,无法粘贴!"
        x = random.uniform(crop_img_w, bg_img_w - crop_img_w)
        assert bg_img_h - crop_img_h > 0, "背景图片的高度小于裁剪的图片高度,无法粘贴!"
        y = random.uniform(crop_img_h, bg_img_h - crop_img_h)
        theta = random.randint(0, 30)

        # 计算将裁剪图片水平放置到随机点的时候(裁剪图片中心点和随机点重合)的4个顶点的坐标
        (x_lt, y_lt), (x_rt, y_rt), (x_rb, y_rb), (x_lb,
                                                   y_lb) = compute_coordinate_by_wh(x, y, crop_img_w, crop_img_h)

        # 计算将水平图片绕中心点顺时针旋转后的4个顶点的坐标
        (x_lt_rotated, y_lt_rotated) = compute_rotated_coordinate(
            x, y, x_lt, y_lt, theta)
        (x_rt_rotated, y_rt_rotated) = compute_rotated_coordinate(
            x, y, x_rt, y_rt, theta)
        (x_rb_rotated, y_rb_rotated) = compute_rotated_coordinate(
            x, y, x_rb, y_rb, theta)
        (x_lb_rotated, y_lb_rotated) = compute_rotated_coordinate(
            x, y, x_lb, y_lb, theta)

        # print((x_lt_rotated, y_lt_rotated))
        # print((x_rt_rotated, y_rt_rotated))
        # print((x_rb_rotated, y_rb_rotated))
        # print((x_lb_rotated, y_lb_rotated))

        # 由于旋转之后,其余部分会填充黑色,所以这里需要将图片添加一个alpha通道,表示透明度
        crop_img2 = crop_img.convert('RGBA')
        bg_img2 = bg_img.convert('RGBA')
        # rotate()默认是逆时针。这里用-theta表示顺时针旋转theta度
        crop_img_rotated = crop_img2.rotate(-theta, expand=True)
        # 计算包含将水平图片绕中心点顺时针旋转后的图片的最大的框的四个顶点坐标
        crop_img_rotated_w, crop_img_rotated_h = crop_img_rotated.width, crop_img_rotated.height
        (x_lt_box, y_lt_box), (x_rt_box, y_rt_box), (x_rb_box, y_rb_box), (x_lb_box,
                                                                           y_lb_box) = compute_coordinate_by_wh(x, y, crop_img_rotated_w, crop_img_rotated_h)
        # 将图片粘贴到包含旋转后的图片的最大的框的左上角
        tmp = Image.new('RGBA', bg_img2.size, (0, 0, 0, 0))
        tmp.paste(bg_img2, (0, 0))
        tmp.paste(crop_img_rotated, (int(x_lt_box), int(y_lt_box)),
                  mask=crop_img_rotated)
        # 将图片转回RGB后,保存为jpg格式
        synth_img = tmp.convert('RGB')
        save_name = str(int(round(time.time() * 1000*1000))) + '.jpg'
        synth_img.save('./synthesis_imgs/' + save_name)

        """ # 绘制原始框和旋转后的框
        draw = ImageDraw.Draw(synth_img)
        draw.polygon([(x_lt, y_lt),
                      (x_rt, y_rt), (x_rb, y_rb), (x_lb, y_lb)], outline='blue')
        draw.polygon([(x_lt_box, y_lt_box),
                      (x_rt_box, y_rt_box), (x_rb_box, y_rb_box), (x_lb_box, y_lb_box)], outline='yellow')
        draw.polygon([(x_lt_rotated, y_lt_rotated),
                      (x_rt_rotated, y_rt_rotated), (x_rb_rotated, y_rb_rotated), (x_lb_rotated, y_lb_rotated)], outline='red')
        synth_img.show() """
        # 生成标签
        with open('./det_label.txt', 'a') as out_file:
            s = get_rec_label('./crop_imgs_label.txt', im)
            # print(s)
            points = []
            points.append([x_lt_rotated, y_lt_rotated])
            points.append([x_rt_rotated, y_rt_rotated])
            points.append([x_rb_rotated, y_rb_rotated])
            points.append([x_lb_rotated, y_lb_rotated])
            result = {"transcription": s, "points": points, "difficult": False}
            out_file.write('./synthesis_imgs/' + save_name + '\t' + json.dumps(
                [result], ensure_ascii=False) + '\n')
        print(f'将裁剪图片{im}顺时针旋转后合成到背景图片{bg_img_lists[random_index]}成功!')

        """ 3. 将剪裁图片逆时针旋转随机角度后,再贴到背景图上 """
        # 随机选取一张背景图
        random_index = random.randint(0, len(bg_img_lists) - 1)
        bg_img = Image.open('./background_imgs/' + bg_img_lists[random_index])
        bg_img_w, bg_img_h = bg_img.width, bg_img.height
        assert bg_img_w - crop_img_w > 0, "背景图片的宽度小于裁剪的图片宽度,无法粘贴!"
        x = random.uniform(crop_img_w, bg_img_w - crop_img_w)
        assert bg_img_h - crop_img_h > 0, "背景图片的高度小于裁剪的图片高度,无法粘贴!"
        y = random.uniform(crop_img_h, bg_img_h - crop_img_h)
        theta = random.randint(0, 30)

        # 计算将图片水平放置到中心点的时候的4个顶点的坐标
        (x_lt, y_lt), (x_rt, y_rt), (x_rb, y_rb), (x_lb,
                                                   y_lb) = compute_coordinate_by_wh(x, y, crop_img_w, crop_img_h)

        # 计算将水平图片绕中心点逆时针旋转后的4个顶点的坐标,这里用-theta表示逆时针旋转
        (x_lt_rotated, y_lt_rotated) = compute_rotated_coordinate(
            x, y, x_lt, y_lt, -theta)
        (x_rt_rotated, y_rt_rotated) = compute_rotated_coordinate(
            x, y, x_rt, y_rt, -theta)
        (x_rb_rotated, y_rb_rotated) = compute_rotated_coordinate(
            x, y, x_rb, y_rb, -theta)
        (x_lb_rotated, y_lb_rotated) = compute_rotated_coordinate(
            x, y, x_lb, y_lb, -theta)

        # print((x_lt_rotated, y_lt_rotated))
        # print((x_rt_rotated, y_rt_rotated))
        # print((x_rb_rotated, y_rb_rotated))
        # print((x_lb_rotated, y_lb_rotated))

        # 由于旋转之后,其余部分会填充黑色,所以这里需要将图片添加一个alpha通道,表示透明度
        crop_img2 = crop_img.convert('RGBA')
        bg_img2 = bg_img.convert('RGBA')
        # rotate()默认是逆时针。逆时针旋转theta度
        crop_img_rotated = crop_img2.rotate(theta, expand=True)
        # 计算包含将水平图片绕中心点逆时针旋转后的图片的最大的框的四个顶点坐标
        crop_img_rotated_w, crop_img_rotated_h = crop_img_rotated.width, crop_img_rotated.height
        (x_lt_box, y_lt_box), (x_rt_box, y_rt_box), (x_rb_box, y_rb_box), (x_lb_box,
                                                                           y_lb_box) = compute_coordinate_by_wh(x, y, crop_img_rotated_w, crop_img_rotated_h)
        # 将图片粘贴到包含旋转后的图片的最大的框的左上角
        tmp = Image.new('RGBA', bg_img2.size, (0, 0, 0, 0))
        tmp.paste(bg_img2, (0, 0))
        tmp.paste(crop_img_rotated, (int(x_lt_box), int(y_lt_box)),
                  mask=crop_img_rotated)
        # 将图片转回RGB后,保存为jpg格式
        synth_img = tmp.convert('RGB')
        save_name = str(int(round(time.time() * 1000*1000))) + '.jpg'
        synth_img.save('./synthesis_imgs/' + save_name)

        """ # 绘制原始框和旋转后的框
        draw = ImageDraw.Draw(synth_img)
        draw.polygon([(x_lt, y_lt),
                      (x_rt, y_rt), (x_rb, y_rb), (x_lb, y_lb)], outline='blue')
        draw.polygon([(x_lt_box, y_lt_box),
                      (x_rt_box, y_rt_box), (x_rb_box, y_rb_box), (x_lb_box, y_lb_box)], outline='yellow')
        draw.polygon([(x_lt_rotated, y_lt_rotated),
                      (x_rt_rotated, y_rt_rotated), (x_rb_rotated, y_rb_rotated), (x_lb_rotated, y_lb_rotated)], outline='red')
        synth_img.show() """
        # 生成标签
        with open('./det_label.txt', 'a') as out_file:
            s = get_rec_label('./crop_imgs_label.txt', im)
            # print(s)
            points = []
            points.append([x_lt_rotated, y_lt_rotated])
            points.append([x_rt_rotated, y_rt_rotated])
            points.append([x_rb_rotated, y_rb_rotated])
            points.append([x_lb_rotated, y_lb_rotated])
            result = {"transcription": s, "points": points, "difficult": False}
            out_file.write('./synthesis_imgs/' + save_name + '\t' + json.dumps(
                [result], ensure_ascii=False) + '\n')
        print(f'将裁剪图片{im}逆时针旋转后合成到背景图片{bg_img_lists[random_index]}成功!')
        # break
创作不易,喜欢的话加个关注点个赞,❤谢谢谢谢❤

技术共进,成长同行——讯飞AI开发者社区
更多推荐

 1
1 0
0- 0


 已为社区贡献7条内容

所有评论(0)