
[深度学习]图片的几种读写方式以及相互转换
1)PIL.Image.open(fp,mode='r',formats=None)所属package:Pillow描述:TheImagemodule provides a class with the same name which is used to represent a PIL image.The module also provides a number of factory func
一 读写方式
1)
PIL.Image.open(fp, mode='r', formats=None)
所属package:Pillow
描述:
The Image module provides a class with the same name which is used to represent a PIL image.
The module also provides a number of factory functions, including functions to load images from files, and to create new images.
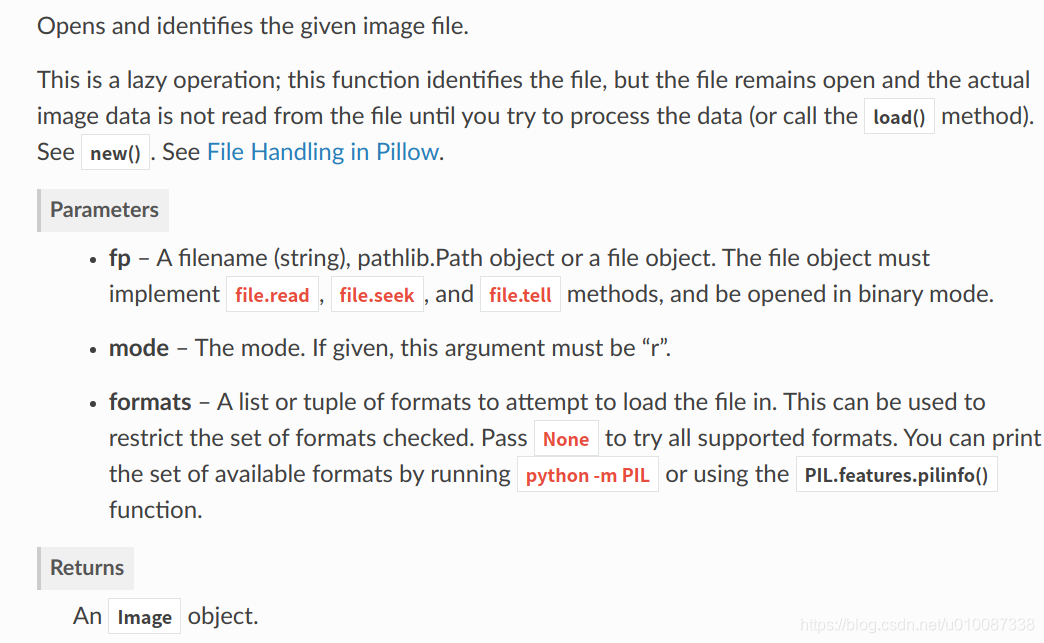
Image.save(fp, format=None, **params)
所属package:Pillow
Parameters:
fp – A filename (string), pathlib.Path object or file object.
format – Optional format override. If omitted, the format to use is determined from the filename extension.
options – Extra parameters to the image writer.
Returns: None
2)
cv2.imread('messi5.jpg',0)
所属package:opencv-python
描述:
读入图像:image=cv2.imread('1.jpg'),得到的image为np的ndarray类型。
cv2.imread(path, flags)
flags:指定以何种方式加载图片,有三个取值:
- cv2.IMREAD_COLOR:读取一副彩色图片,图片的透明度会被忽略,默认为该值,实际取值为1;
- cv2.IMREAD_GRAYSCALE:以灰度模式读取一张图片,实际取值为0
- cv2.IMREAD_UNCHANGED:加载一副彩色图像,透明度不会被忽略。
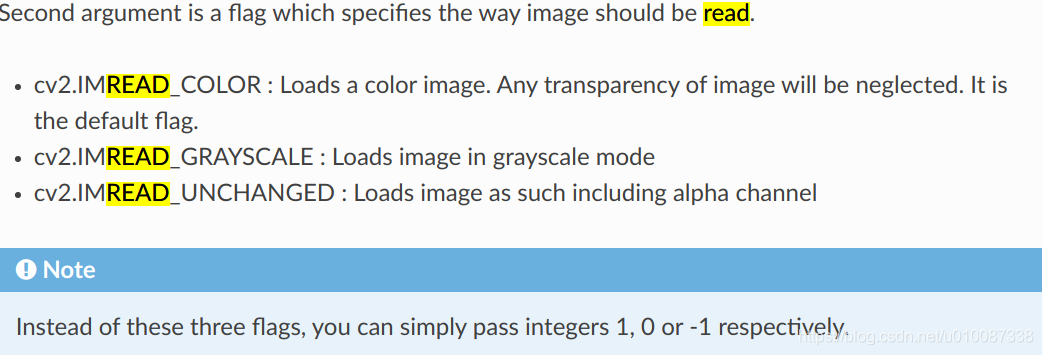
For BGR image, it returns an array of Blue, Green, Red values. For grayscale image, just corresponding intensity is returned.
3)
cv2.imwrite(os.path.join(out_dir, str(index) + '.png'), img)所属package:opencv-python
cv2.imwrite("./cat2.jpg", img, [int(cv2.IMWRITE_JPEG_QUALITY), 5])
cv2.imwrite("./cat3.jpg", img, [int(cv2.IMWRITE_JPEG_QUALITY), 100])
cv2.imwrite("./cat.png", img, [int(cv2.IMWRITE_PNG_COMPRESSION), 0])
cv2.imwrite("./cat2.png", img, [int(cv2.IMWRITE_PNG_COMPRESSION), 9])
对于JPEG,其表示的是图像的质量,用0-100的整数表示,默认为95。 注意,cv2.IMWRITE_JPEG_QUALITY类型为Long,必须转换成int。
对于PNG,第三个参数表示的是压缩级别。cv2.IMWRITE_PNG_COMPRESSION,从0到9,压缩级别越高。默认级别为3。
4)
dlib.load_rgb_image(filename: unicode) → numpy.ndarray[(rows,cols,3),uint8]
所属package:dlib
描述:得到的numpy.ndarray[(rows,cols,3),uint8]形状为(h, w, c) with RGB order.
5)
skimage.io.imread(fname, as_gray=False, plugin=None, **plugin_args)
所属package:scikit-image描述:
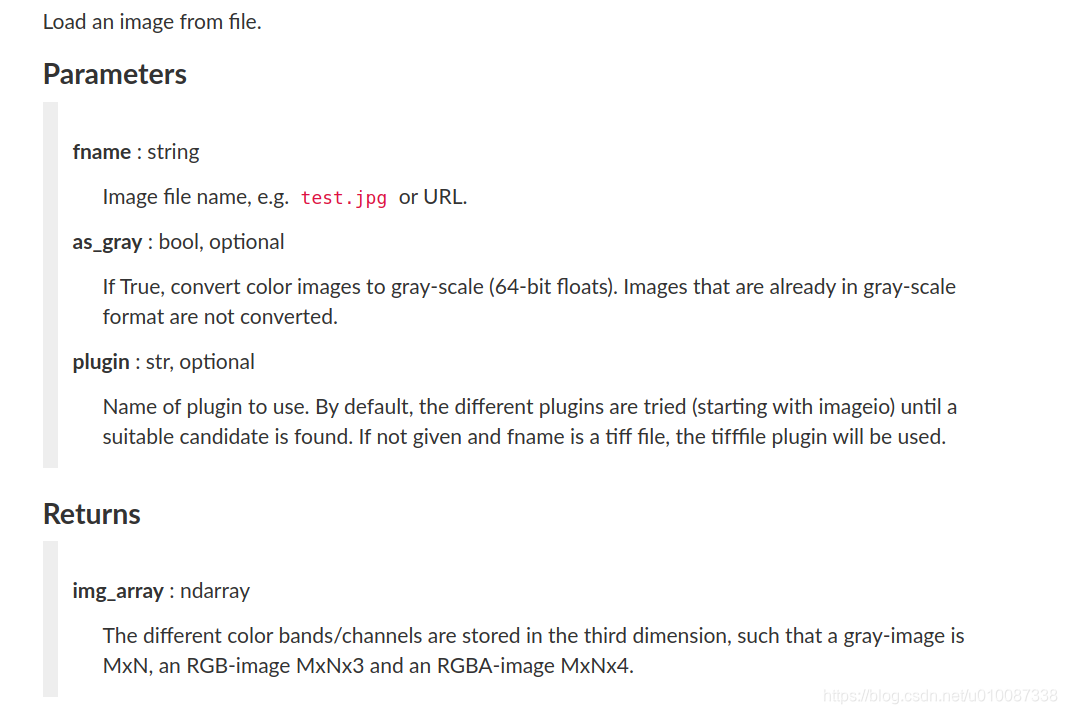
嗯!和dlib.load_rgb_image返回的是同样的东西.
二 PIL和opencv相互转换
好多人都觉得PIL.Image里面提供的函数不够用,喜欢先转换成opencv的image,再操作.
opencv的image也好,dlib的image也好都是numpy数组(ndarray),彩色图像都是 numpy.ndarray[(rows,cols,3)],只不过通道顺序不同,
从opencv的image 到 PIL.Image转换:
 # You may need to convert the color.
img = cv2.cvtColor(img, cv2.COLOR_BGR2RGB)
im_pil = Image.fromarray(img)从PIL.Image到opencv的image的转换:
im = im.convert('RGB')
open_cv_image = np.array(im)
# Convert RGB to BGR
open_cv_image = open_cv_image[:, :, ::-1].copy()
Convert BGR and RGB without using cvtColor()
Converting BGR and RGB can be realized without using cvtColor().
There are several ways, for example, as follows.
im_bgr = cv2.imread('data/src/lena.jpg')

im_rgb = im_bgr[:, :, [2, 1, 0]]
Image.fromarray(im_rgb).save('data/dst/lena_swap.jpg')

im_rgb = im_bgr[:, :, ::-1]
Image.fromarray(im_rgb).save('data/dst/lena_swap_2.jpg')
三 给网络喂数据
torchvision.transforms.ToTensor
想把前面得到的ndarray喂给pytorch网络,必须要将其先转换为tensor
Convert a PIL Image or numpy.ndarray to tensor.
Converts a PIL Image or numpy.ndarray (H x W x C) in the range [0, 255] to a torch.FloatTensor of shape (C x H x W) in the range [0.0, 1.0] if the PIL Image belongs to one of the modes (L, LA, P, I, F, RGB, YCbCr, RGBA, CMYK, 1)
or if the numpy.ndarray has dtype = np.uint8
In the other cases, tensors are returned without scaling.
transform.ToTensor(),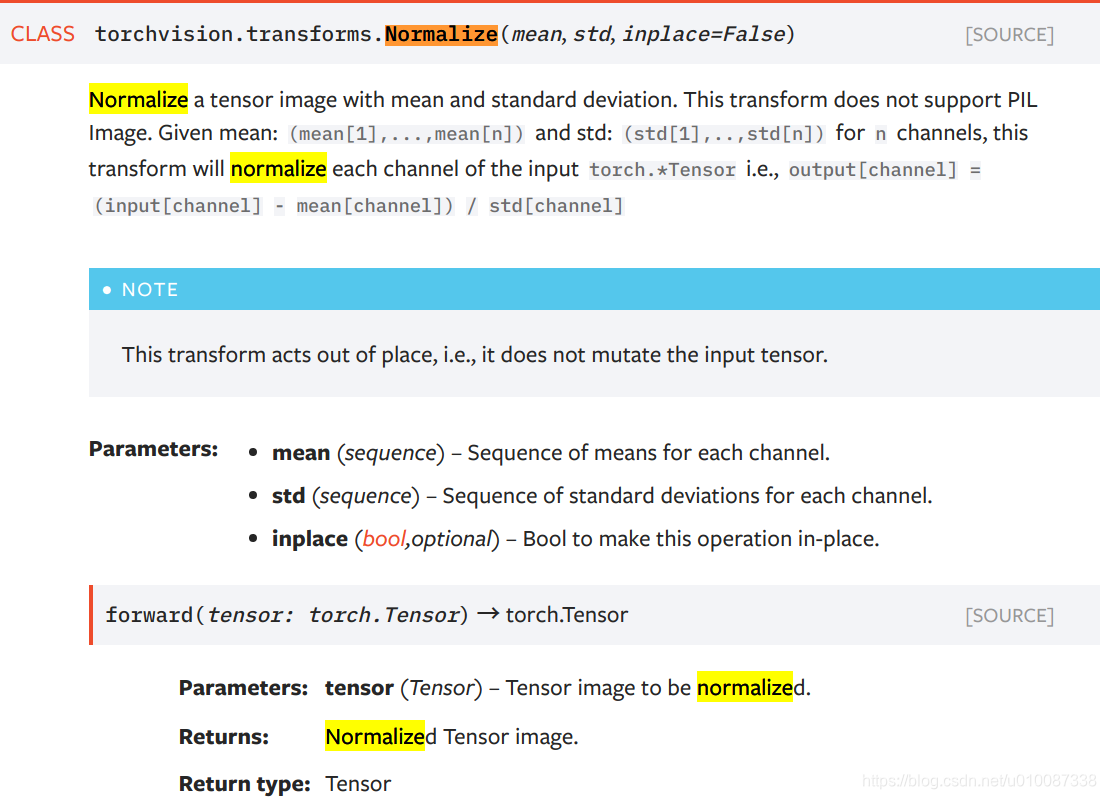
transform.Normalize((0.5,0.5,0.5),(0.5,0.5,0.5))那transform.Normalize()是怎么工作的呢?以上面代码为例,ToTensor()能够把灰度范围从0-255变换到0-1之间,而后面的transform.Normalize()则把0-1变换到(-1,1).具体地说,对每个通道而言,Normalize执行以下操作:
image=(image-mean)/std
其中mean和std分别通过(0.5,0.5,0.5)和(0.5,0.5,0.5)进行指定。原来的0-1最小值0则变成(0-0.5)/0.5=-1,而最大值1则变成(1-0.5)/0.5=1.
再看一眼官方定义就明白了.
好了,得到的normalized tensor,会在神经网络中尽情的flow,一直到流出网络时就是我们想要的结果了.
可是这是的数据仍然是normalized tensor,我们需要把它还原成最初的格式
案例一:
此时的min=-1,max=1,先把tensor变回[0, 1]之间:
_tensor = _tensor.squeeze(0).float().detach().cpu().clamp_(*min_max)
_tensor = (_tensor - min_max[0]) / (min_max[1] - min_max[0])
再通过
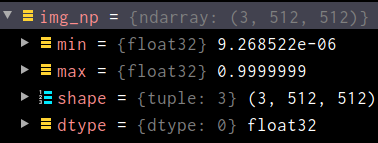
img_np = _tensor.numpy()变为narray,此时它的min为0,max为1 shape为(3, 512, 512)
再经过下面一系列操作变回原图片相同的格式,完毕!
img_np = img_np.transpose(1, 2, 0)
img_np = cv2.cvtColor(img_np, cv2.COLOR_RGB2BGR)
img_np = (img_np * 255.0).round()
img_np = img_np.astype(np.uint8)
案例二:
假如现在的图片是如下格式的tensor,如何还原回RPG图片并输出呢?
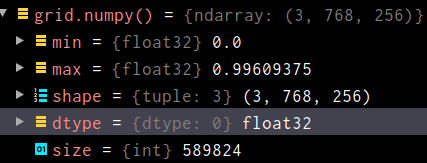
简单:
grid.mul(255).add_(0.5).clamp_(0, 255).permute(1, 2, 0).to('cpu', torch.uint8).numpy()四 normal renormal
normalize = transforms.Normalize(mean = [ 0.485, 0.456, 0.406 ], std = [ 0.229, 0.224, 0.225 ])
---->>>>>
Most easiest way would be:
invTrans = transforms.Compose([ transforms.Normalize(mean = [ 0., 0., 0. ],
                                                     std = [ 1/0.229, 1/0.224, 1/0.225 ]),
                                transforms.Normalize(mean = [ -0.485, -0.456, -0.406 ],
                                                     std = [ 1., 1., 1. ]),
                               ])

inv_tensor = invTrans(inp_tensor)
五 resize
    ratio = expected_pixels / (image.shape[0] * image.shape[1])
    # return cv2.resize(image, (0, 0), fx=ratio, fy=ratio)
    return cv2.resize(image, (0, 0), fx=0.25, fy=0.25)
from PIL import Image
with Image.open("hopper.jpg") as im:
# Provide the target width and height of the image
(width, height) = (im.width // 2, im.height // 2)
im_resized = im.resize((width, height))具体参数如下:
Image.resize() Returns a resized copy of this image.
Syntax: Image.resize(size, resample=0)
Parameters:size – The requested size in pixels, as a 2-tuple: (width, height).
resample – An optional resampling filter. This can be one of PIL.Image.NEAREST (use nearest neighbour), PIL.Image.BILINEAR (linear interpolation), PIL.Image.BICUBIC (cubic spline interpolation), or PIL.Image.LANCZOS (a high-quality downsampling filter). If omitted, or if the image has mode “1” or “P”, it is set PIL.Image.NEAREST.Returns type: An Image object.
六 显示图像
cv2.imshow("lala",image)
cv2.waitKey(0)
waitkey 作用:等待键盘触发事件,释放窗口。
七 色度(通道)转化
灰度转化为彩色:
img = cv2.cvtColor(img, cv2.COLOR_GRAY2BGR)img有二维矩阵变成三维矩阵。前两维表示位置,第三维通道。img[1,1,0],
第一个值表示y或者行,第二个值表示x或者列。第三个表示通道。
八 crop
def crop_center(img,cropx,cropy):
    y,x,c = img.shape
    startx = x//2 - cropx//2
    starty = y//2 - cropy//2
    return img[starty:starty+cropy, startx:startx+cropx, :]

技术共进,成长同行——讯飞AI开发者社区
更多推荐

 1
1 0
0- 0


 已为社区贡献7条内容

所有评论(0)