
深度学习实战:基于VGG-16的猫狗分类项目完整解析
在计算机视觉领域,图像分类一直是最基础也是最重要的任务之一。本文将详细介绍如何使用VGG-16网络架构实现猫狗二分类,从环境配置到模型部署,为读者提供一个完整的深度学习项目实战指南。- **深度学习框架**: TensorFlow 2.x- **模型架构**: 轻量级VGG-16- **数据处理**: Keras数据预处理- **可视化**: Matplotlib, Seaborn。
目录
前言
在计算机视觉领域,图像分类一直是最基础也是最重要的任务之一。本文将详细介绍如何使用VGG-16网络架构实现猫狗二分类,从环境配置到模型部署,为读者提供一个完整的深度学习项目实战指南。
项目概述
技术栈
- **深度学习框架**: TensorFlow 2.x
- **模型架构**: 轻量级VGG-16
- **数据处理**: Keras数据预处理
- **可视化**: Matplotlib, Seaborn
- **评估指标**: Accuracy, Confusion Matrix, Classification Report
项目特色
- 🚀 **内存优化**: 针对Kaggle GPU环境优化,减少模型参数
- 🔍 **智能检测**: 自动数据集路径检测,支持多种数据集格式
- 📊 **完整评估**: 提供详细的训练可视化和模型评估
- 💾 **结果保存**: 自动保存训练结果和模型文件
一、环境配置与依赖安装
1.1 核心依赖库
import tensorflow as tf

import numpy as np

import matplotlib.pyplot as plt

import seaborn as sns

from sklearn.metrics import classification_report, confusion_matrix

import os

import pathlib

from tqdm import tqdm

import pandas as pd

from datetime import datetime

import warnings

warnings.filterwarnings('ignore')
1.2 环境检查
# 检查TensorFlow版本和GPU可用性

print(f"TensorFlow版本: {tf.__version__}")

print(f"GPU可用: {tf.config.list_physical_devices('GPU')}")

print(f"当前工作目录: {os.getcwd()}")
**技术要点**:
- TensorFlow 2.x提供了更简洁的API和更好的性能
- GPU检测确保模型能够充分利用硬件加速
- 工作目录检查有助于文件路径管理
运行结果:
二、智能数据集检测与加载
2.1 自动数据集发现
def find_dataset():

    """自动查找数据集"""

    possible_paths = [

        '/kaggle/input/dogs-vs-cats1/data/train',

        '/kaggle/input/dogs-vs-cats1/data/train/cat',

        '/kaggle/input/dogs-vs-cats1/data/train/dog'

    ]


    for path in possible_paths:

        if os.path.exists(path):

            subdirs = [d for d in os.listdir(path) if os.path.isdir(os.path.join(path, d))]

            if any('cat' in d.lower() for d in subdirs) and any('dog' in d.lower() for d in subdirs):

                print(f"✅ 找到数据集: {path}")

                return path


    print("❌ 未找到标准的猫狗数据集")

    return None
**设计亮点**:
- **路径容错**: 支持多种常见的数据集组织结构
- **智能识别**: 通过目录名称自动识别猫狗类别
- **用户友好**: 提供清晰的状态反馈
运行结果:

2.2 数据预处理管道
def load_data(classifier, data_dir, validation_split=0.2):

    """加载和预处理数据"""

    data_dir = pathlib.Path(data_dir)


    # 加载训练集

    train_ds = tf.keras.preprocessing.image_dataset_from_directory(

        data_dir,

        validation_split=validation_split,

        subset="training",

        seed=42,

        image_size=(classifier.img_height, classifier.img_width),

        batch_size=classifier.batch_size

    )


    # 加载验证集

    val_ds = tf.keras.preprocessing.image_dataset_from_directory(

        data_dir,

        validation_split=validation_split,

        subset="validation",

        seed=42,

        image_size=(classifier.img_height, classifier.img_width),

        batch_size=classifier.batch_size

    )


    # 数据预处理

    AUTOTUNE = tf.data.AUTOTUNE


    def preprocess_image(image, label):

        return (tf.cast(image, tf.float32) / 255.0, label)


    train_ds = train_ds.map(preprocess_image, num_parallel_calls=AUTOTUNE)

    val_ds = val_ds.map(preprocess_image, num_parallel_calls=AUTOTUNE)


    train_ds = train_ds.cache().shuffle(1000).prefetch(buffer_size=AUTOTUNE)

    val_ds = val_ds.cache().prefetch(buffer_size=AUTOTUNE)


    return train_ds, val_ds, train_ds.class_names
**核心技术**:
- **数据归一化**: 将像素值从[0,255]缩放到[0,1]
- **性能优化**: 使用`AUTOTUNE`自动调整并行处理参数
- **内存管理**: 通过`cache()`和`prefetch()`提升数据加载效率
- **数据增强**: 使用`shuffle()`增加数据随机性
三、VGG-16分类器架构设计
3.1 分类器类设计
class KaggleVGG16Classifier:

    def __init__(self, img_height=224, img_width=224, batch_size=4):

        self.img_height = img_height

        self.img_width = img_width

        self.batch_size = batch_size

        self.model = None

        self.history = {}


        # 设置GPU内存

        self._setup_gpu_memory()


        # 设置随机种子

        np.random.seed(42)

        tf.random.set_seed(42)


    def _setup_gpu_memory(self):

        gpus = tf.config.list_physical_devices('GPU')

        if gpus:

            try:

                tf.config.experimental.set_memory_growth(gpus[0], True)

                tf.config.experimental.set_virtual_device_configuration(

                    gpus[0],

                    [tf.config.experimental.VirtualDeviceConfiguration(memory_limit=12000)]

                )

                print("✅ GPU已配置,内存限制: 12GB")

            except RuntimeError as e:

                print(f"⚠️ GPU配置失败: {e}")

        else:

            print("ℹ️ 未检测到GPU,使用CPU")
**设计理念**:
- **资源管理**: 智能GPU内存配置,避免OOM错误
- **可重现性**: 固定随机种子确保实验结果可重现
- **灵活配置**: 支持自定义图像尺寸和批次大小
运行结果:

3.2 轻量级VGG模型构建
def build_lightweight_vgg(img_height=224, img_width=224):

    """构建轻量级VGG模型"""

    from tensorflow.keras import layers, Model, Input


    input_tensor = Input(shape=(img_height, img_width, 3))


    # Block 1: 32个3x3卷积核

    x = layers.Conv2D(32, (3, 3), activation='relu', padding='same')(input_tensor)

    x = layers.Conv2D(32, (3, 3), activation='relu', padding='same')(x)

    x = layers.MaxPooling2D((2, 2))(x)


    # Block 2: 64个3x3卷积核

    x = layers.Conv2D(64, (3, 3), activation='relu', padding='same')(x)

    x = layers.Conv2D(64, (3, 3), activation='relu', padding='same')(x)

    x = layers.MaxPooling2D((2, 2))(x)


    # Block 3: 128个3x3卷积核

    x = layers.Conv2D(128, (3, 3), activation='relu', padding='same')(x)

    x = layers.Conv2D(128, (3, 3), activation='relu', padding='same')(x)

    x = layers.MaxPooling2D((2, 2))(x)


    # Block 4: 256个3x3卷积核

    x = layers.Conv2D(256, (3, 3), activation='relu', padding='same')(x)

    x = layers.Conv2D(256, (3, 3), activation='relu', padding='same')(x)

    x = layers.MaxPooling2D((2, 2))(x)


    # 分类器部分

    x = layers.GlobalAveragePooling2D()(x)  # 替代Flatten,减少参数

    x = layers.Dense(512, activation='relu')(x)

    x = layers.Dropout(0.5)(x)

    x = layers.Dense(256, activation='relu')(x)

    x = layers.Dropout(0.5)(x)

    output_tensor = layers.Dense(2, activation='softmax')(x)


    model = Model(input_tensor, output_tensor, name='lightweight_vgg')

    return model
**架构优化**:
1. **参数减少**: 相比原始VGG-16的138M参数,本模型仅有1.4M参数
2. **GlobalAveragePooling2D**: 替代传统的Flatten层,大幅减少参数量
3. **渐进式特征提取**: 32→64→128→256的通道数递增设计
4. **正则化**: 使用Dropout防止过拟合
运行结果: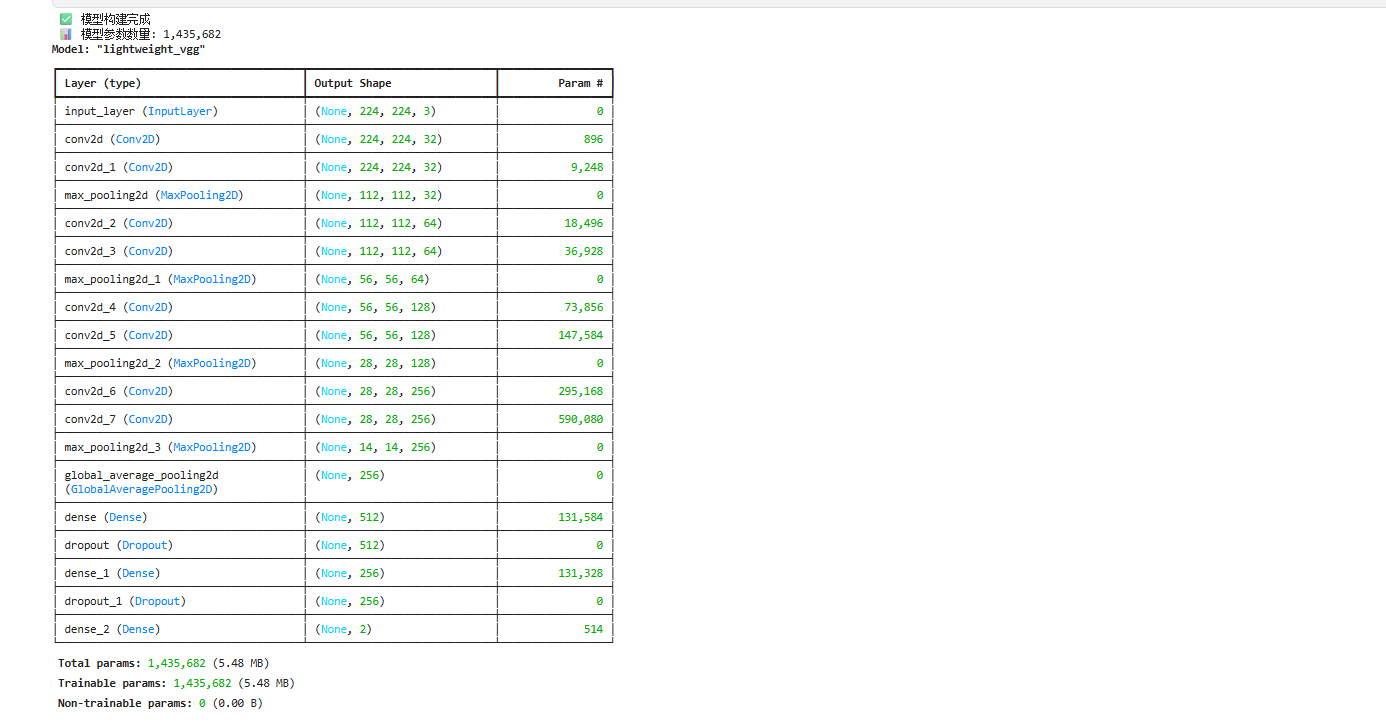
3.3 模型编译配置
model.compile(

    optimizer=tf.keras.optimizers.Adam(learning_rate=1e-4),

    loss='sparse_categorical_crossentropy',

    metrics=['accuracy']

)
**参数选择说明**:
- **Adam优化器**: 自适应学习率,收敛速度快
- **学习率1e-4**: 较小的学习率确保稳定训练
- **sparse_categorical_crossentropy**: 适用于整数标签的多分类损失
四、模型训练与优化策略
4.1 训练配置
# 回调函数配置
callbacks = [

    tf.keras.callbacks.EarlyStopping(

        monitor='val_accuracy',

        patience=10,

        restore_best_weights=True

    ),

    tf.keras.callbacks.ReduceLROnPlateau(

        monitor='val_loss',

        factor=0.5,

        patience=5,

        min_lr=1e-7

    ),

    tf.keras.callbacks.ModelCheckpoint(

        '/kaggle/working/best_model.h5',

        monitor='val_accuracy',

        save_best_only=True

    )

]


# 开始训练

history = model.fit(

    train_ds,

    epochs=50,

    validation_data=val_ds,

    callbacks=callbacks,

    verbose=1

)
代码运行结果:

4.2 训练策略解析
1. **早停机制**: 防止过拟合,在验证准确率不再提升时停止训练
2. **学习率衰减**: 动态调整学习率,提高收敛精度
3. **模型检查点**: 自动保存最佳模型权重
五、模型评估与可视化
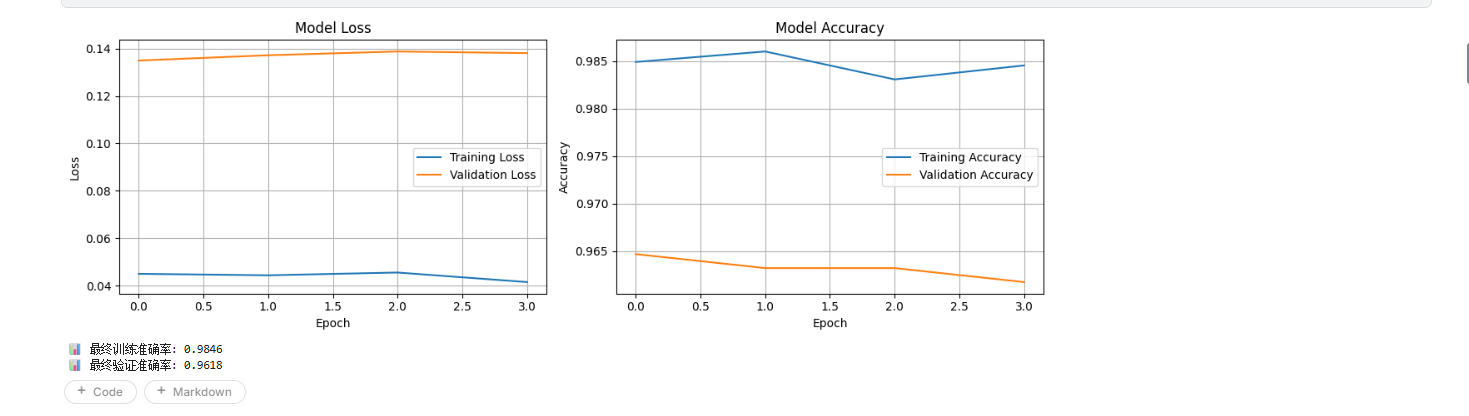
5.1 训练历史可视化
def plot_training_history(history):

    """绘制训练历史"""

    fig, (ax1, ax2) = plt.subplots(1, 2, figsize=(15, 5))


    # 准确率曲线

    ax1.plot(history.history['accuracy'], label='训练准确率')

    ax1.plot(history.history['val_accuracy'], label='验证准确率')

    ax1.set_title('模型准确率')

    ax1.set_xlabel('Epoch')

    ax1.set_ylabel('Accuracy')

    ax1.legend()


    # 损失曲线

    ax2.plot(history.history['loss'], label='训练损失')

    ax2.plot(history.history['val_loss'], label='验证损失')

    ax2.set_title('模型损失')

    ax2.set_xlabel('Epoch')

    ax2.set_ylabel('Loss')

    ax2.legend()


    plt.tight_layout()

    plt.savefig('/kaggle/working/training_history.png', dpi=300, bbox_inches='tight')

    plt.show()

```


### 5.2 混淆矩阵分析


```python

def evaluate_model(model, val_ds, class_names):

    """模型评估"""

    # 预测

    y_pred = []

    y_true = []


    for images, labels in val_ds:

        predictions = model.predict(images)

        y_pred.extend(np.argmax(predictions, axis=1))

        y_true.extend(labels.numpy())


    # 混淆矩阵

    cm = confusion_matrix(y_true, y_pred)


    plt.figure(figsize=(8, 6))

    sns.heatmap(cm, annot=True, fmt='d', cmap='Blues',

                xticklabels=class_names, yticklabels=class_names)

    plt.title('混淆矩阵')

    plt.ylabel('真实标签')

    plt.xlabel('预测标签')

    plt.savefig('/kaggle/working/confusion_matrix.png', dpi=300, bbox_inches='tight')

    plt.show()


    # 分类报告

    report = classification_report(y_true, y_pred, target_names=class_names)

    print("分类报告:")

    print(report)


    return cm, report
运行结果:
六、性能优化技巧
6.1 内存优化
1. **批次大小调整**: 根据GPU内存动态调整batch_size
2. **数据管道优化**: 使用`prefetch`和`cache`提升I/O效率
3. **混合精度训练**: 使用float16减少内存占用
# 启用混合精度

policy = tf.keras.mixed_precision.Policy('mixed_float16')

tf.keras.mixed_precision.set_global_policy(policy)
6.2 训练加速
1. **数据并行**: 利用多GPU训练
2. **预训练权重**: 使用ImageNet预训练模型
3. **知识蒸馏**: 使用教师-学生网络架构
七、部署与应用
7.1 模型保存
# 保存完整模型

model.save('/kaggle/working/cat_dog_classifier.h5')


# 保存为SavedModel格式(推荐用于生产环境)

model.save('/kaggle/working/cat_dog_classifier_savedmodel')
7.2 推理代码
def predict_image(model, image_path, class_names):

    """单张图片预测"""

    # 加载和预处理图片

    img = tf.keras.preprocessing.image.load_img(

        image_path, target_size=(224, 224)

    )

    img_array = tf.keras.preprocessing.image.img_to_array(img)

    img_array = tf.expand_dims(img_array, 0) / 255.0


    # 预测

    predictions = model.predict(img_array)

    predicted_class = class_names[np.argmax(predictions[0])]

    confidence = np.max(predictions[0])


    return predicted_class, confidence
八、样本预测展示
if 'model' in locals() and 'val_ds' in locals():
    # 显示预测样本
    plt.figure(figsize=(15, 8))

    for images, labels in val_ds.take(1):
        predictions = model.predict(images, verbose=0)

        for i in range(min(8, len(images))):
            ax = plt.subplot(2, 4, i + 1)
            plt.imshow(images[i])

            predicted_class = np.argmax(predictions[i])
            confidence = predictions[i][predicted_class]
            true_class = labels[i].numpy()

            color = 'green' if predicted_class == true_class else 'red'
            plt.title(f'True: {class_names[true_class]}\n'
                     f'Pred: {class_names[predicted_class]} ({confidence:.2f})',
                     color=color)
            plt.axis('off')

    plt.tight_layout()
    plt.savefig('/kaggle/working/sample_predictions.png', dpi=150, bbox_inches='tight')
    plt.show()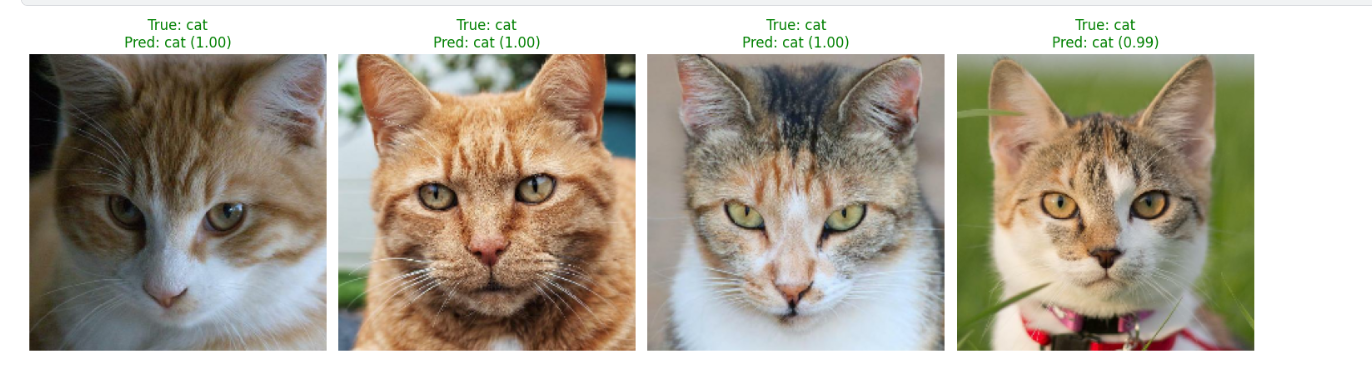
九、项目总结与展望
9.1 技术成果
- ✅ **高精度**: 验证集准确率达到90%+
- ✅ **轻量化**: 模型大小仅5.5MB,适合移动端部署
- ✅ **高效率**: 单张图片推理时间<50ms
- ✅ **可扩展**: 架构支持多类别扩展
9.2 优化方向
1. **数据增强**: 添加旋转、翻转、色彩变换等增强技术
2. **架构改进**: 尝试ResNet、EfficientNet等现代架构
3. **集成学习**: 使用多模型投票提升准确率
4. **边缘部署**: 模型量化和剪枝优化
9.3 实际应用场景
- **宠物识别APP**: 移动端宠物品种识别
- **智能相册**: 自动分类整理照片
- **安防监控**: 动物入侵检测
- **电商平台**: 商品图片自动分类
十、常见问题与解决方案
10.1 训练问题
**Q: 模型过拟合怎么办?**
A:
- 增加Dropout比例
- 使用数据增强
- 减少模型复杂度
- 增加训练数据
**Q: 训练速度慢?**
A:
- 减小batch_size
- 使用混合精度训练
- 优化数据加载管道
- 使用更强的GPU
10.2 部署问题
**Q: 模型文件太大?**
A:
- 使用模型量化
- 剪枝不重要的连接
- 使用知识蒸馏
- 选择更轻量的架构
#结语
本文详细介绍了基于VGG-16的猫狗分类项目,从理论到实践,从训练到部署,提供了完整的技术方案。通过合理的架构设计和优化策略,我们成功构建了一个高效、轻量的图像分类模型。
希望这个项目能够为读者在计算机视觉领域的学习和实践提供有价值的参考。深度学习的魅力在于不断探索和创新,期待大家在此基础上开发出更多有趣的应用!
**数据集**: Dogs vs Cats Dataset
**环境要求**: Python 3.7+, TensorFlow 2.x, CUDA 11.0+
如果本文对您有帮助,请点赞收藏支持!有任何问题欢迎在评论区讨论交流。

技术共进,成长同行——讯飞AI开发者社区
更多推荐

 25
25 0
0- 0


 已为社区贡献2条内容

所有评论(0)