
基于python语言dlib库和opencv库的视频眨眼检测
基于python的视频眨眼检测。
·
功能说明:
基于python编程语言,使用dlib 和opencv开发的视频眨眼检测。
环境:
* python 3.6.8
* opencv 3.4.2.16
* dlib 19.7.0
原理:
1.使用opencv-python读取处理视频图像
2.使用线程机制处理人脸检测关键点
3.根据dlib算法检测到的关键点计算眼部特征,通过欧氏距离计算确定是睁眼还是闭眼
4.统计闭眼次数并在视频图片中绘制结果
原始代码:
# 基于opencv-python和dlib库的视频眨眼检测

# 导入工具包
from scipy.spatial import distance as dist
from collections import OrderedDict
import numpy as np
import argparse
import time
# pip install dlib==19.6.1 -i https://mirrors.aliyun.com/pypi/simple
import dlib
# pip install opencv-python==3.4.1
import cv2

# 关键点排序
FACIAL_LANDMARKS_68_IDXS = OrderedDict([
    ("mouth", (48, 68)),
    ("right_eyebrow", (17, 22)),
    ("left_eyebrow", (22, 27)),
    ("right_eye", (36, 42)),
    ("left_eye", (42, 48)),
    ("nose", (27, 36)),
    ("jaw", (0, 17))
])


# http://vision.fe.uni-lj.si/cvww2016/proceedings/papers/05.pdf
def eye_aspect_ratio(eye):
    """
    计算眼睛上下关键点欧式距离
    :param eye:眼睛关键点位置
    :return: 眼睛睁开程度
    """
    # 计算距离,竖直的
    A = dist.euclidean(eye[1], eye[5])
    B = dist.euclidean(eye[2], eye[4])
    # 计算距离,水平的
    C = dist.euclidean(eye[0], eye[3])
    # ear值
    ear = (A + B) / (2.0 * C)
    return ear


# 输入参数
ap = argparse.ArgumentParser()
ap.add_argument("-p", "--shape-predictor", required=True,
                help="path to facial landmark predictor")
ap.add_argument("-v", "--video", type=str, default="",
                help="path to input video file")
args = vars(ap.parse_args())
print(args)
# 设置判断参数
EYE_AR_THRESH = 0.3 # 低于该值则判断为眨眼
EYE_AR_CONSEC_FRAMES = 3

# 初始化计数器
COUNTER = 0
TOTAL = 0

# 检测与定位工具
print("[INFO] loading facial landmark predictor...")
detector = dlib.get_frontal_face_detector()
#predictor = dlib.shape_predictor(args["shape_predictor"])
predictor = dlib.shape_predictor('shape_predictor_68_face_landmarks.dat')
# 分别取两个眼睛区域
(lStart, lEnd) = FACIAL_LANDMARKS_68_IDXS["left_eye"]
(rStart, rEnd) = FACIAL_LANDMARKS_68_IDXS["right_eye"]

# 读取视频
print("[INFO] starting video stream thread...")
#vs = cv2.VideoCapture(args["video"])
vs = cv2.VideoCapture(0)
#vs = FileVideoStream(args["video"]).start()
time.sleep(1.0)


def shape_to_np(shape, dtype="int"):
    # 创建68*2
    coords = np.zeros((shape.num_parts, 2), dtype=dtype)
    # 遍历每一个关键点
    # 得到坐标
    for i in range(0, shape.num_parts):
        coords[i] = (shape.part(i).x, shape.part(i).y)
    return coords


# 遍历每一帧
while True:
    # 预处理
    frame = vs.read()[1]
    if frame is None:
        break

    (h, w) = frame.shape[:2]
    width = 1200
    r = width / float(w)
    dim = (width, int(h * r))
    frame = cv2.resize(frame, dim, interpolation=cv2.INTER_AREA)
    gray = cv2.cvtColor(frame, cv2.COLOR_BGR2GRAY)

    # 检测人脸
    rects = detector(gray, 0)

    # 遍历每一个检测到的人脸
    for rect in rects:
        # 获取坐标
        shape = predictor(gray, rect)
        shape = shape_to_np(shape)

        # 分别计算ear值
        leftEye = shape[lStart:lEnd]
        rightEye = shape[rStart:rEnd]
        leftEAR = eye_aspect_ratio(leftEye)
        rightEAR = eye_aspect_ratio(rightEye)

        # 算一个平均的
        ear = (leftEAR + rightEAR) / 2.0

        # 绘制眼睛区域
        leftEyeHull = cv2.convexHull(leftEye)
        rightEyeHull = cv2.convexHull(rightEye)
        cv2.drawContours(frame, [leftEyeHull], -1, (0, 255, 0), 1)
        cv2.drawContours(frame, [rightEyeHull], -1, (0, 255, 0), 1)

        # 检查是否满足阈值
        if ear < EYE_AR_THRESH:
            COUNTER += 1

        else:
            # 如果连续几帧都是闭眼的,总数算一次
            if COUNTER >= EYE_AR_CONSEC_FRAMES:
                TOTAL += 1

            # 重置
            COUNTER = 0

        # 显示
        cv2.putText(frame, "Blinks: {}".format(TOTAL), (10, 30),
                    cv2.FONT_HERSHEY_SIMPLEX, 0.7, (0, 0, 255), 2)
        cv2.putText(frame, "EAR: {:.2f}".format(ear), (300, 30),
                    cv2.FONT_HERSHEY_SIMPLEX, 0.7, (0, 0, 255), 2)

    cv2.imshow("Frame", frame)
    key = cv2.waitKey(10) & 0xFF

    if key == 27:
        break

vs.release()
cv2.destroyAllWindows()
运行该代码进行调用摄像头检测和读取本地视频检测的命令如下:
python detect_blinks.py -p shape_predictor_68_face_landmarks.dat -v test.mp4
python detect_blinks.py -p shape_predictor_68_face_landmarks.dat -v 0
原始代码需要借助于命令行参数才可以运行,后来经过修改后,可以直接在编译器中运行的,代码如下:
# 视频眨眼检测
# 导入工具包
from scipy.spatial import distance as dist
from collections import OrderedDict
import numpy as np
import argparse
import time
# pip install dlib==19.6.1 -i https://mirrors.aliyun.com/pypi/simple
import dlib
# pip install opencv-python==3.4.1
import cv2

# 关键点排序
FACIAL_LANDMARKS_68_IDXS = OrderedDict([
    ("mouth", (48, 68)),
    ("right_eyebrow", (17, 22)),
    ("left_eyebrow", (22, 27)),
    ("right_eye", (36, 42)),
    ("left_eye", (42, 48)),
    ("nose", (27, 36)),
    ("jaw", (0, 17))
])


# http://vision.fe.uni-lj.si/cvww2016/proceedings/papers/05.pdf
def eye_aspect_ratio(eye):
    """
    计算眼睛上下关键点欧式距离
    :param eye:眼睛关键点位置
    :return: 眼睛睁开程度
    """
    # 计算距离,竖直的
    A = dist.euclidean(eye[1], eye[5])
    B = dist.euclidean(eye[2], eye[4])
    # 计算距离,水平的
    C = dist.euclidean(eye[0], eye[3])
    # ear值
    ear = (A + B) / (2.0 * C)
    return ear

# 设置判断参数
EYE_AR_THRESH = 0.3 # 低于该值则判断为眨眼
EYE_AR_CONSEC_FRAMES = 3

# 初始化计数器
COUNTER = 0
TOTAL = 0

# 检测与定位工具
print("[INFO] loading facial landmark predictor...")
detector = dlib.get_frontal_face_detector()
predictor = dlib.shape_predictor('shape_predictor_68_face_landmarks.dat')

# 分别取两个眼睛区域
(lStart, lEnd) = FACIAL_LANDMARKS_68_IDXS["left_eye"]
(rStart, rEnd) = FACIAL_LANDMARKS_68_IDXS["right_eye"]

# 读取视频
print("[INFO] starting video stream thread...")
vs = cv2.VideoCapture(0)
time.sleep(1.0)


def shape_to_np(shape, dtype="int"):
    # 创建68*2
    coords = np.zeros((shape.num_parts, 2), dtype=dtype)
    # 遍历每一个关键点
    # 得到坐标
    for i in range(0, shape.num_parts):
        coords[i] = (shape.part(i).x, shape.part(i).y)
    return coords


# 遍历每一帧
while True:
    # 预处理
    frame = vs.read()[1]
    if frame is None:
        break

    (h, w) = frame.shape[:2]
    width = 1200
    r = width / float(w)
    dim = (width, int(h * r))
    frame = cv2.resize(frame, dim, interpolation=cv2.INTER_AREA)
    gray = cv2.cvtColor(frame, cv2.COLOR_BGR2GRAY)

    # 检测人脸
    rects = detector(gray, 0)

    # 遍历每一个检测到的人脸
    for rect in rects:
        # 获取坐标
        shape = predictor(gray, rect)
        shape = shape_to_np(shape)

        # 分别计算ear值
        leftEye = shape[lStart:lEnd]
        rightEye = shape[rStart:rEnd]
        leftEAR = eye_aspect_ratio(leftEye)
        rightEAR = eye_aspect_ratio(rightEye)

        # 算一个平均的
        ear = (leftEAR + rightEAR) / 2.0

        # 绘制眼睛区域
        leftEyeHull = cv2.convexHull(leftEye)
        rightEyeHull = cv2.convexHull(rightEye)
        cv2.drawContours(frame, [leftEyeHull], -1, (0, 255, 0), 1)
        cv2.drawContours(frame, [rightEyeHull], -1, (0, 255, 0), 1)

        # 检查是否满足阈值
        if ear < EYE_AR_THRESH:
            COUNTER += 1

        else:
            # 如果连续几帧都是闭眼的,总数算一次
            if COUNTER >= EYE_AR_CONSEC_FRAMES:
                TOTAL += 1

            # 重置
            COUNTER = 0

        # 显示
        cv2.putText(frame, "Blinks: {}".format(TOTAL), (10, 30),
                    cv2.FONT_HERSHEY_SIMPLEX, 0.7, (0, 0, 255), 2)
        cv2.putText(frame, "EAR: {:.2f}".format(ear), (300, 30),
                    cv2.FONT_HERSHEY_SIMPLEX, 0.7, (0, 0, 255), 2)

    cv2.imshow("Frame", frame)
    key = cv2.waitKey(10) & 0xFF

    if key == 27:
        break

vs.release()
cv2.destroyAllWindows()
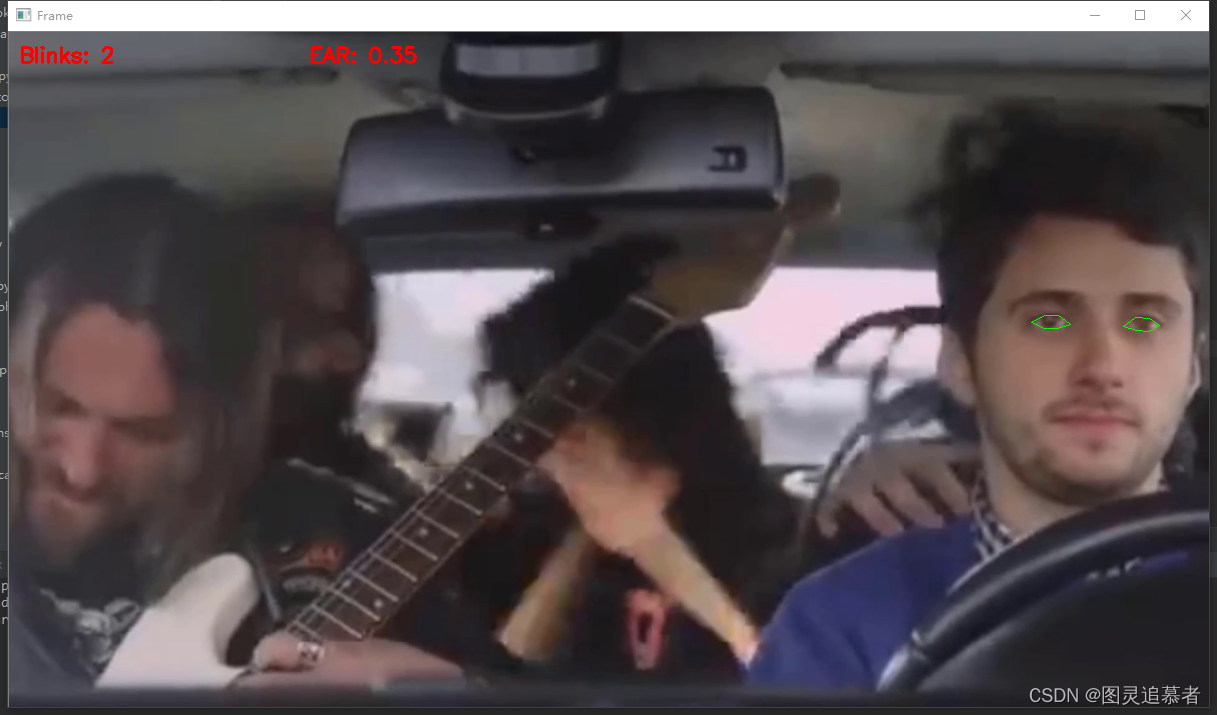
检测效果如下:
下载链接:https://mp.csdn.net/mp_download/manage/download/UpDetailed

技术共进,成长同行——讯飞AI开发者社区
更多推荐


 0
0 0
0- 0


 已为社区贡献16条内容

所有评论(0)