
实战:Spring AI Alibaba + Redis:搞定多轮对话持久化的 Hello World(附全部代码)
在AI浪潮席卷下,Java开发迎来巨变。SpringAI与阿里巴巴AI(SpringAiAlibaba)横空出世,为Java程序员打开智能应用开发大门。多轮对话持久化作为核心功能之一,资料却极为稀缺。今天,我将深入剖析Spring AI Alibaba项目中基于Redis实现多轮对话持久化的全过程,助你掌握这一关键技能。从环境搭建到代码实现,从序列化配置到对话管理,每一步都折腾了我很久。完整代码呈
一、概述
在AI技术浪潮的推动下,Java开发领域正经历着深刻的变革。Spring AI 与阿里巴巴 AI(Spring AI Alibaba)的推出,为Java开发者打开了智能应用开发的大门。多轮对话持久化作为智能应用开发中的核心功能之一,目前相关资料却极为稀缺。
今天,我将深入剖析 Spring AI Alibaba 项目中基于 Redis 实现多轮对话持久化的全过程,帮助大家掌握这一关键技能。从环境搭建到代码实现,从序列化配置到对话管理,每一步都经过反复验证,确保清晰易懂。
完整代码已整理呈现,您可以直接上手,快速验证效果,避免踩坑。
二、依赖
- 开发工具:推荐使用最新版本的 IntelliJ IDEA,以获得更好的兼容性和功能支持。
- JDK:17 及以上版本,IDEA 自带的 JDK 安装方便,配置简单。
- 阿里云百炼平台:百炼平台(提供强大的 AI 模型支持和训练服务)。
- 如果在基础环境搭建方面遇到困难,可以参考我之前分享的一篇文章,里面详细介绍了搭建步骤:一起学习 Spring AI Alibaba项目
- Redis:熟悉的朋友可以自行安装,不熟悉的朋友也可以通过网上教程轻松完成。后续我也会整理一份基于 AI 学习的环境搭建文档。
三、代码结构
│─src
│    └─main
│        ├─java
│        │  └─com
│        │      └─niubi
│        │          └─hello
│        │              └─alibaba
│        │                  │  HelloSpringAiApplication.java
│        │                  │
│        │                  ├─common
│        │                  │      ChatEntity.java
│        │                  │      ChatInit.java
│        │                  │      ChatRedisMemory.java
│        │                  │      RedisConfig.java
│        │                  │
│        │                  └─controller
│        │                          ChatRedisController.java
│        │
│        └─resources
│                application.yml
│
└─ pom.xml
四、流程:
1. 创建消息实体(ChatEntity.java)
@NoArgsConstructor
@AllArgsConstructor
@Data
public class ChatEntity implements Serializable {
    String chatId;
    String type;
    String text;
}
说明:定义了消息实体类,用于存储对话的 ID、类型和内容,实现了序列化接口以便在 Redis 中存储。
2. Redis配置类(RedisConfig.java)
接下来,创建 RedisConfig 类,对 RedisTemplate 进行个性化配置。
@Configuration
public class RedisConfig {

    @Bean
    public RedisTemplate<String, Object> redisTemplate(RedisConnectionFactory factory) {
        RedisTemplate<String, Object> redisTemplate = new RedisTemplate<>();
        redisTemplate.setConnectionFactory(factory);
        redisTemplate.setKeySerializer(new StringRedisSerializer());
        redisTemplate.setValueSerializer(new Jackson2JsonRedisSerializer<>(Object.class));
        redisTemplate.setHashKeySerializer(new StringRedisSerializer());
        redisTemplate.setHashValueSerializer(new Jackson2JsonRedisSerializer<>(Object.class));
        redisTemplate.afterPropertiesSet();
        return redisTemplate;
    }
}
说明:配置了 RedisTemplate,使用 JSON 序列化器将对象存储为 JSON 格式,方便后续的存储和读取。
3. 实现 Redis 聊天记忆模型(ChatRedisMemory.java)
创建 ChatRedisMemory 类来实现 ChatMemory 的 Redis 模型。
@Slf4j
@Component
public class ChatRedisMemory implements ChatMemory {

    private static final String KEY_PREFIX = "chat:history:";
    private final RedisTemplate<String, Object> redisTemplate;

    public ChatRedisMemory(RedisTemplate<String, Object> redisTemplate) {
        this.redisTemplate = redisTemplate;
    }

    @Override
    public void add(String conversationId, List<Message> messages) {
        String key = KEY_PREFIX + conversationId;
        List<ChatEntity> listIn = new ArrayList<>();
        for (Message msg : messages) {
            String[] strs = msg.getText().split("</think>");
            String text = strs.length == 2 ? strs[1] : strs[0];

            ChatEntity ent = new ChatEntity();
            ent.setChatId(conversationId);
            ent.setType(msg.getMessageType().getValue());
            ent.setText(text);
            listIn.add(ent);
        }
        redisTemplate.opsForList().rightPushAll(key, listIn.toArray());
        redisTemplate.expire(key, 30, TimeUnit.MINUTES);
    }

    @Override
    public List<Message> get(String conversationId, int lastN) {
        String key = KEY_PREFIX + conversationId;
        Long size = redisTemplate.opsForList().size(key);
        if (size == null || size == 0) {
            return Collections.emptyList();
        }

        int start = Math.max(0, (int) (size - lastN));
        List<Object> listTmp = redisTemplate.opsForList().range(key, start, -1);
        List<Message> listOut = new ArrayList<>();
        ObjectMapper objectMapper = new ObjectMapper();
        for (Object obj : listTmp) {
            ChatEntity chat = objectMapper.convertValue(obj, ChatEntity.class);
            if (MessageType.USER.getValue().equals(chat.getType())) {
                listOut.add(new UserMessage(chat.getText()));
            } else if (MessageType.ASSISTANT.getValue().equals(chat.getType())) {
                listOut.add(new AssistantMessage(chat.getText()));
            } else if (MessageType.SYSTEM.getValue().equals(chat.getType())) {
                listOut.add(new SystemMessage(chat.getText()));
            }
        }
        return listOut;
    }

    @Override
    public void clear(String conversationId) {
        redisTemplate.delete(KEY_PREFIX + conversationId);
    }
}
说明:实现了 Redis 中的对话记忆功能,包括添加对话、获取对话历史和清除对话记录。
4. 注入类(ChatInit.java)
@Configuration
@RequiredArgsConstructor
public class ChatInit {

    @Autowired
    private ChatModel chatModel;

    @Bean
    public ChatClient chatClient(ChatMemory chatMemory) {
        return ChatClient.builder(chatModel)
                .defaultSystem("你是个高级助理,习惯回答问题用1、2、3...的条列式回答")
                .build();
    }

    @Bean
    public ChatMemory chatMemory(RedisTemplate<String, Object> redisTemplate) {
        return new ChatRedisMemory(redisTemplate);
    }
}
说明:通过 Spring 的依赖注入机制,将 Redis 聊天记忆模型与 ChatClient 进行绑定,确保对话记忆功能能够正常工作。
5. 编写核心控制器(ChatRedisController.java)
最后,编写最重要的 ChatRedisController 文件。
@Slf4j
@RestController
@RequestMapping("/ai/v1")
public class ChatRedisController {

    @Autowired
    private ChatClient chatClient;
    @Autowired
    private ChatMemory chatMemory;

    // 对话记忆长度
    private final Integer CHAT_HISTORY_SIZE = 10;

    @GetMapping(value = "/redis/chat")
    public String chat(@RequestParam String userId, @RequestParam String inputMsg) {

        log.info("/redis/chat  userId: [{}],  input:  [{}]", userId, inputMsg);

        String text = chatClient.prompt()
                .user(inputMsg)
                .advisors(new MessageChatMemoryAdvisor(chatMemory, userId, CHAT_HISTORY_SIZE))
                .call()
                .content();
        log.info("text --> [{}]", text);
        return text;
    }
}
说明:定义了对外的 API 接口,通过 ChatClient 和 ChatMemory 实现了多轮对话的处理逻辑,并将对话内容持久化到 Redis 中。
5. 启动类与配置文件
为了保证完整性,把启动类 HelloSpringAiApplication 也贴出来。
@EnableCaching
@SpringBootApplication
public class HelloSpringAiApplication {

    public static void main(String[] args) {
        SpringApplication.run(HelloSpringAiApplication.class, args);
    }
}
说明:Spring Boot 启动类,开启了缓存支持。
配置文件 application.yml 也一样,给大家看看。
server:
  port: 8080
spring:
  application:
    name: Hello-AI
  data:
    redis:
      host: 192.168.0.110
      port: 6579
      password: xxxxxxxxxxxxx
      database: 0
  ai:
    dashscope:
      # 注意这个是使用阿里云百炼平台的 API-KEY
      api-key: sk-xxxxxxxxxxxxxxxxxxxxxxxxx
      model: qwen-turbo
说明:配置了 Redis 的连接信息以及阿里云百炼平台的 API-KEY,确保项目能够正常运行。
6. 项目构建文件
既然都到这里了,那 pom.xml 文件也贴出来吧。
<properties>
    <java.version>23</java.version>
    <project.build.sourceEncoding>UTF-8</project.build.sourceEncoding>
    <project.reporting.outputEncoding>UTF-8</project.reporting.outputEncoding>
    <!-- 自定义依赖版本 -->
    <spring-boot.version>3.4.3</spring-boot.version>
    <alibaba.ai.version>1.0.0-M6.1</alibaba.ai.version>
    <spring.ai.ollama.version>1.0.0-M6</spring.ai.ollama.version>
    <commons-lang3.version>3.17.0</commons-lang3.version>
    <maven.compiler.version>3.11.0</maven.compiler.version>
</properties>

<!-- 依赖声明 -->
<dependencies>
    <!-- Spring Boot基础依赖 -->
    <dependency>
        <groupId>org.springframework.boot</groupId>
        <artifactId>spring-boot-starter-web</artifactId>
        <version>${spring-boot.version}</version>
    </dependency>
    <dependency>
        <groupId>org.springframework.boot</groupId>
        <artifactId>spring-boot-starter-data-redis</artifactId>
        <version>${spring-boot.version}</version>
    </dependency>
    <dependency>
        <groupId>com.alibaba.cloud.ai</groupId>
        <artifactId>spring-ai-alibaba-starter</artifactId>
        <version>${alibaba.ai.version}</version>
    </dependency>
    <dependency>
        <groupId>org.apache.commons</groupId>
        <artifactId>commons-lang3</artifactId>
        <version>${commons-lang3.version}</version>
    </dependency>
    <dependency>
        <groupId>org.projectlombok</groupId>
        <artifactId>lombok</artifactId>
        <optional>true</optional>
    </dependency>
</dependencies>
<!-- 构建配置 -->
<build>
    <plugins>
        <!-- 编译器插件 -->
        <plugin>
            <groupId>org.apache.maven.plugins</groupId>
            <artifactId>maven-compiler-plugin</artifactId>
            <version>${maven.compiler.version}</version>
            <configuration>
                <release>${java.version}</release>
                <annotationProcessorPaths>
                    <path>
                        <groupId>org.projectlombok</groupId>
                        <artifactId>lombok</artifactId>
                        <version>1.18.32</version>
                    </path>
                </annotationProcessorPaths>
            </configuration>
        </plugin>

        <!-- Spring Boot打包插件 -->
        <plugin>
            <groupId>org.springframework.boot</groupId>
            <artifactId>spring-boot-maven-plugin</artifactId>
            <configuration>
                <excludes>
                    <exclude>
                        <groupId>org.projectlombok</groupId>
                        <artifactId>lombok</artifactId>
                    </exclude>
                </excludes>
            </configuration>
        </plugin>
    </plugins>
</build>

<!-- 仓库配置 -->
<repositories>
    <repository>
        <id>alimaven</id>
        <name>aliyun maven</name>
        <url>https://maven.aliyun.com/repository/public</url>
        <releases>
            <enabled>true</enabled>
        </releases>
        <snapshots>
            <enabled>false</enabled> <!-- 按需启用快照 -->
        </snapshots>
    </repository>
    <repository>
        <id>spring-milestones</id>
        <name>Spring Milestones</name>
        <url>https://repo.spring.io/milestone</url>
        <snapshots>
            <enabled>false</enabled>
        </snapshots>
    </repository>
</repositories>
说明:定义了项目的依赖和构建配置,确保项目能够正确编译和运行。
五、验证时刻
为了验证效果,项目编译好之后,启动服务,我们测试一下。
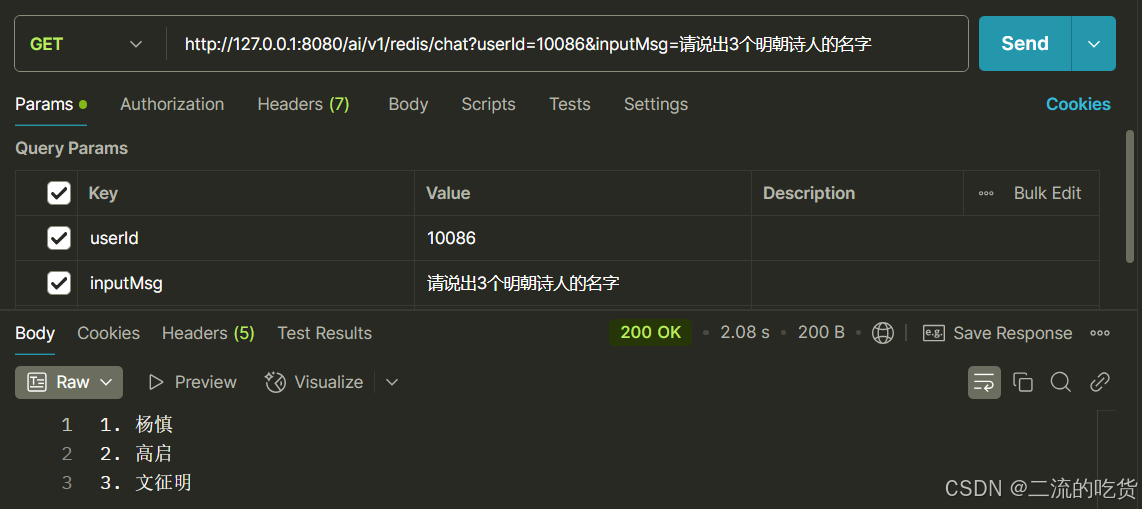
根据 controller 中提供的接口:
http://127.0.0.1:8080/ai/v1/redis/chat?userId=10086&input=
第一轮对话:请说出3个明朝诗人的名字
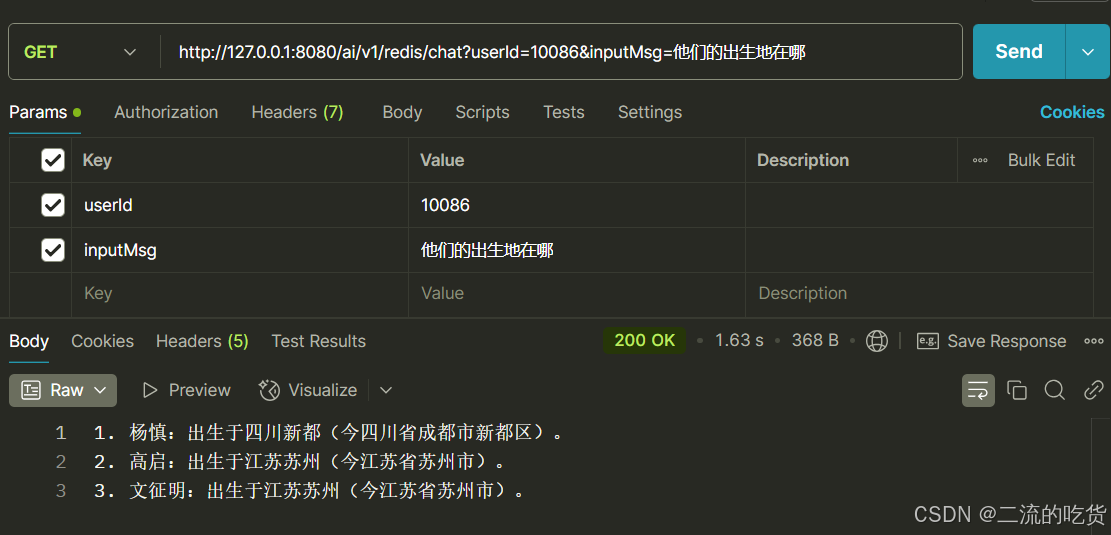
第二轮对话:他们的出生地在哪
第三轮对话:这些地方曾经出过哪些美女
此时,我们也看看 Redis 的存储吧,指令:
LRANGE chat:history:10086 0 -1
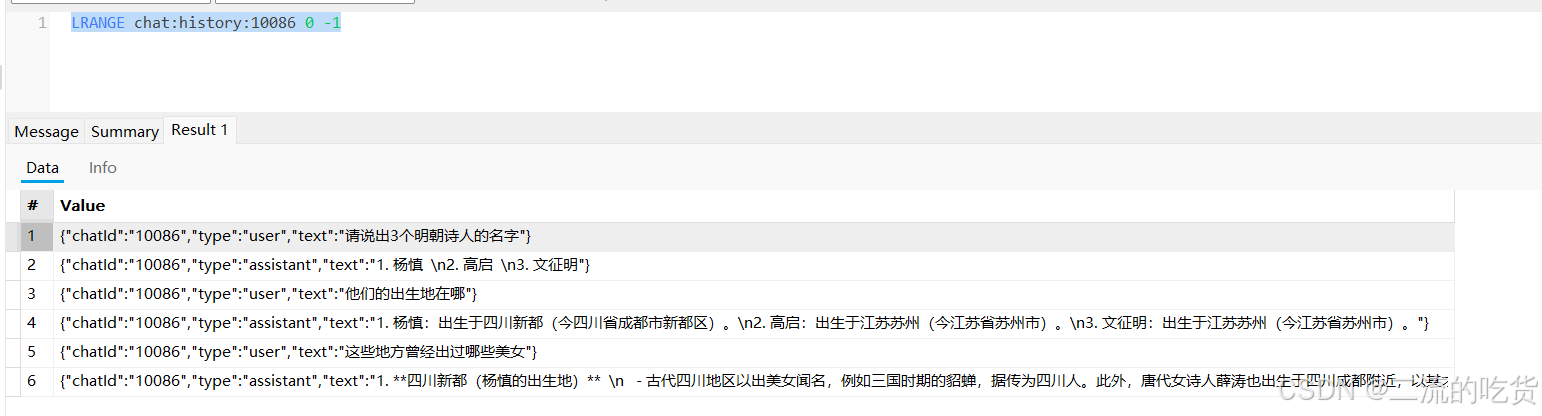
从测试结果来看,对话内容已经成功持久化到 Redis 中,多轮对话功能实现得相当不错。
六、补充点内容
本次分享聚焦“可持久化的多轮对话”,以 Redis 为示例,实现对话记录的长期保存。当然,这一功能也可以拓展至数据库等其他存储方式。这一功能是智能应用开发的关键基石,有了它,搭配前端项目,就能借助阿里百炼开启大模型开发之路。
未来,我会持续探索 Spring AI Alibaba 项目的更多功能,不断更新学习成果。若您在学习过程中有任何疑问、建议,或想交流心得,欢迎随时在评论区留言,您的支持和反馈是我前进的最大动力。

技术共进,成长同行——讯飞AI开发者社区
更多推荐

 34
34 0
0- 0


 已为社区贡献4条内容

所有评论(0)