
2 图片的分割处理和亚像素精度处理(c++和python)
本文的图片处理分为图片分割、图像的亚像素坐标处理。亚像素处理的原理可以看论文,该论文的详解及c++的代码实现可以看博文。下面的内容很多来自以上博文的内容,我只是对部分代码做了稍微的修改。
本文的图片处理分为图片分割、图像的亚像素坐标处理。亚像素处理的原理可以看论文一种基于多项式插值改进的亚像素细分算法,该论文的详解及c++的代码实现可以看博文基于多项式插值的亚像素边缘定位算法_基于多项式插值的亚像素算法-CSDN博客。下面的内容很多来自以上博文的内容,我只是对部分代码做了稍微的修改。
注意,前三部分是亚像素的理论和c++的代码实现,第四部分是python的代码实现。
一. 背景
在测量或者定位的应用中会涉及到边缘检测, 但是像 OpenCV 这样的开源库中边缘检测算法的精度在像素级别, 比如 Canny, Sobel blablabla. 要想提高精度就需要用到 亚像素 的技术, 在不改变硬件成本的前提下提高检测精度。
二、代码实现(龟速版)
1.梯度幅值
梯度检测包含幅值和方向,用8个方向模板在检测图像上进行卷积运算(模板滑过的地方的像素值和模板中对应的值相乘, 最后全部加总), 得到 8 张梯度图像, 方向模板如下. 模板的方向就是和 X 轴的夹角。
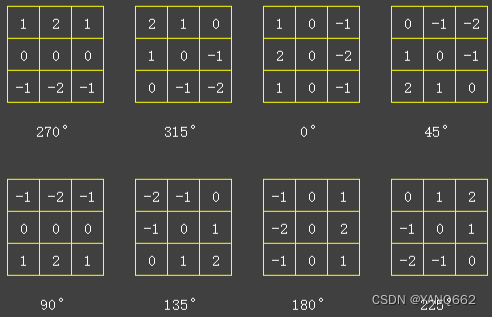
以下代码生成 8 个方向模板
#include<opencv2/opencv.hpp>
#include <opencv2/highgui/highgui.hpp>
#include <iostream>
#include<list>
#include<vector>
#include <typeinfo>


using namespace cv;
using namespace std;


#define KERNEL_SUM 8

Mat kernels[KERNEL_SUM];

int k = 0;
kernels[k++] = (Mat_<float>(3, 3) <<  1,  2,  1,  0,  0,  0, -1, -2, -1);	// 270°
kernels[k++] = (Mat_<float>(3, 3) <<  2,  1,  0,  1,  0, -1,  0, -1, -2);	// 315°
kernels[k++] = (Mat_<float>(3, 3) <<  1,  0, -1,  2,  0, -2,  1,  0, -1);	// 0°
kernels[k++] = (Mat_<float>(3, 3) <<  0, -1, -2,  1,  0, -1,  2,  1,  0);	// 45°

flip(kernels[0], kernels[k++], 0);											// 90°

kernels[k++] = (Mat_<float>(3, 3) << -2, -1,  0, -1,  0,  1,  0,  1,  2);	// 135°

flip(kernels[2], kernels[k++], 1);											// 180°

kernels[k++] = (Mat_<float>(3, 3) <<  0,  1,  2, -1,  0,  1, -2, -1,  0);	// 225°
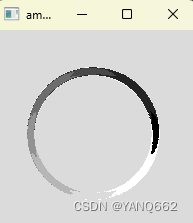
接下来利用模板卷积生成梯度图像, 假设要检测的图像长下面这个样, 边缘是模糊的
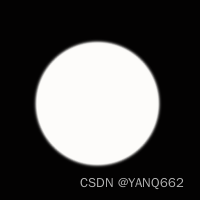
利用 filter2D 函数计算梯度
// 梯度图像
Mat gradients[KERNEL_SUM];
// 检测图像, 路径自己更改, 注意要是单通道图像
Mat imgsrc = imread("E:\\vs\\daima\\opencvs\\OpencvPractice\\1.jpg");//IMREAD_ANYCOLOR

for (int k = 0; k < KERNEL_SUM; k++)
{
    filter2D(imgsrc, gradients[k], CV_16S, kernels[k]);// CV_64F    //

    Mat imgshowt;
    normalize(gradients[k], imgshowt, 0, 255, NORM_MINMAX);
    cv::Mat rlt;
    imgshowt.convertTo(rlt, CV_8UC1);//将imgshowt转换为无符号单通道的整型并赋值给rlt  CV_8UC1
    cvtColor(rlt, gradients[k], cv::COLOR_BGR2GRAY);//将rlt转换为灰度图并赋值给gradients[k]

    imshow("img", rlt);
    waitKey(0);
}注意,这里和前面博文的代码稍有不同,因为原图像是3通道的图像(我在前面博文截取了个圆的图片用来处理),在以上代码中用filter2D函数后将处理的图片修改为了单通道图片,并且显示了8个卷积核处理的不同图片,结果如下(截取了前博文的图片,但效果相同):
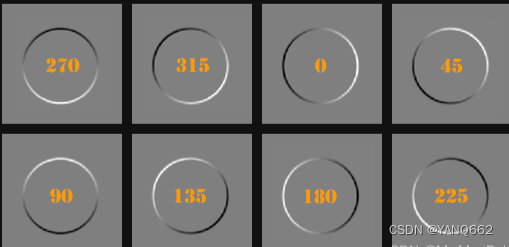
从图中可以看出各模板可以检测出指定方向的边缘, 其中白色表示该方向最大梯度值, 黑色表示反向最大梯度值。
梯度幅值最大值处的点就是边缘的整数坐标。
2. 梯度方向
梯度方向指向梯度幅值最大的方向, 现在已经有 8 张幅值图像, 只要比较其中最大的幅值即可得到其方向, 例如第 0 张梯度图像在 (i, j) 处的幅值比其他图像都大, 则 (i, j) 点的梯度方向是 270°. 下面我们用代码求出最大幅度值和方向。
//2. 梯度方向
// (1. 角度列表
const short angle_list[] = { 270, 315, 0, 45, 90, 135, 180, 225 };
// (2. 总幅值矩阵
Mat amplitude(imgsrc.rows, imgsrc.cols, CV_8UC1, Scalar::all(0));
// (3. 角度矩阵, 后面初始化成 -64 只是为了归一化之后能显示角度 0
Mat angle(imgsrc.rows, imgsrc.cols, CV_16SC1, Scalar::all(-64));//CV_16SC1 -64
for (int r = 0; r < imgsrc.rows; r++)
{
short* pAng = angle.ptr<short>(r);
for (int c = 0; c < imgsrc.cols; c++)
{
// 找出最大值
for (int i = 0; i < KERNEL_SUM; i++)
{
if (amplitude.ptr<unsigned char>(r)[c] < gradients[i].ptr<unsigned char>(r)[c])
{
amplitude.ptr<unsigned char>(r)[c] = gradients[i].ptr<unsigned char>(r)[c];
pAng[c] = angle_list[i];
}
}
}
}
Mat imgshow;
imshow("amplitude", amplitude);
imwrite("D:\Datas\\1.jpg",amplitude);
waitKey(0);
normalize(angle, imgshow, 0, 255, NORM_MINMAX);
imgshow.convertTo(imgshow, CV_8UC1);
imshow("amplitude", imgshow);
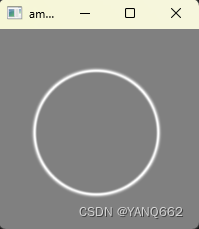
waitKey(0);完成之后显示幅值和角度图像如下:
3. 单像素边缘
以上的方式处理的图像边缘是比较粗的,那么我们如何将边缘的粗细提取成单像素呢,就是找最亮的像素点作为边缘。这个也比较简单, 只要在 3 × 3 的邻域中根据梯度的方向比较中心点 “左右” 的两个点幅值就可以知道了. 左右我打了引号, 有可能是在对角方向和上下方向. 如果不能理解的话, 把幅值图放大如下, 仿佛看到了马赛克

我们发现在梯度方向幅值从小到大, 再变小, 我们只需要判断中间是否大于两边(“左右”)的幅值,如果同时大于两边,则是边缘点, 如果不是同时大于两边, 则不是边缘点, 下面用代码实现此判断。
 // 3.单像素边缘,整数坐标边缘图像
 //cout << "===============> start 单像素边缘 <================" << endl;
 Mat edge(imgsrc.rows, imgsrc.cols, CV_8UC1, Scalar::all(0));

 for (int r = 1; r < imgsrc.rows - 1; r++)
 {
     // 3 * 3 邻域, 所以用 3 个指针, 一个指针指一行
     const unsigned char* pAmp1 = amplitude.ptr<unsigned char>(r - 1);
     const unsigned char* pAmp2 = amplitude.ptr<unsigned char>(r);
     const unsigned char* pAmp3 = amplitude.ptr<unsigned char>(r + 1);

     const short* pAng = angle.ptr<short>(r);
     unsigned char* pEdge = edge.ptr<unsigned char>(r);

     for (int c = 1; c < imgsrc.cols - 1; c++)
     {
         switch (pAng[c])
         {
         case 270:
             if (pAmp2[c] > pAmp1[c] && pAmp2[c] >= pAmp3[c])
             {
                 pEdge[c] = 255;
             }
             break;
         case 90:
             if (pAmp2[c] >= pAmp1[c] && pAmp2[c] > pAmp3[c])
             {
                 pEdge[c] = 255;
             }
             break;

         case 315:
             if (pAmp2[c] > pAmp1[c - 1] && pAmp2[c] >= pAmp3[c + 1])
             {
                 pEdge[c] = 255;
             }
             break;
         case 135:
             if (pAmp2[c] >= pAmp1[c - 1] && pAmp2[c] > pAmp3[c + 1])
             {
                 pEdge[c] = 255;
             }
             break;

         case 0:
             if (pAmp2[c] > pAmp2[c - 1] && pAmp2[c] >= pAmp2[c + 1])
             {
                 pEdge[c] = 255;
             }
             break;
         case 180:
             if (pAmp2[c] >= pAmp2[c - 1] && pAmp2[c] > pAmp2[c + 1])
             {
                 pEdge[c] = 255;
             }
             break;

         case 45:
             if (pAmp2[c] >= pAmp1[c + 1] && pAmp2[c] > pAmp3[c - 1])
             {
                 pEdge[c] = 255;
             }
             break;
         case 225:
             if (pAmp2[c] > pAmp1[c + 1] && pAmp2[c] >= pAmp3[c - 1])
             {
                 pEdge[c] = 255;
             }
             break;

         default:
             break;
         }
     }
 }
 imshow("edg", edge);//总共有462个点为255(白色)
 waitKey(0);

 //cout << "===============> end 单像素边缘 <================" << endl;
该代码得到的图片显示结果如下:
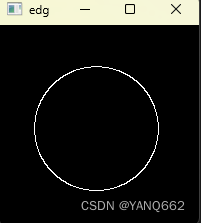
现在的边缘是不是只有一个像素宽了, 到这里可以算是完成了 50% 工作了, 还有两个问题需要解决, 一是如何求出亚像素坐标, 二是怎样表示亚像素坐标
4. 亚像素坐标
根据以下公式可计算亚像素坐标, 其实这个公式是二次多项式拟合(剪切前面博文的内容)
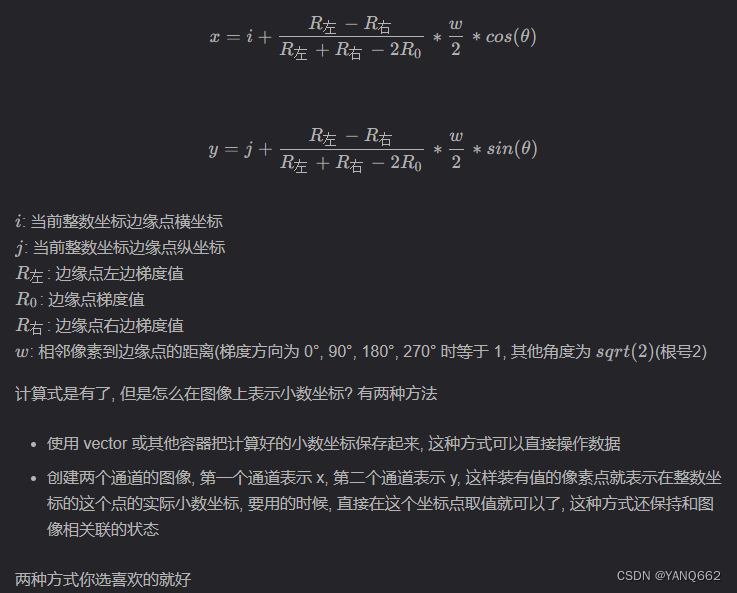
下面代码中, sin 前面的负号非常关键, 因为图像的 y 方向和直角坐标系的 y 方向相反
// 4. 亚像素坐标
cout << "===============> start 亚像素坐标 <================" << endl;

// 根号2
const double root2 = sqrt(2.0);
// 三角函数表
double tri_list[2][KERNEL_SUM] = { 0 };

for (int i = 0; i < KERNEL_SUM; i++)
{
    tri_list[0][i] = cos(angle_list[i] * CV_PI / 180.0);
    // sin前面的负号非常关键, 因为图像的y方向和直角坐标系的y方向相反
    tri_list[1][i] = -sin(angle_list[i] * CV_PI / 180.0);

}

// vector 方式记录小数坐标
vector<Point3f> vPts;
// Mat 方式记录小数坐标, 注意这里是双通道
Mat coordinate(imgsrc.rows, imgsrc.cols, CV_32FC2, Scalar::all(0));

for (int r = 1; r < imgsrc.rows - 1; r++)
{
    // 3 * 3 邻域, 所以用3个指针, 一个指针指一行
    const short* pAmp1 = amplitude.ptr<short>(r - 1);
    const short* pAmp2 = amplitude.ptr<short>(r);
    const short* pAmp3 = amplitude.ptr<short>(r + 1);

    const short* pAng = angle.ptr<short>(r);
    const short* pEdge = edge.ptr<short>(r);

    float* pCoordinate = coordinate.ptr<float>(r);

    for (int c = 1; c < imgsrc.cols - 1; c++)
    {
        if (pEdge[c])
        {
            int nAngTmp = 0;
            double dTmp = 0;

            switch (pAng[c])
            {
            case 270:
                nAngTmp = 0;
                dTmp = ((double)pAmp1[c] - pAmp3[c]) / (pAmp1[c] + pAmp3[c] - 2 * pAmp2[c] + 0.000001) * 0.5;
                break;

            case 90:
                nAngTmp = 4;
                dTmp = -((double)pAmp1[c] - pAmp3[c]) / (pAmp1[c] + pAmp3[c] - 2 * pAmp2[c] + 0.000001) * 0.5;
                break;

            case 315:
                nAngTmp = 1;
                dTmp = ((double)pAmp1[c - 1] - pAmp3[c + 1]) / (pAmp1[c - 1] + pAmp3[c + 1] - 2 * pAmp2[c] + 0.000001) * root2 * 0.5;
                break;

            case 135:
                nAngTmp = 5;
                dTmp = -((double)pAmp1[c - 1] - pAmp3[c + 1]) / (pAmp1[c - 1] + pAmp3[c + 1] - 2 * pAmp2[c] + 0.000001) * root2 * 0.5;
                break;

            case 0:
                nAngTmp = 2;
                dTmp = ((double)pAmp2[c - 1] - pAmp2[c + 1]) / (pAmp2[c - 1] + pAmp2[c + 1] - 2 * pAmp2[c] + 0.000001) * 0.5;
                break;

            case 180:
                nAngTmp = 6;
                dTmp = -((double)pAmp2[c - 1] - pAmp2[c + 1]) / (pAmp2[c - 1] + pAmp2[c + 1] - 2 * pAmp2[c] + 0.000001) * 0.5;
                break;

            case 45:
                nAngTmp = 3;
                dTmp = ((double)pAmp3[c - 1] - pAmp1[c + 1]) / (pAmp1[c + 1] + pAmp3[c - 1] - 2 * pAmp2[c] + 0.000001) * root2 * 0.5;
                break;

            case 225:
                nAngTmp = 7;
                dTmp = -((double)pAmp3[c - 1] - pAmp1[c + 1]) / (pAmp1[c + 1] + pAmp3[c - 1] - 2 * pAmp2[c] + 0.000001) * root2 * 0.5;
                break;

            default:
                break;
            }

            const double x = c + dTmp * tri_list[0][nAngTmp];
            const double y = r + dTmp * tri_list[1][nAngTmp];
            const short z = angle_list[nAngTmp];
            //cout << dTmp<< "    "<< tri_list[0][nAngTmp]<<"   "<< dTmp * tri_list[0][nAngTmp] << endl;

            // vector方式
            vPts.push_back(Point3f((float)x, (float)y, (short)z));

            // Mat 方式
            pCoordinate[c << 1] = (float)x;
            pCoordinate[(c << 1) + 1] = (float)y;
        }
    }
}

//cout << "" << vPts.size() << endl;//总共有462个点为255(白色)
//for (size_t i = 0; i < vPts.size(); i++)
//{
//    cout << vPts[i].z << ":    " << vPts[i].x << ",    " << vPts[i].y <<endl;
//}

cout << "===============> end 亚像素坐标 <================" << endl;
return 0;注意,以上代码大家要了解为什么不同角度下加减不同,了解这个很重要。

三、龟速测试
至此, 龟速版本的代码已经完成了, 找一张其他图像试试? 找 lena 来试试。
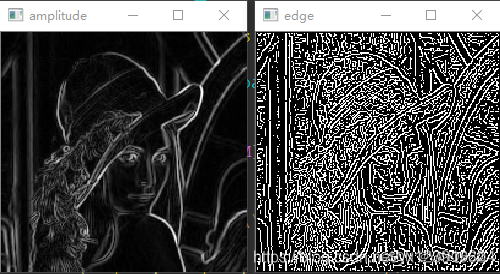
看到边缘图像有的同学可能要伤心了, 女神怎么变成这样了, 那么多边缘被检测出来了, 我们不需要那么多边缘啊. 同学别急, 检测出来那么多边缘是因为我们没有对梯度幅度进行筛选, 你想一下, 我们在计算单像素边缘的时候只要满足中间大于两边就算边缘, 女神图像中有一些中间只比两边大了一点点, 所以这种边缘可以去除, 我们想要的是比较强烈的边缘,解决办法就是设定一个阈值, 当梯度值大于阈值是才算真正的边缘。
将单像素边缘检测修改如下:
// 3.单像素边缘,整数坐标边缘图像
//cout << "===============> start 单像素边缘 <================" << endl;

// 阈值
double thres = 128;	// 此处为增加

Mat edge(imgsrc.rows, imgsrc.cols, CV_8UC1, Scalar::all(0));

for (int r = 1; r < imgsrc.rows - 1; r++)
{
    // 3 * 3 邻域, 所以用 3 个指针, 一个指针指一行
    const unsigned char* pAmp1 = amplitude.ptr<unsigned char>(r - 1);
    const unsigned char* pAmp2 = amplitude.ptr<unsigned char>(r);
    const unsigned char* pAmp3 = amplitude.ptr<unsigned char>(r + 1);

    const short* pAng = angle.ptr<short>(r);
    unsigned char* pEdge = edge.ptr<unsigned char>(r);

    for (int c = 1; c < imgsrc.cols - 1; c++)
    {

        // 以下判断为增加部分
		if (pAmp2[c] < thres)
		{
			continue;
		}
		//

        switch (pAng[c])
        {
        case 270:
            if (pAmp2[c] > pAmp1[c] && pAmp2[c] >= pAmp3[c])
            {
                pEdge[c] = 255;
            }
            break;
        case 90:
            if (pAmp2[c] >= pAmp1[c] && pAmp2[c] > pAmp3[c])
            {
                pEdge[c] = 255;
            }
            break;

        case 315:
            if (pAmp2[c] > pAmp1[c - 1] && pAmp2[c] >= pAmp3[c + 1])
            {
                pEdge[c] = 255;
            }
            break;
        case 135:
            if (pAmp2[c] >= pAmp1[c - 1] && pAmp2[c] > pAmp3[c + 1])
            {
                pEdge[c] = 255;
            }
            break;

        case 0:
            if (pAmp2[c] > pAmp2[c - 1] && pAmp2[c] >= pAmp2[c + 1])
            {
                pEdge[c] = 255;
            }
            break;
        case 180:
            if (pAmp2[c] >= pAmp2[c - 1] && pAmp2[c] > pAmp2[c + 1])
            {
                pEdge[c] = 255;
            }
            break;

        case 45:
            if (pAmp2[c] >= pAmp1[c + 1] && pAmp2[c] > pAmp3[c - 1])
            {
                pEdge[c] = 255;
            }
            break;
        case 225:
            if (pAmp2[c] > pAmp1[c + 1] && pAmp2[c] >= pAmp3[c - 1])
            {
                pEdge[c] = 255;
            }
            break;

        default:
            break;
        }
    }
}
imshow("edg", edge);//总共有462个点为255(白色)
imwrite("D:\Datas\\2.jpg", edge);
waitKey(0);

//cout << "===============> end 单像素边缘 <================" << endl;
四、python的代码实现
由于上面已经讲清楚原理和步骤,python代码和c++相似。代码如下:
import math
import numpy as np
import cv2
import matplotlib.pyplot as plt

#8个卷积核,分别对应0,45,90,135,180,225,270,315
#度数
angle_index = np.array((0,45,90,135,180,225,270,315)) #(1,8)
#卷积核
keras = np.zeros((8,3,3)) #存放8个3X3的卷积核
keras[0] = np.array(([1,  0, -1],[2,  0, -2],[1,  0, -1]), dtype="float32")# 0
keras[1] = np.array(([0, -1, -2],[1,  0, -1],[2,  1,  0]), dtype="float32")# 45
keras[2] = np.array(([-1,  -2, -1],[0,  0, 0],[1,  2, 1]), dtype="float32")# 90
keras[3] = np.array(([-2,  -1, 0],[-1,  0, 1],[0,  1, 2]), dtype="float32")# 135
keras[4] = np.array(([-1,  0, 1],[-2,  0, 2],[-1,  0, 1]), dtype="float32")# 180
keras[5] = np.array(([0,  1, 2],[-1,  0, 1],[-2,  -1, 0]), dtype="float32")# 225
keras[6] = np.array(([1,  2, 1],[0,  0, 0],[-1,  -2, -1]), dtype="float32")# 270
keras[7] = np.array(([2,  1, 0],[1,  0, -1],[0,  -1, -2]), dtype="float32")# 315


if __name__ == "__main__":
    # 1.输入图片路径,读取图片
    img1 = cv2.imread(r"imgs/1.jpg") #imgs/1.jpg
    # 2.灰度化处理图像
    grayImage = cv2.cvtColor(img1, cv2.COLOR_BGR2GRAY)

    # 3.创建存放8个边缘处理的图片的容器
    dst = np.zeros((8,grayImage.shape[0],grayImage.shape[1]))

    # 循环8个卷积核,对不同的卷积核进行filter2D处理
    for i in range(8):
        dst[i] = cv2.filter2D(grayImage, -1, keras[i])

    # 4.梯度方向
        #对比上面8个图片,找出zui
    # (1 创建一个将8个半圆合并成一个圆的图片
    amplitude = np.zeros((grayImage.shape[0],grayImage.shape[1]))
    angle = np.zeros((grayImage.shape[0],grayImage.shape[1])) #每个坐标对应的角度


    for i in range(grayImage.shape[0]):
        for j in range(grayImage.shape[0]):
            st = 0
            for k in range(8):
                if amplitude[i][j] < dst[k][i][j]:
                    amplitude[i][j] = dst[k][i][j]
                    st = angle_index[k]
            angle[i][j] = st

    cv2.imshow("ss",amplitude)
    cv2.waitKey(0)
    cv2.imshow("ss", angle)
    cv2.waitKey(0)

    # 5.单像素边缘
      #在amplitude中找到单个像素点
    #(1 创建一个单个像素点的图片处理器
    edge = np.zeros((grayImage.shape[0], grayImage.shape[1]))
    for r in range(1,grayImage.shape[0]-1):
        pAmp1 = amplitude[r-1]
        pAmp2 = amplitude[r]
        pAmp3 = amplitude[r + 1]
        for c in range(1, grayImage.shape[1] - 1):

            if angle[r][c] == 270:
                if (pAmp2[c] > pAmp1[c] and pAmp2[c] >= pAmp3[c]):
                    edge[r][c] = 255
            if angle[r][c] == 90:
                if (pAmp2[c] >= pAmp1[c] and pAmp2[c] > pAmp3[c]):
                    edge[r][c] = 255
            if angle[r][c] == 315:
                if (pAmp2[c] > pAmp1[c - 1] and pAmp2[c] >= pAmp3[c + 1]):
                    edge[r][c] = 255
            if angle[r][c] == 135:
                if (pAmp2[c] >= pAmp1[c - 1] and pAmp2[c] > pAmp3[c + 1]):
                    edge[r][c] = 255
            if angle[r][c] == 0:
                if (pAmp2[c] > pAmp2[c - 1] and pAmp2[c] >= pAmp2[c + 1]):
                    edge[r][c] = 255
            if angle[r][c] == 180:
                if (pAmp2[c] >= pAmp2[c - 1] and pAmp2[c] > pAmp2[c + 1]):
                    edge[r][c] = 255
            if angle[r][c] == 45:
                if (pAmp2[c] >= pAmp1[c + 1] and pAmp2[c] > pAmp3[c - 1]):
                    edge[r][c] = 255
            if angle[r][c] == 225:
                if (pAmp2[c] > pAmp1[c + 1] and pAmp2[c] >= pAmp3[c - 1]):
                    edge[r][c] = 255

    cv2.imshow("tt",edge)
    cv2.waitKey(0)

    # 6.亚像素坐标
    root2 = math.sqrt(2.0) #根号2
    tri_list = np.zeros((2,8))#三角函数表
    for i in range(8):
        tri_list[0][i] = math.cos(angle_index[i] * math.pi / 180.0)
        tri_list[1][i] = -math.sin(angle_index[i] * math.pi / 180.0)#sin前面的负号非常关键, 因为图像的y方向和直角坐标系的y方向相反
    vPts = [] #记录小数坐标(x,y)

    for r in range(1,grayImage.shape[0]-1):
        # 3 * 3 邻域, 所以用3个指针, 一个指针指一行
        pAmp1 = amplitude[r - 1]
        pAmp2 = amplitude[r]
        pAmp3 = amplitude[r + 1]
        for c in range(1, grayImage.shape[1] - 1):
            dTmp = 0
            nAngTmp = 0
            if angle[r][c] == 270:
                nAngTmp = 6
                dTmp = (pAmp1[c] - pAmp3[c]) / (pAmp1[c] + pAmp3[c] - 2 * pAmp2[c] + 0.00001) * 0.5
            elif angle[r][c] == 90:
                nAngTmp = 2
                dTmp = -(pAmp1[c] - pAmp3[c]) / (pAmp1[c] + pAmp3[c] - 2 * pAmp2[c] + 0.00001) * 0.5
            elif angle[r][c] == 315:
                nAngTmp = 7
                dTmp = (pAmp1[c - 1] - pAmp3[c + 1]) / (pAmp1[c - 1] + pAmp3[c + 1] - 2 * pAmp2[c] + 0.00001) * root2 * 0.5
            elif angle[r][c] == 135:
                nAngTmp = 3
                dTmp = -(pAmp1[c - 1] - pAmp3[c + 1]) / (pAmp1[c - 1] + pAmp3[c + 1] - 2 * pAmp2[c] + 0.00001) * root2 * 0.5
            elif angle[r][c] == 0:
                nAngTmp = 0
                dTmp = (pAmp2[c - 1] - pAmp2[c + 1]) / (pAmp2[c - 1] + pAmp2[c + 1] - 2 * pAmp2[c] + 0.00001) * 0.5
            elif angle[r][c] == 180:
                nAngTmp = 4
                dTmp = -(pAmp2[c - 1] - pAmp2[c + 1]) / (pAmp2[c - 1] + pAmp2[c + 1] - 2 * pAmp2[c] + 0.00001) * 0.5
            elif angle[r][c] == 45:
                nAngTmp = 1
                dTmp = (pAmp3[c - 1] - pAmp1[c + 1]) / (pAmp1[c + 1] + pAmp3[c - 1] - 2 * pAmp2[c] + 0.00001) * root2 * 0.5
            elif angle[r][c] == 225:
                nAngTmp = 5
                dTmp = -(pAmp3[c - 1] - pAmp1[c + 1]) / (pAmp1[c + 1] + pAmp3[c - 1] - 2 * pAmp2[c] + 0.00001) * root2 * 0.5

            x = c + dTmp * tri_list[0][nAngTmp]
            y = r + dTmp * tri_list[1][nAngTmp]
            vPts.append([x,y])
运行结果和c++的相似,大家可以自行选择编程语言。

技术共进,成长同行——讯飞AI开发者社区
更多推荐

 22
22 0
0- 0


 已为社区贡献10条内容

所有评论(0)