
定点化和模型量化(三)
The Snapdragon Neural Processing Engine (SNPE)是高通骁龙为了加速网络模型设计的框架。但它不只支持高通,SNPE还支持多种硬件平台,ARM平台、Intel平台等。支持的深度学习框架也有包括Caffe、TensorFlow和ONNX等。SNPE可以前向运行模型,但需要先将模型转换为Deep Learning Container (DLC) file才可以加
量化解决的是训练使用的浮点和运行使用的硬件只支持定点的矛盾。这里介绍一些实际量化中使用到的工具。
SNPE简介
The Snapdragon Neural Processing Engine (SNPE)是高通骁龙为了加速网络模型设计的框架。但它不只支持高通,SNPE还支持多种硬件平台,ARM平台、Intel平台等。支持的深度学习框架也有包括Caffe、TensorFlow和ONNX等。
SNPE可以前向运行模型,但需要先将模型转换为Deep Learning Container (DLC) file才可以加载进SNPE中。
CPU支持支持双精度浮点和8位量化的模型,GPU支持混合精度或者单精度浮点,数字信号处理器DSP就只支持支持8位整形。DLC进一步进行8bit量化才可以运行在Qualcomm Hexagon DSP上。
下图是典型的workflow:
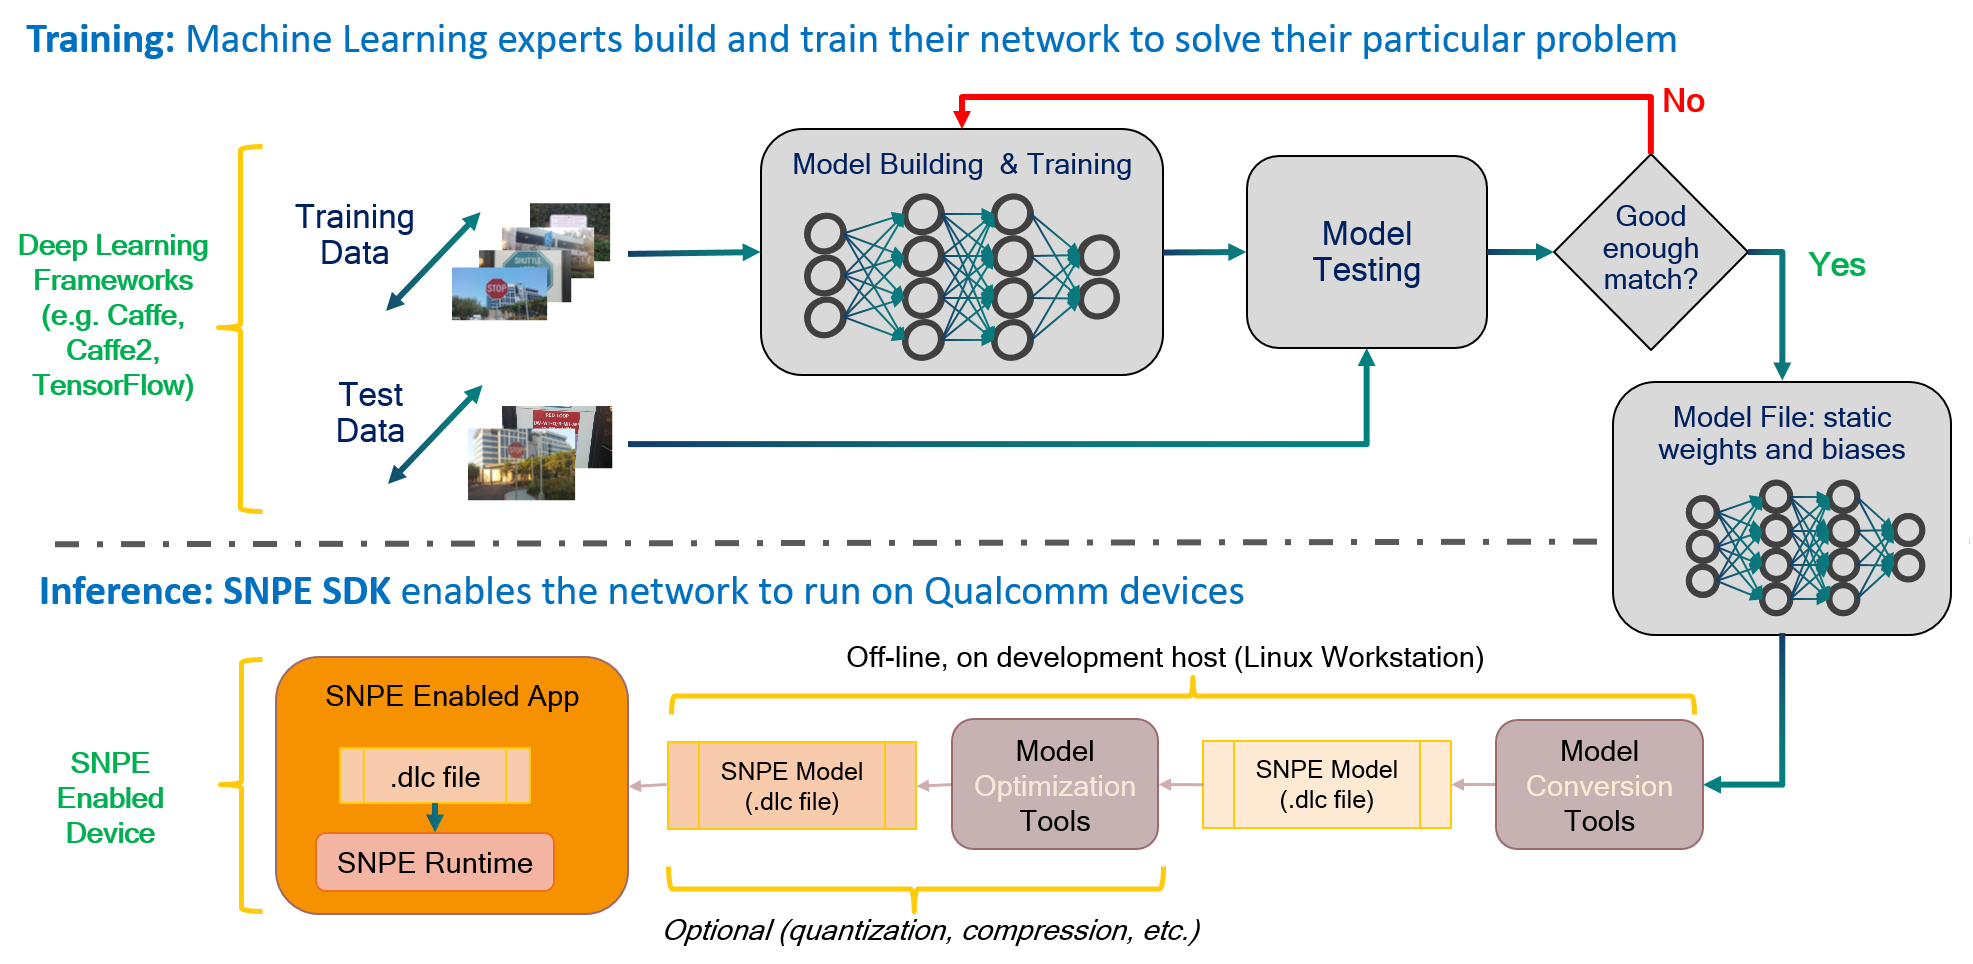
上图的上半部分是我们熟悉的模型浮点训练,当模型效果达到预期之后,模型参数固定下来,然后转换成dlc,dlc再经过压缩,量化等操作,最后运行在SNPE中。
SNPE安装及命令
下载SNPE压缩包,版本号与高通芯片有关,主流是2.13,还有2.17,2.22等。在压缩包的docs文件夹里面有官方html文档。
source ./bin/envsetup.sh,激活snpe环境。sh ,bash ,./, source的作用都是执行脚本。然后就可以在终端中调用snpe指令了:
转换dlc
以TensorFlow 为例,模型文件可以是pb file或者checkpoint+meta,调用SNPE转换指令时给定模型路径和输入尺寸,最后一层节点名字,就可以得到dlc文件:
snpe-tensorflow-to-dlc --input_network $SNPE_ROOT/models/inception_v3/tensorflow/inception_v3_2016_08_28_frozen.pb \
                       --input_dim input "1,299,299,3" --out_node "InceptionV3/Predictions/Reshape_1" \
                       --output_path inception_v3.dlc
如果是pytorch框架得到的模型,使用snpe-pytorch-to-dlc,serialized PyTorch model into a SNPE DLC file。
更一般地,不管什么框架,都可以先将模型转换为onnx格式。ONNX(Open Neural Network Exchange)是一种开放式的文件格式,专为机器学习设计,用于存储训练好的模型。它使得不同的深度学习框架(如Pytorch,MXNet)可以采用相同格式存储模型数据。onnx转dlc使用命令snpe-onnx-to-dlc。
解析dlc:
snpe-dlc-info -i ./xxxx.dlcdlc量化:snpe-dlc-quantize。
[ --input_dlc=<val> ]
                        Path to the dlc container containing the model for which fixed-point encoding
                        metadata should be generated. This argument is required.
  [ --input_list=<val> ]
                        Path to a file specifying the trial inputs. This file should be a plain text file,
                        containing one or more absolute file paths per line. These files will be taken to constitute
                        the trial set. Each path is expected to point to a binary file containing one trial input
                        in the 'raw' format, ready to be consumed by SNPE without any further modifications.
                        This is similar to how input is provided to snpe-net-run
application.
[ --enable_htp ]      Pack HTP information in quantized DLC.
Snapdragon Neural Processing Engine SDK: Tools
一般安卓手机都需要enable_htp,才可以跑在DSP/HTP上。如果这一步生成dlc时没有选择enable_htp,可以再执行snpe-dlc-graph-prepare命令,可以将离线的grapha转换为适用于DSP/HTP runtimes的dlc。
run on linux
cd $SNPE_ROOT/models/alexnet
snpe-net-run --container dlc/bvlc_alexnet.dlc --input_list data/cropped/raw_list.txt
这里可选参数还有--use_dsp 和--enable_init_cache,但是加上可能会遇到segmentfault(后来证明是手机系统版本的原因)。如果snpe要跑dsp的流程,就要打开--use_dsp。
run on android target
推lib下面对应架构的所有so
推lib/dsp下面的so
推bin里面的snpe-net-run
AIMET简介
刚才提到的量化其实是后量化,要想实现量化感知训练QAT,需要使用AIMET(AI Model Efficiency Toolkit),AIMET也是高通提供的工具,可以实现量化和压缩。
AIMET是一个库,有torch的版本,需要import aimet_torch.可以对训练好的模型进行量化和压缩,从而在保证精度损失最小的情况下缩短运行时间,减轻内存压力。
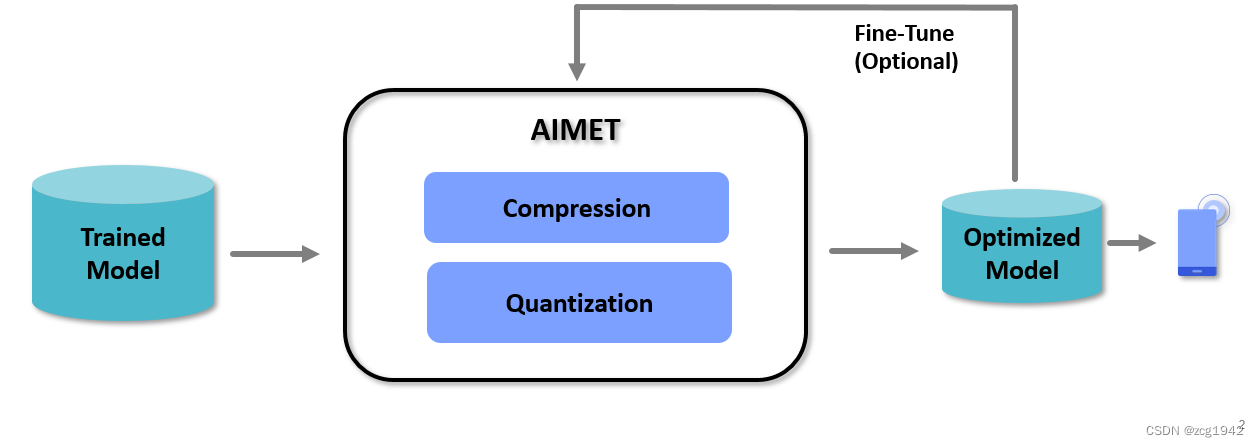
虽然是在训练过后再使用AIMET,但它不是简单地转化为dlc,而是也有一个训练的过程,这个过程尽量缩小与浮点模型的误差。
AIMET安装
在官方链接中寻找合适自己的torch对应的版本。可以看到每个版本都提供了众多的whl文件,每个whl对应不同的组合。

AIMET实例
PTQ
参考github上面的文档。AIMET PyTorch AutoQuant API — AI Model Efficiency Toolkit Documentation: ver tf-torch-cpu_1.31.0
即便是后量化也有很多方法组合,需要一些专业的分析。AIMET 提供了AutoQuant 这样的接口,可以自动分析模型,选择最合适的后量化方法。用户只需要指明能接受的精度损失就可以了。
核心是实例化一个AutoQuant类:
auto_quant = AutoQuant(model,                        # Load a pretrained FP32 model
                       dummy_input=dummy_input,      # dummy_input 是一个随机数组,只要维度符合输入就行。
                       data_loader=unlabeled_imagenet_data_loader,
                       eval_callback=eval_callback)  # 统计准确率
auto_quant有一些参数需要设置:
精度:可以通过修改auto_quant.set_mixed_precision_params指定weight和activation的量化精度:W8A8/W8A16/W16A16.
batch,迭代次数相关的:通过auto_quant.set_adround_params设置。
开始量化:
auto_quant.set_adaround_params(adaround_params)
model, optimized_accuracy, encoding_path = auto_quant.optimize(allowed_accuracy_drop=0.01)
print(f"- Quantized Accuracy (after optimization):  {optimized_accuracy}")
注意,auto_quant.optimize会返回三个值,分别是model,精度,和encoding path。encoding path以类似json的格式记录了每一层的名称,位宽,最大值最小值,offset,scale,还有是否是symmertic。
这里的offset,scale应该就对应上一篇量化中提到的step和zero point。
如果已经有encoding结果,可以直接读取对应的pth模型,从而跳过autoquant。
QAT
参考文档。AIMET PyTorch Quantization SIM API — AI Model Efficiency Toolkit Documentation: ver tf-torch-cpu_1.31.0
关键是构建QuantizationSimModel:
sim = QuantizationSimModel(model=model,
                           quant_scheme=QuantScheme.post_training_tf_enhanced,
                           dummy_input=dummy_input,
                           default_output_bw=8,  # Default bitwidth (4-31) to use for quantizing all layer inputs and outputs
                           default_param_bw=8)   # Default bitwidth (4-31) to use for quantizing all layer parameters
其中model是torch.load后量化中得到的encoding结果得到的,作为QAT的初始值。
真正的QAT也只用一行代码完成:
ImageNetDataPipeline.finetune(sim.model, epochs=1, learning_rate=5e-7, learning_rate_schedule=[5, 10], use_cuda=use_cuda)也可以把sim当成一个正常的模型,然后使用常规的torch的梯度更新的训练方法进行训练。比如最经典的搭配就是Adam优化器+CosineAnnealingWarmRestarts。只不过相比于浮点模型的训练,这里的学习率要更低一些。
reference:
基于CentOS更新 glibc - 解决 `GLIBC_2.29‘ not found-CSDN博客
MVision/CNN/Deep_Compression/quantization at master · Ewenwan/MVision · GitHub
Snapdragon Neural Processing Engine SDK: Features Overview
Tensorflow模型量化(Quantization)原理及其实现方法 - 知乎
GitHub - quic/aimet: AIMET is a library that provides advanced quantization and compression techniques for trained neural network models.AI Model Efficiency ToolkitGitHub - quic/aimet: AIMET is a library that provides advanced quantization and compression techniques for trained neural network models.

技术共进,成长同行——讯飞AI开发者社区
更多推荐


 24
24 0
0- 0


 已为社区贡献4条内容

所有评论(0)