
nginx 部署前端项目的详细步骤(vue项目build打包+nginx部署)_前端工程打包部署到nginx(2)
函数式编程其实是一种编程思想,它追求更细的粒度,将应用拆分成一组组极小的单元函数,组合调用操作数据流;它提倡着 纯函数 / 函数复合 / 数据不可变, 谨慎对待函数内的 状态共享 / 依赖外部 / 副作用;
//开启服务
1.start nginx.exe // cmd命令进入nginx文件夹后,使用该命令
2.直接点击nginx目录下的nginx.exe
// 停止服务
nginx -s stop // 快速停止nginx
nginx -s quit // quit是完整有序的停止nginx
//重新加载配置文件
nginx -s reload // 热加载
#### 2.2.2 默认配置


**nginx-1.21.0\conf下的nginx.conf**
工作进程的数量
worker_processes 1; # 与worker_connections乘积表示实际处理事件的总数
events {
worker_connections 1024; # 每个工作进程连接数
}
http {
include mime.types; # 文件扩展名与文件类型映射表
include self/ *.conf; # 独立出不同网站不同配置文件,引入其他的配置文件
default_type application/octet-stream; # 默认文件类型
# 日志格式
log_format  access  '$remote_addr - $remote_user [$time_local] $host "$request" '
              '$status $body_bytes_sent "$http_referer" '
              '"$http_user_agent" "$http_x_forwarded_for" "$clientip"';
access_log  /srv/log/nginx/access.log  access; # 日志输出目录
gzip  on; # gzip模块设置,设置是否开启gzip压缩输出
sendfile  on; # 开启文件传输模式
#tcp_nopush  on; # 减少网络报文数量

#keepalive_timeout  0; # 连接不超时,单位 s
# 链接超时时间,自动断开
keepalive_timeout  60;

# 虚拟主机
server {
    listen       80; # 监听地址以及端口
    server_name  localhost; # 浏览器访问域名

    charset utf-8; # 默认字符集
    access_log  logs/localhost.access.log  access;

    # 路由
    location / {
        root   html; # 访问根目录 nginx-1.21.0\html
        index  index.html index.htm; # 入口文件,可以接收index、index.html、index.htm文件
    }
}
}
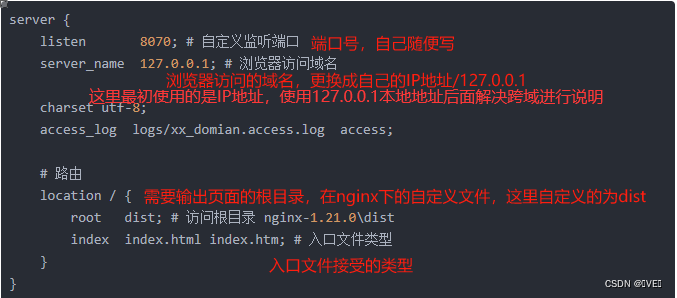
#### 2.2.3 搭建不同网站的站点
在其他配置文件'self'目录下,添加新建站点的配置**文件'xxx.conf'**

server {
listen 8070; # 自定义监听端口
server_name 127.0.0.1; # 浏览器访问域名
charset utf-8;
access_log  logs/xx_domian.access.log  access;

# 路由
location / {
    root   dist; # 访问根目录 nginx-1.21.0\dist
    index  index.html index.htm; # 入口文件类型
}
}

#### 2.2.4 禁止访问的目录以及一键申请SSL证书验证目录相关设置
#禁止访问的文件或目录
location ~ ^/(\.user.ini|\.htaccess|\.git|\.svn|\.project|LICENSE|README.md)
{
    return 404;
}

#一键申请SSL证书验证目录相关设置
location ~ \.well-known{
    allow all;
}
#### 2.2.5 根据文件类型设置过期时间
# location ~ .*\.(gif|jpg|jpeg|png|bmp|swf)$
# {
#     expires      30d; // 30天过期
#     access_log off;
# }

# location ~ .*\.(js|css)?$
# {
#     expires      12h;
#     access_log off;
# }
#### 2.2.6 禁止文件缓存
location ~* .(js|css|png|jpg|gif)$ {
add_header Cache-Control no-store;
}
#### 2.2.7 跨域问题
场景:
-- 我们前端使用的路径配置为:[http://127.0.0.1:8070/]( )(nginx配置)

-- 需要向后端请求的路径为: [http://192.168.1.19:8087]( )/(项目打包配置)

此时前端向后端发送请求一定会出现跨域!!
**解决方法:**启动nginx服务器,**将server\_name设置为127.0.0.1****,然后设置响应的拦截前端需要跨域的请求置相应的location以拦截前端需要跨域的请求,最后将请求代理回自己需要请求的后端路径**,以我的为例:
server
{
listen 8001;
server_name 127.0.0.1;
location /api/ {
     proxy_pass  http://192.168.1.19:8087/;
     proxy_http_version 1.1; # http版本
     proxy_set_header Upgrade $http_upgrade; # 继承地址,这里的$http_upgrade为上面的proxy_pass
     proxy_set_header Connection "upgrade";
     proxy_set_header  X-Real-IP $remote_addr; # 传递的ip
     proxy_connect_timeout 60;
     proxy_send_timeout  60;
     proxy_read_timeout 3000;
}
}
## 第三章 配置参考


小编基本配置提供参考——
server
{
listen 8070;
server_name 127.0.0.1;
index index.php index.html index.htm default.php default.htm default.html;
root dist;
#REWRITE-END

#禁止访问的文件或目录
location ~ ^/(\.user.ini|\.htaccess|\.git|\.svn|\.project|LICENSE|README.md)
{
    return 404;
}
总结:
-
函数式编程其实是一种编程思想,它追求更细的粒度,将应用拆分成一组组极小的单元函数,组合调用操作数据流;
-
它提倡着 纯函数 / 函数复合 / 数据不可变, 谨慎对待函数内的 状态共享 / 依赖外部 / 副作用;
开源分享:【大厂前端面试题解析+核心总结学习笔记+真实项目实战+最新讲解视频】
Tips:
其实我们很难也不需要在面试过程中去完美地阐述出整套思想,这里也只是浅尝辄止,一些个人理解而已。博主也是初级小菜鸟,停留在表面而已,只求对大家能有所帮助,轻喷🤣;
我个人觉得: 这些编程范式之间,其实并不矛盾,各有各的 优劣势。
理解和学习它们的理念与优势,合理地 设计融合,将优秀的软件编程思想用于提升我们应用;
所有设计思想,最终的目标一定是使我们的应用更加 解耦颗粒化、易拓展、易测试、高复用,开发更为高效和安全;

技术共进,成长同行——讯飞AI开发者社区
更多推荐


 18
18 0
0- 0


 已为社区贡献6条内容

所有评论(0)