
搭建简易MCP服务并进行测试
根据这位佬的,搭建一个简易计算器MCP服务。
·
补充说明
可以使用Claud作为客户端,只需要在本机claud的配置文件内配置好执行路径,然后重启claud即可
参考:https://modelcontextprotocol.io/quickstart/server#windows
前言
根据这位佬的博客,搭建一个简易计算器MCP服务
步骤
(1)首先创建项目和依赖
mkdir mcp-calculator-server
cd mcp-calculator-server
npm init -y

# 核心MCP SDK
npm install @modelcontextprotocol/sdk @modelcontextprotocol/inspector
# 输入验证库
npm install zod
# TypeScript相关依赖
npm install -D typescript @types/node
# 创建TypeScript配置
npx tsc --init
(2)粘贴计算器服务端代码
代码如下:
#!/usr/bin/env node

/**
 * 新手版 MCP 计算器服务器
 *
 * 这是一个简化的MCP服务器示例,适合初学者学习
 * 提供基本的加减乘除运算功能
 *
 * 安装依赖:
 * npm install @modelcontextprotocol/sdk zod
 *
 * 编译运行:
 * npx tsc
 * node build/server/index.js
 */

// 导入需要的模块
import { McpServer } from "@modelcontextprotocol/sdk/server/mcp.js";
import { StdioServerTransport } from "@modelcontextprotocol/sdk/server/stdio.js";
import { z } from "zod";

// 创建服务器
const server = new McpServer({
  name: "simple-calculator",
  version: "1.0.0",
  capabilities: {
    resources: {},
    tools: {},
  },
});

// 定义数字验证规则
const NumberSchema = z.number().describe("数字");

// 加法工具
server.tool(
  "add",
  "计算两个数字相加",
  {
    a: NumberSchema,
    b: NumberSchema,
  },
  async ({ a, b }) => {
    const result = a + b;

    return {
      content: [
        {
          type: "text",
          text: `${a} + ${b} = ${result}`,
        },
      ],
    };
  }
);

// 减法工具
server.tool(
  "subtract",
  "计算两个数字相减",
  {
    a: NumberSchema,
    b: NumberSchema,
  },
  async ({ a, b }) => {
    const result = a - b;

    return {
      content: [
        {
          type: "text",
          text: `${a} - ${b} = ${result}`,
        },
      ],
    };
  }
);

// 乘法工具
server.tool(
  "multiply",
  "计算两个数字相乘",
  {
    a: NumberSchema,
    b: NumberSchema,
  },
  async ({ a, b }) => {
    const result = a * b;

    return {
      content: [
        {
          type: "text",
          text: `${a} × ${b} = ${result}`,
        },
      ],
    };
  }
);

// 除法工具
server.tool(
  "divide",
  "计算两个数字相除",
  {
    a: NumberSchema,
    b: NumberSchema,
  },
  async ({ a, b }) => {
    // 检查除数是否为零
    if (b === 0) {
      return {
        content: [
          {
            type: "text",
            text: "错误:不能除以零",
          },
        ],
      };
    }

    const result = a / b;

    return {
      content: [
        {
          type: "text",
          text: `${a} ÷ ${b} = ${result}`,
        },
      ],
    };
  }
);

// 启动服务器
async function main() {
  try {
    const transport = new StdioServerTransport();
    await server.connect(transport);
    console.error("计算器服务器已启动");
  } catch (error) {
    console.error("启动失败:", error);
    process.exit(1);
  }
}

main().catch((error) => {
  console.error("运行出错:", error);
  process.exit(1);
});

/*
使用方法:

1. 安装依赖包
   npm install @modelcontextprotocol/sdk zod

2. 编译 TypeScript
   npx tsc

3. 在 VS Code 中配置 .vscode/mcp.json:
   {
     "servers": {
       "calculator": {
         "type": "stdio",
         "command": "node",
         "args": ["你的绝对路径/server/index.js"]
       }
     }
   }

4. 重启 VS Code,然后就可以使用计算功能了

代码说明:

- McpServer: 创建 MCP 服务器
- server.tool(): 定义可用的工具/功能
- NumberSchema: 验证输入必须是数字
- async/await: 处理异步操作
- StdioServerTransport: 使用标准输入输出通信

每个工具包含:
- 名称 (如 "add")
- 描述 (如 "计算两个数字相加")
- 参数定义 (如 {a: NumberSchema, b: NumberSchema})
- 实现函数 (执行具体的计算逻辑)
*/
(3)粘贴客户端测试代码
然后使用MCP官方的inspector来作为客户端进行测试,我们使用node,那么就是这个仓库
代码为inspector.ts,具体如下:
import { spawn } from 'child_process';

function wrap(proc: any, payload: any) {
  const json = JSON.stringify(payload);
  const msg = `Content-Length: ${Buffer.byteLength(json)}\r\n\r\n${json}`;
  proc.stdin.write(msg);
}

async function main() {
  const proc = spawn('node', ['index.js'], {
    stdio: ['pipe','pipe','inherit']
  });

  let buf = '';
  proc.stdout.on('data', (c: Buffer) => {
    buf += c.toString();
    processResponses();
  });

  function processResponses() {
    while (true) {
      const idx = buf.indexOf('\r\n\r\n');
      if (idx < 0) return;
      const header = buf.slice(0, idx);
      const m = /Content-Length: (\d+)/i.exec(header);
      if (!m) return;
      const len = +m[1];
      const start = idx + 4;
      if (buf.length < start + len) return;
      const body = buf.slice(start, start + len);
      buf = buf.slice(start + len);
      const msg = JSON.parse(body);
      console.log('<<', msg);
    }
  }

  // 1. 初始化
  wrap(proc, {
    jsonrpc: '2.0', id: 1, method: 'initialize',
    params: {
      protocolVersion: '2025-03-26',
      capabilities: { tools: {} }
    }
  });

  // 等待初始化响应
  await new Promise(res => setTimeout(res, 100));

  // 2. 调用工具
  wrap(proc, {
    jsonrpc: '2.0', id: 2, method: 'tools/call',
    params: { name: 'add', arguments: { a: 5, b: 3 } }
  });
}

main();
(4)生成js文件并运行
执行如下代码编译ts文件为js文件,默认生成在同一路径
# 这将会将当前项目下的所有ts代码转换为js
npx tsc
使用inspector 启动客户端,并指定服务端代码路径
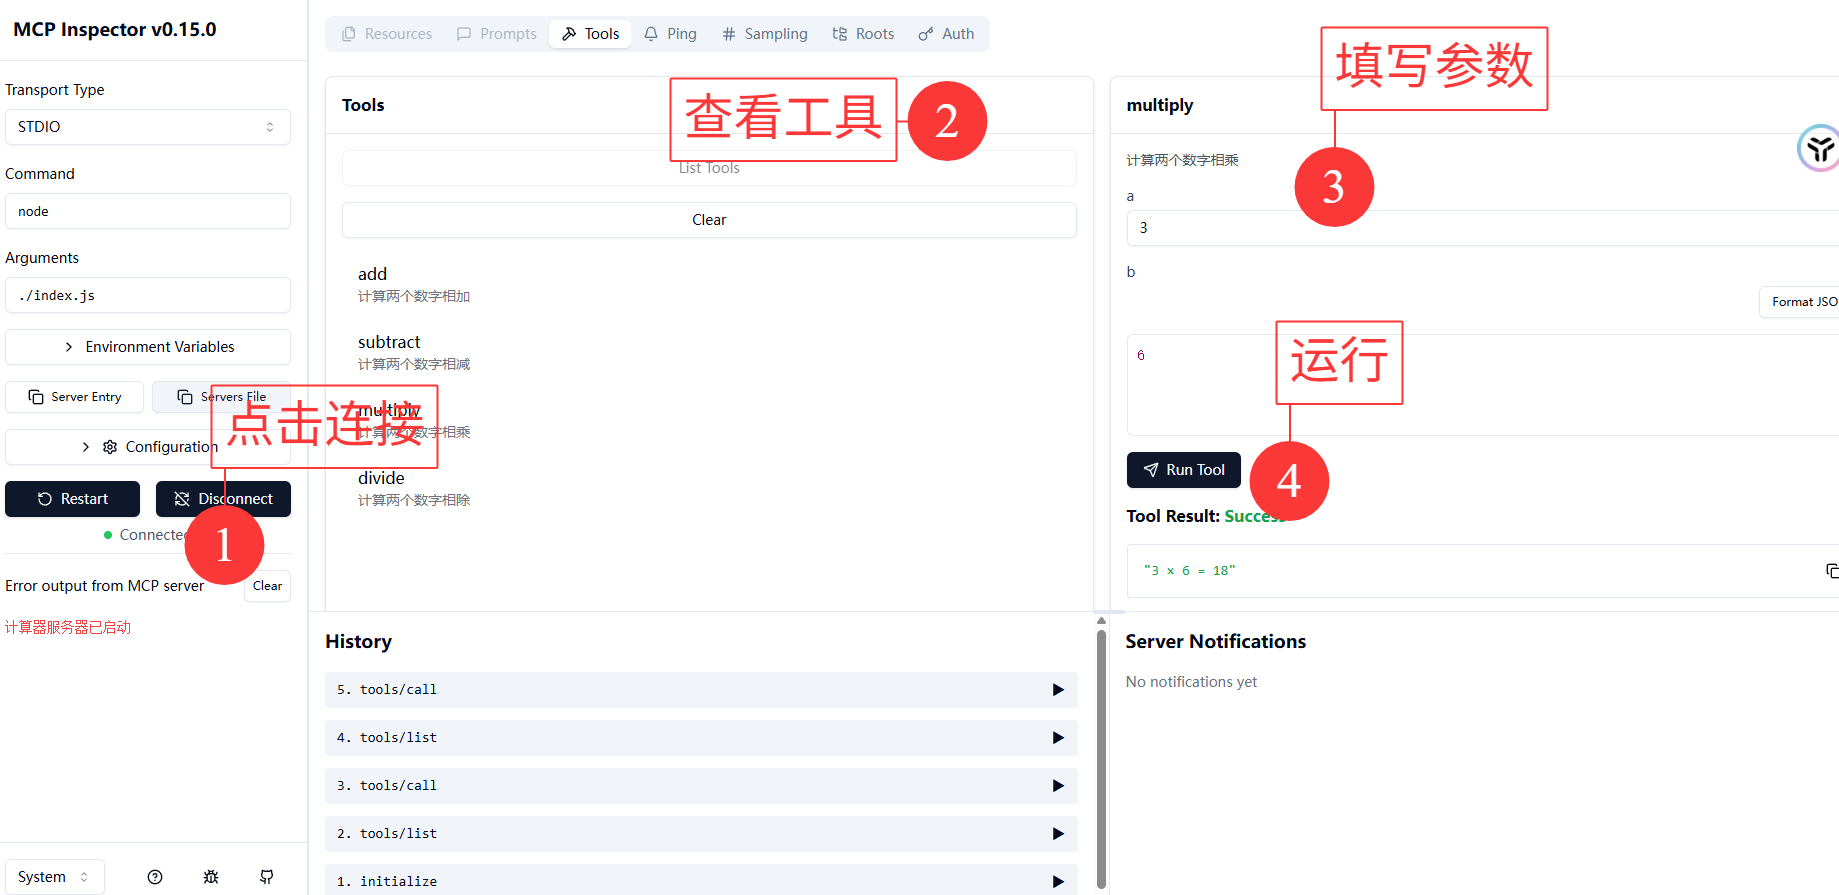
npx @modelcontextprotocol/inspector node ./index.js结果
这样就可以在UI界面尽情测试了
参考

技术共进,成长同行——讯飞AI开发者社区
更多推荐

 3
3 0
0- 0


 已为社区贡献11条内容

所有评论(0)