
【ESP32 连接 WS2812 灯带,通过巴法云平台实现远程调光调色】
使用巴法云平台下发指令给esp32控制ws2812灯带,可控制灯带的三种LED亮度。
使用巴法云平台下发指令给esp32控制ws2812灯带,可控制灯带的三种LED亮度。
一、硬件准备
1.ESP32 开发板:ESP32 是一款功能强大的微控制器,集成了 Wi-Fi 和蓝牙功能,非常适合物联网项目。
2.WS2812 灯带:WS2812 是一种智能控制 LED 光源,内置驱动芯片,只需一根数据线即可实现控制。
3.杜邦线若干:用于连接开发板和灯带。


二、软件准备
1.Arduino IDE:一个简单易用的集成开发环境,方便我们编写和上传代码到 ESP32 开发板。可以从Arduino 官方网站下载安装。
2.安装 ESP32 开发板支持:打开 Arduino IDE,依次点击 “文件”->“首选项”,在 “附加开发板管理器网址”输入框中填入以下网址:
https://espressif.github.io/arduino-esp32/package_esp32_index_cn.json
如果以上地址无法访问,可以使用社区地址:
https://arduino.me/packages/esp32.json
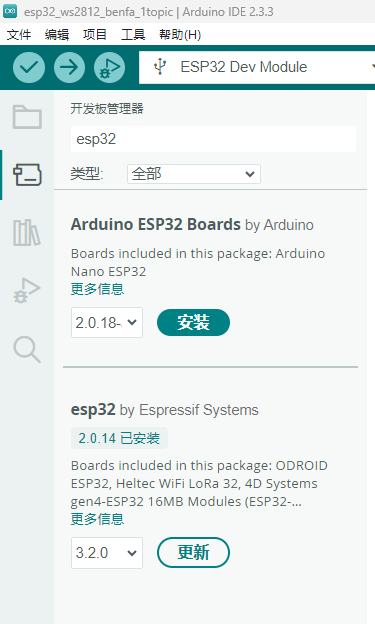
然后点击 “工具”->“开发板”->“开发板管理器”,搜索并安装 “esp32”,请选择安装第二个 esp32 by Espressif Systems。
参考:链接: ArduinoIDE安装ESP32支持
或者: 搭建ESP32-Arduino开发环境(离线一键安装超级好用)
3.巴法云平台账号:前往 巴法云官网注册账号,巴法云提供了简单易用的物联网平台服务,能帮助我们快速实现设备联网和远程控制。
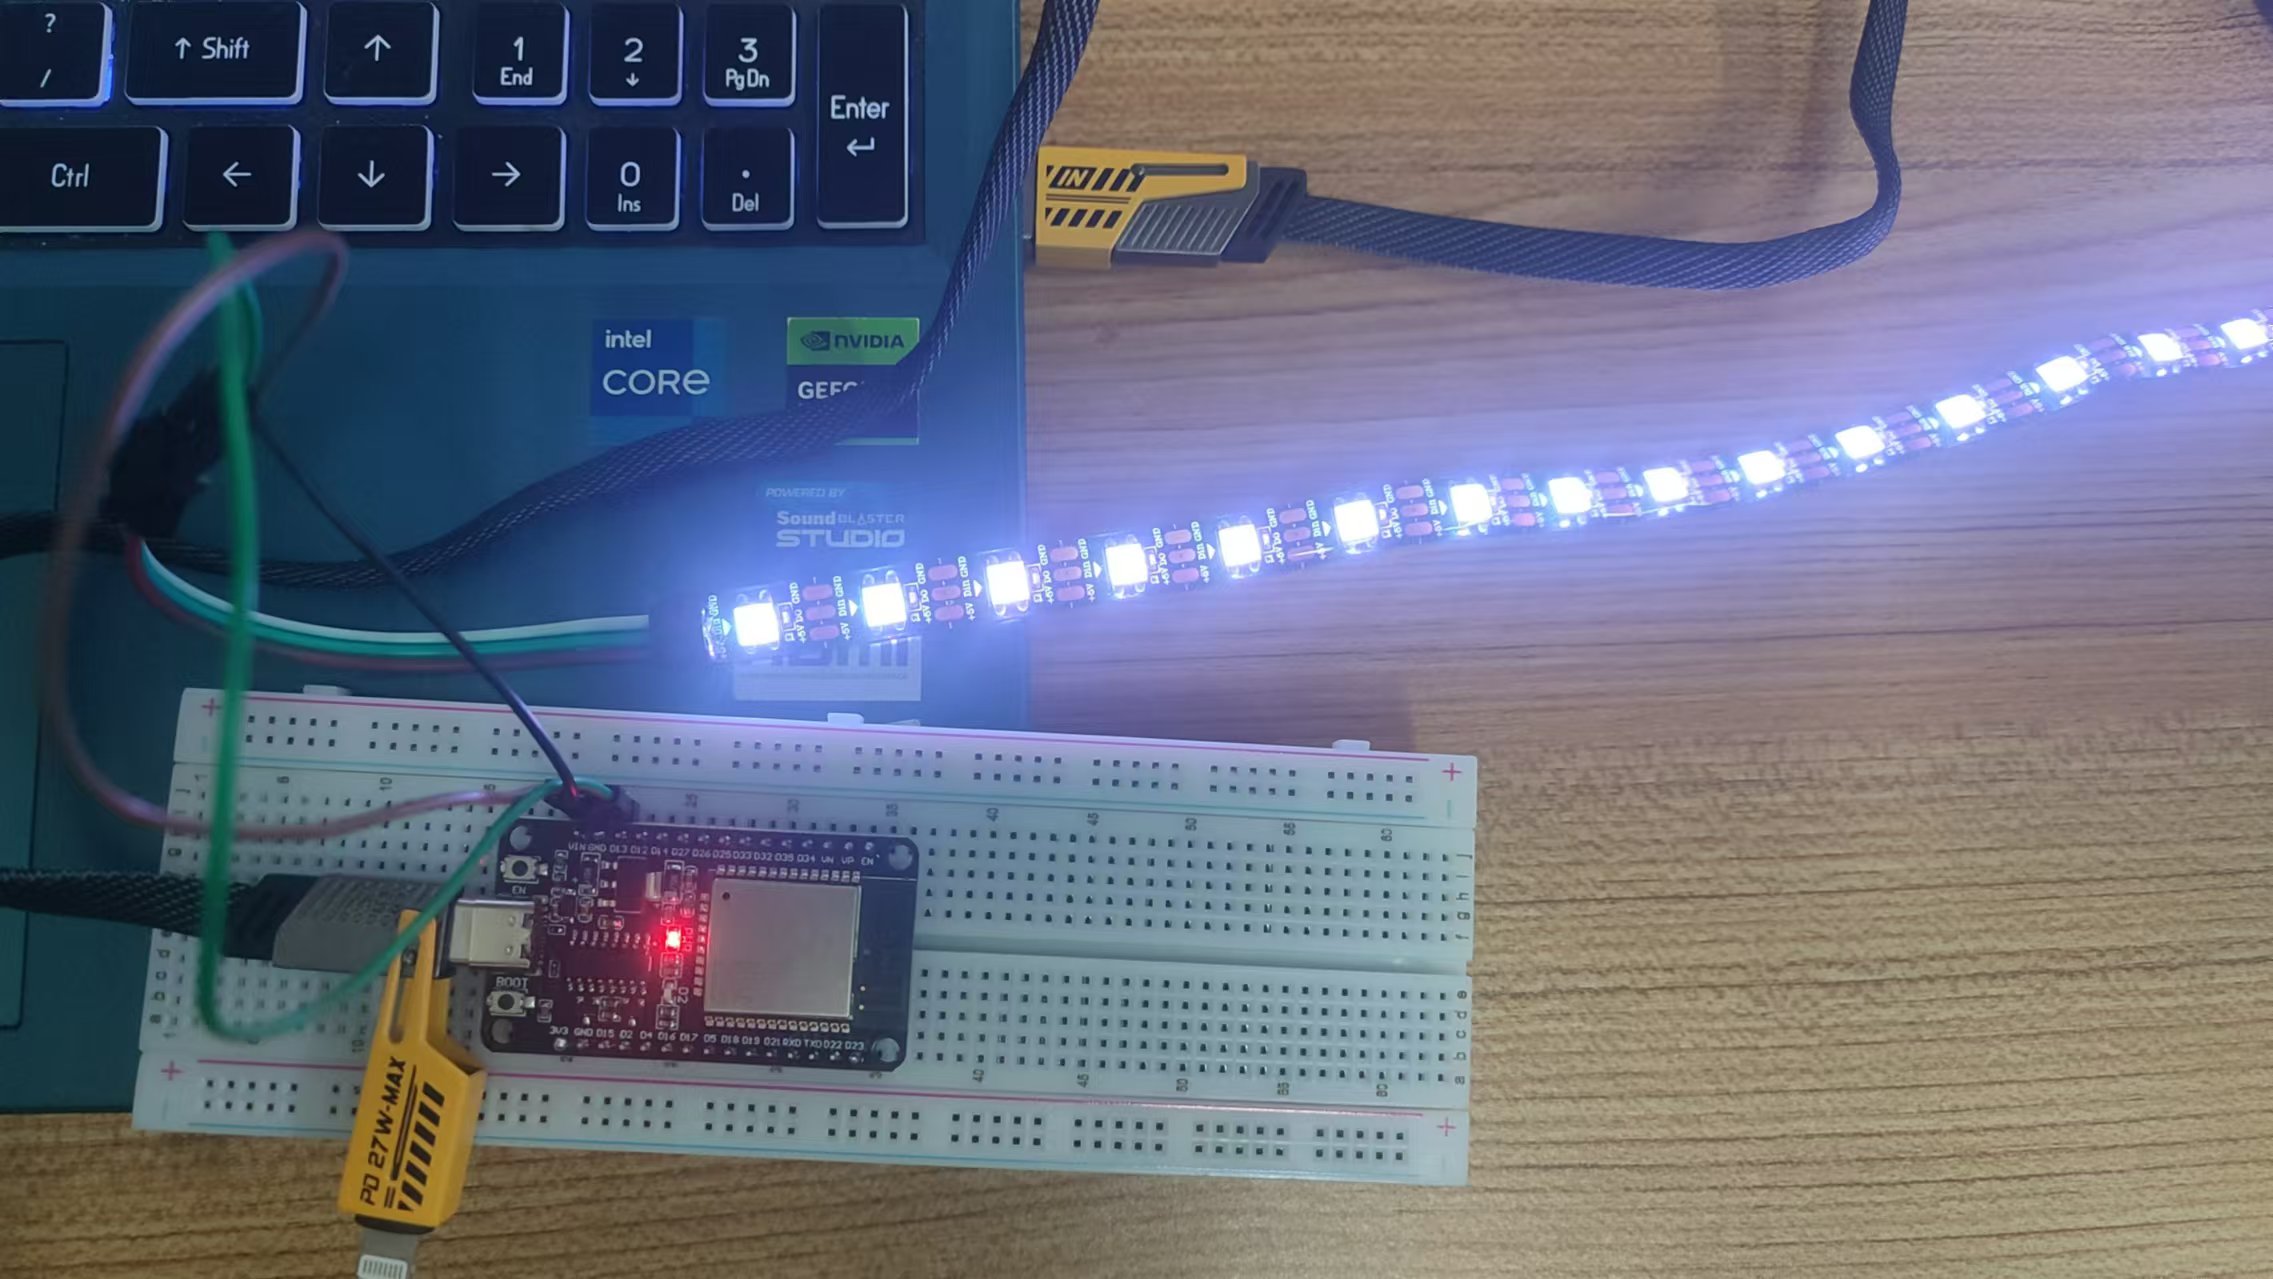
三、连接硬件
| esp32 | ws2812 |
|---|---|
| VIN(5v) | +5v |
| GND | GND |
| D13 | DIN |
四、巴法云平台配置
1.登录巴法云平台,点击“MQTT”设备云 。
2.新建主题,填写主题名称“ws2812”(可自行修改,主题名称需要与代码中保持一致)点击“新建”。
注意事项:添加设备时,设备名称尽量简洁且具有辨识度;主题名称(topic)与私钥(client id)需要在后面代码中用到
五、编写代码
在 Arduino IDE 中新建一个项目,将以下代码复制粘贴到项目中:
#include <WiFi.h>
#include <PubSubClient.h>
#include <FastLED.h>

// WS2812灯带相关设置
#define LED_PIN     13       // ESP32的GPIO13引脚,可根据实际连接修改
#define NUM_LEDS    30       //灯带上灯珠的数量,可修改
#define BRIGHTNESS  255
#define LED_TYPE    WS2812
#define COLOR_ORDER GRB
CRGB leds[NUM_LEDS];

// 巴法云 MQTT 服务器信息
const char* mqtt_server = "bemfa.com";
const int mqtt_port = 9501;
const char* clientId = "your_client_id";  // 替换为你的巴法云私钥
const char* topic = "your_topic";  // 替换为你在巴法云创建的主题(如果你在巴法云新建主题时使用的是前面四.2中的ws2812,则填写ws2812即可)

// WiFi 信息
const char* ssid = "your_wifi_ssid";  // 替换为你的 WiFi 名称
const char* password = "your_wifi_password";  // 替换为你的 WiFi 密码

WiFiClient espClient;
PubSubClient client(espClient);

// 连接WiFi
void setup_wifi() {
  delay(10);
  Serial.println();
  Serial.print("Connecting to ");
  Serial.println(ssid);

  WiFi.begin(ssid, password);

  while (WiFi.status() != WL_CONNECTED) {
    delay(500);
    Serial.print(".");
  }

  if (WiFi.status() == WL_CONNECTED) {
    Serial.println("");
    Serial.println("WiFi connected");
    Serial.println("IP address: ");
    Serial.println(WiFi.localIP());
  } else {
    Serial.println("WiFi connection failed");
  }
}

// 连接 MQTT 服务器
void reconnect() {
  while (!client.connected()) {
    Serial.print("Attempting MQTT connection...");
    if (client.connect(clientId)) {
      Serial.println("connected");
      client.subscribe(topic);
      Serial.println("Subscribed to topic: " + String(topic));
    } else {
      Serial.print("failed, rc=");
      Serial.print(client.state());
      Serial.println(" try again in 5 seconds");
      delay(5000);
    }
  }
}

// 处理接收到的 MQTT 消息
void callback(char* topic, byte* payload, unsigned int length) {
  Serial.print("Message arrived on topic: ");
  Serial.println(topic);
  String message = "";
  for (int i = 0; i < length; i++) {
    message += (char)payload[i];
  }
  Serial.print("Payload: ");
  Serial.println(message);

  // 解析接收到的颜色信息,格式为 "R,G,B"
  int commaIndex1 = message.indexOf(',');
  int commaIndex2 = message.indexOf(',', commaIndex1 + 1);
  if (commaIndex1 != -1 && commaIndex2 != -1) {
    int r = message.substring(0, commaIndex1).toInt();
    int g = message.substring(commaIndex1 + 1, commaIndex2).toInt();
    int b = message.substring(commaIndex2 + 1).toInt();

    // 设置灯带颜色
    for (int i = 0; i < NUM_LEDS; i++) {
      leds[i] = CRGB(r, g, b);
    }
    FastLED.show();
    Serial.println("LEDs updated with color: R=" + String(r) + ", G=" + String(g) + ", B=" + String(b));
  } else {
    Serial.println("Invalid message format. Expected format: R,G,B");
  }
}

void setup() {
  Serial.begin(115200);
  // 初始化灯带
  FastLED.addLeds<LED_TYPE, LED_PIN, COLOR_ORDER>(leds, NUM_LEDS);
  FastLED.setBrightness(BRIGHTNESS);

  // 连接 WiFi
  setup_wifi();

  // 设置 MQTT 服务器和回调函数
  client.setServer(mqtt_server, mqtt_port);
  client.setCallback(callback);
}

void loop() {
  if (!client.connected()) {
    reconnect();
  }
  client.loop();
}
代码说明
1.头文件和库引用:
#include <WiFi.h>
#include <PubSubClient.h>
#include <FastLED.h>
引入了用于 WiFi 连接的 WiFi.h、MQTT 通信的 PubSubClient.h 以及控制 WS2812 灯带的 FastLED.h 库。
注意事项:未下载过以上库文件的请提前下载。
- WiFi.h:一般情况下 Arduino IDE 会自动安装与开发板对应的 WiFi 库,无需手动下载
- PubSubClient.h:这是一个用于实现 MQTT 协议的客户端库,Arduino IDE 默认没有包含这个库,需要手动下载。
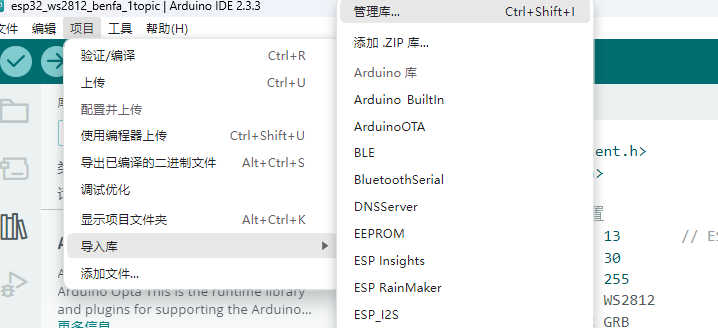
- FastLED.h:同样,Arduino IDE 默认不包含这个库,它用于控制 WS2812 等类型的 LED 灯带。你可以通过
点击“项目”->“导入库”->“管理库”,搜索库名安装.
2.灯带和服务器信息定义:
#define LED_PIN     13
#define NUM_LEDS    30
#define BRIGHTNESS  255
#define LED_TYPE    WS2812
#define COLOR_ORDER GRB
CRGB leds[NUM_LEDS];

const char* mqtt_server = "bemfa.com";
const int mqtt_port = 9501;
const char* clientId = "your_client_id";
const char* topic = "your_topic";

const char* ssid = "your_wifi_ssid";
const char* password = "your_wifi_password";
定义了 WS2812 灯带的引脚 LED_PIN、灯珠数量 NUM_LEDS、亮度BRIGHTNESS、灯带类型 LED_TYPE 和颜色顺序 COLOR_ORDER。同时定义了 MQTT 服务器的地址 mqtt_server、端口 mqtt_server_port、客户端 ID clientId、主题 topic,以及 WiFi 的 SSID ssid 和密码 password。
3.WiFi 连接函数:
void setup_wifi() {
  delay(10);
  Serial.println();
  Serial.print("Connecting to ");
  Serial.println(ssid);

  WiFi.begin(ssid, password);

  while (WiFi.status() != WL_CONNECTED) {
    delay(500);
    Serial.print(".");
  }

  if (WiFi.status() == WL_CONNECTED) {
    Serial.println("");
    Serial.println("WiFi connected");
    Serial.println("IP address: ");
    Serial.println(WiFi.localIP());
  } else {
    Serial.println("WiFi connection failed");
  }
}
函数 setup_wifi 用于连接 WiFi,通过 WiFi.begin(ssid, password) 启动连接,使用 WiFi.status() 检查连接状态,连接成功时打印 IP 地址,失败时打印错误信息。
4.MQTT 重连函数:
void reconnect() {
  while (!client.connected()) {
    Serial.print("Attempting MQTT connection...");
    if (client.connect(clientId)) {
      Serial.println("connected");
      client.subscribe(topic);
      Serial.println("Subscribed to topic: " + String(topic));
    } else {
      Serial.print("failed, rc=");
      Serial.print(client.state());
      Serial.println(" try again in 5 seconds");
      delay(5000);
    }
  }
}
函数 reconnect 用于重连 MQTT 服务器,通过 client.connect(clientId) 尝试连接,连接成功时订阅主题并打印订阅信息,失败时打印错误信息并等待 5 秒后重试。
5.MQTT 消息回调函数:
void callback(char* topic, byte* payload, unsigned int length) {
  Serial.print("Message arrived on topic: ");
  Serial.println(topic);
  String message = "";
  for (int i = 0; i < length; i++) {
    message += (char)payload[i];
  }
  Serial.print("Payload: ");
  Serial.println(message);

  // 解析接收到的颜色信息,格式为 "R,G,B"
  int commaIndex1 = message.indexOf(',');
  int commaIndex2 = message.indexOf(',', commaIndex1 + 1);
  if (commaIndex1 != -1 && commaIndex2 != -1) {
    int r = message.substring(0, commaIndex1).toInt();
    int g = message.substring(commaIndex1 + 1, commaIndex2).toInt();
    int b = message.substring(commaIndex2 + 1).toInt();

    // 设置灯带颜色
    for (int i = 0; i < NUM_LEDS; i++) {
      leds[i] = CRGB(r, g, b);
    }
    FastLED.show();
    Serial.println("LEDs updated with color: R=" + String(r) + ", G=" + String(g) + ", B=" + String(b));
  } else {
    Serial.println("Invalid message format. Expected format: R,G,B");
  }
}
函数 callback 是 MQTT 消息的回调函数,当接收到消息时被调用。它将接收到的消息转换为字符串,解析消息中的颜色信息(格式为 “R,G,B”),设置灯带颜色并更新显示,同时在串口监视器中打印消息主题、内容和颜色设置结果,若消息格式不正确则打印错误信息。
6.初始化函数 setup:
void setup() {
  Serial.begin(115200);
  // 初始化灯带
  FastLED.addLeds<LED_TYPE, LED_PIN, COLOR_ORDER>(leds, NUM_LEDS);
  FastLED.setBrightness(BRIGHTNESS);

  // 连接 WiFi
  setup_wifi();

  // 设置 MQTT 服务器和回调函数
  client.setServer(mqtt_server, mqtt_port);
  client.setCallback(callback);
}
setup 函数初始化串口通信,初始化 WS2812 灯带,连接 WiFi,设置 MQTT 服务器地址和消息回调函数。
7.主循环函数 loop:
void loop() {
  if (!client.connected()) {
    reconnect();
  }
  client.loop();
}
loop 函数检查 MQTT 连接状态,若未连接则调用 reconnect 函数尝试重连,然后调用 client.loop() 处理 MQTT 消息循环。
注意事项:在代码中务必将代码中的关键信息替换为自己的实际信息;如果修改了灯带连接的引脚,记得同步修改代码中的LED_PIN参数,否则灯带可能无法响应控制指令 。
your_wifi_ssid:你自己WIFI的名称
password:你自己WIFI的密码
your_client_id:替换为你的巴法云私钥
your_topic:替换为你自己的主题名称(如果你在巴法云新建主题时使用的是前面四.2中的ws2812,则填写ws2812即可)
六、上传代码并测试
1.确保 ESP32 开发板已通过 USB 线连接到电脑,并在 Arduino IDE 中选择正确的开发板和端口,在Arduino IDE中选择“工具”->“开发板”->“esp32”->“ESP32 Dev Module”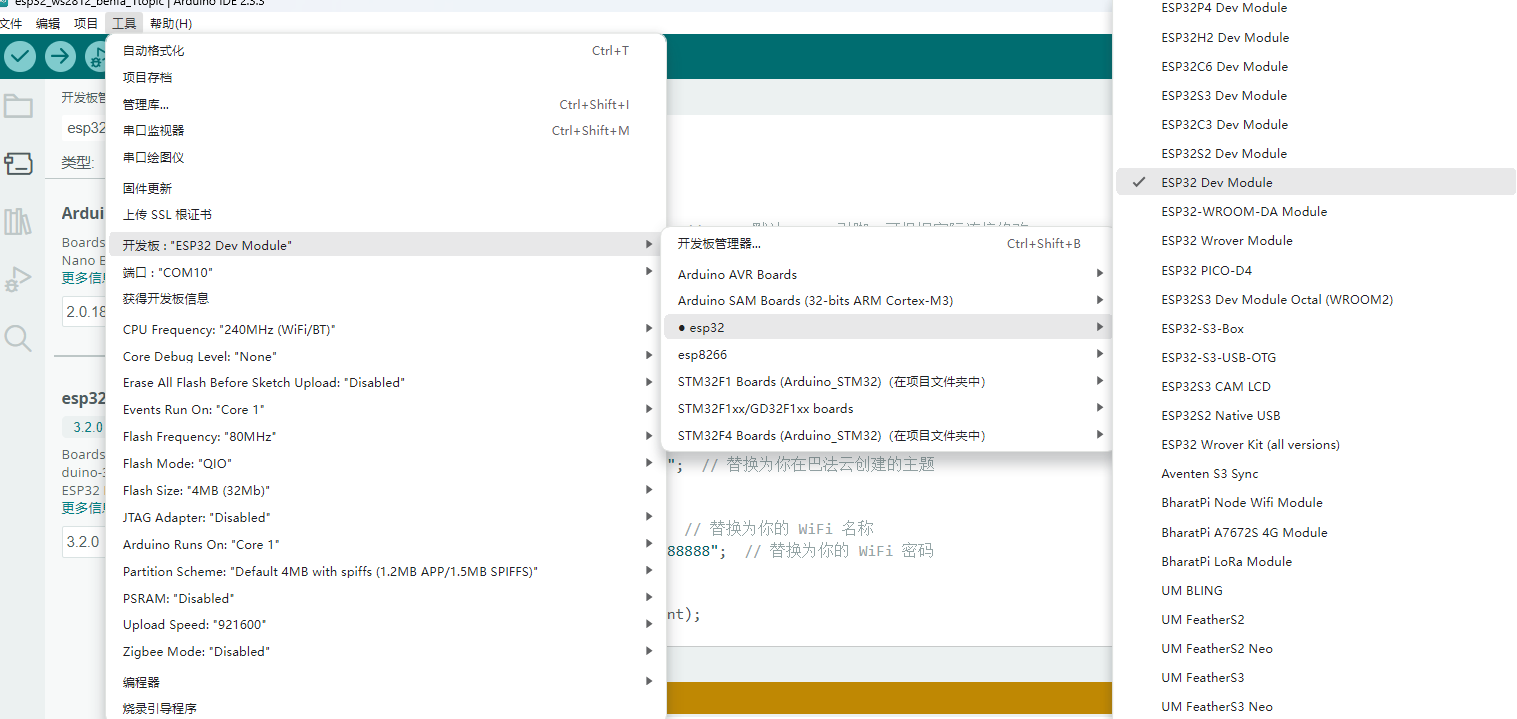
2.点击 Arduino IDE 中的 “上传” 按钮,等待代码上传完成。
3.代码上传成功后,打开巴法云平台的 “MQTT设备云” 页面,找到对应前文新建的主题“ws2812”,在 “消息” 栏中输入想要的光质(例如输入12,10,11)点击“推送消息”,即可改变灯带的光质。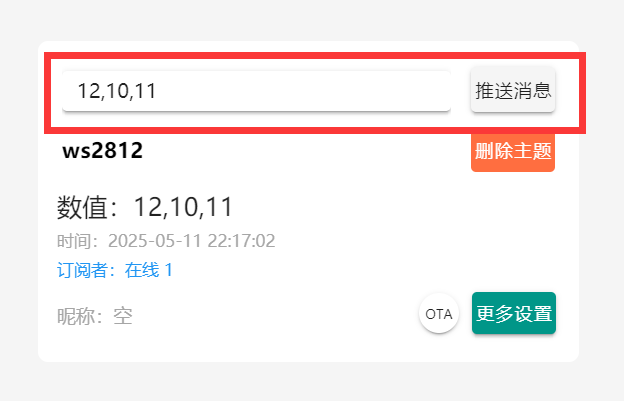
注意事项:
- 调光的数字范围是0~255,即可发送0,0,0至255,255,255
- 推送消息时注意使用英文符号的逗号

技术共进,成长同行——讯飞AI开发者社区
更多推荐


 16
16 0
0- 0


 已为社区贡献3条内容

所有评论(0)