
如何构建基于YOLOv8的烟雾检测系统,并使用PyQt5作为前端框架 三种分类-火焰、烟雾、正常模型-YOLO V8语言
通过上述步骤,你可以使用YOLOv8训练烟雾检测模型,并使用PyQt5创建一个简单的前端界面来显示实时检测结果。确保数据集结构正确,标注文件格式正确,并且路径配置正确好的,让我们详细地介绍如何使用YOLOv8训练烟雾检测数据集,并附上完整的代码。我们将从数据集准备、模型训练、模型测试和推理等方面进行详细介绍。通过上述步骤,你可以使用YOLOv8训练烟雾检测模型,并使用PyQt5创建一个简单的前端界
如何构建基于YOLOv8的烟雾检测系统,并使用PyQt5作为前端框架 三种分类:火焰、烟雾、正常模型:YOLO V8语言
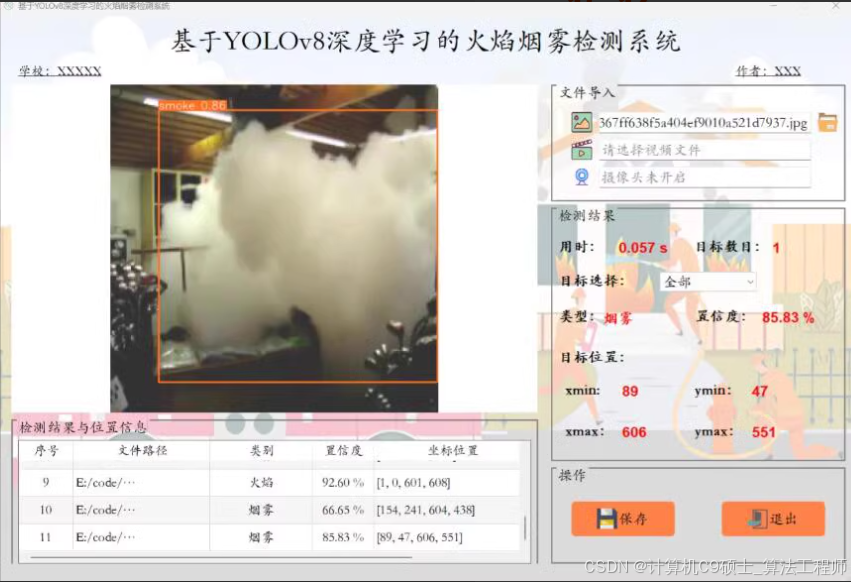
python基于yolo V8烟雾检测系统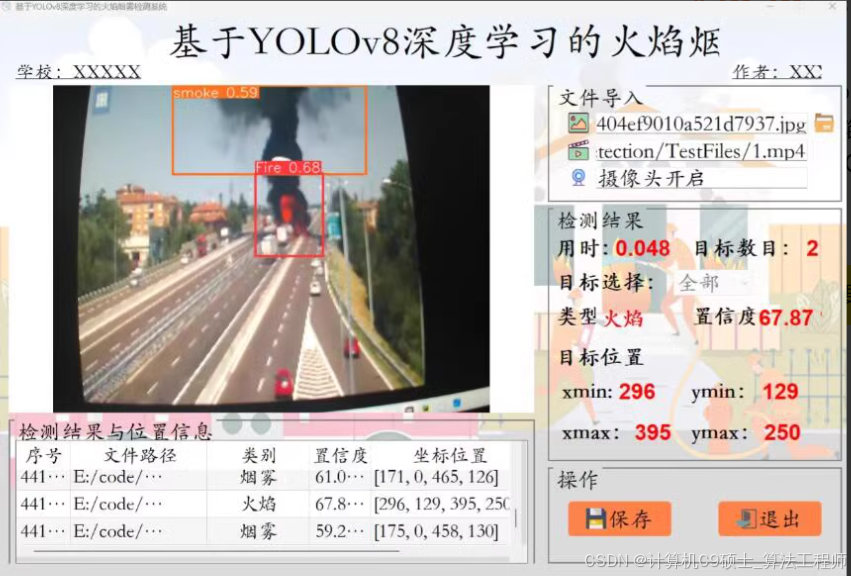
三种分类:火焰、烟雾、正常模型:YOLO V8语言:python前端框架:PyQt5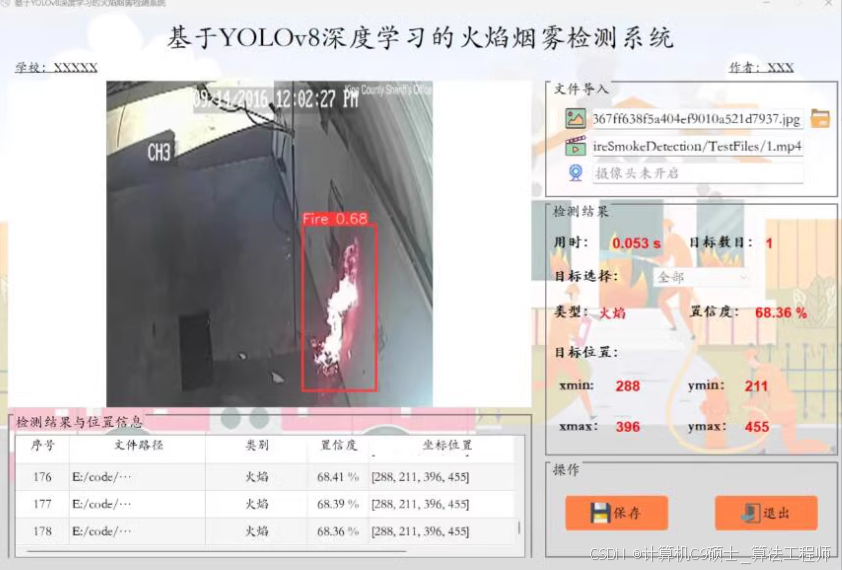
好的,让我们详细介绍一个基于YOLOv8的烟雾检测系统,并使用PyQt5作为前端框架。这个项目将包括以下几个部分: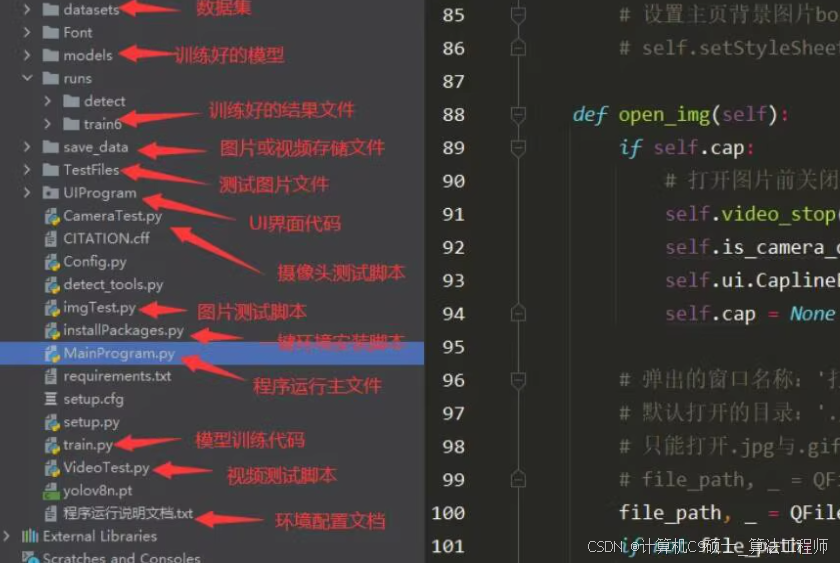
- YOLOv8模型训练1. PyQt5前端界面1. YOLOv8推理和可视化
1. YOLOv8模型训练
首先,我们需要准备数据集并训练YOLOv8模型。
数据集准备
确保你的数据集已经按照YOLO格式标注,并且数据集结构如下:
smoke_dataset/
│
├── images/
│   ├── train/
│   ├── val/
│   └── test/
│
├── labels/
│   ├── train/
│   ├── val/
│   └── test/
│
└── data.yaml
数据配置文件 (data.yaml)
创建一个data.yaml文件,用于配置数据集:
train: ./smoke_dataset/images/train
val: ./smoke_dataset/images/val
test: ./smoke_dataset/images/test

nc: 3  # 类别数量(3类)
names: ['fire', 'smoke', 'normal']  # 类别名称
训练模型
使用以下命令训练YOLOv8模型:
python train.py --data ./smoke_dataset/data.yaml --img 640 --batch 16 --epochs 100 --name yolov8_smoke --weights yolov8n.pt
2. PyQt5前端界面
接下来,我们将使用PyQt5创建一个简单的前端界面,用于显示实时检测结果。
PyQt5界面代码
import sys
from PyQt5.QtWidgets import QApplication, QMainWindow, QLabel, QVBoxLayout, QWidget, QPushButton, QFileDialog
from PyQt5.QtGui import QImage, QPixmap
from PyQt5.QtCore import QTimer
import cv2
from ultralytics import YOLO

class SmokeDetectionApp(QMainWindow):
    def __init__(self):
        super().__init__()
        self.setWindowTitle("Smoke Detection System")
        self.setGeometry(100, 100, 800, 600)

        self.central_widget = QWidget(self)
        self.setCentralWidget(self.central_widget)

        self.layout = QVBoxLayout(self.central_widget)

        self.image_label = QLabel(self)
        self.layout.addWidget(self.image_label)

        self.load_button = QPushButton("Load Image", self)
        self.load_button.clicked.connect(self.load_image)
        self.layout.addWidget(self.load_button)

        self.detect_button = QPushButton("Detect", self)
        self.detect_button.clicked.connect(self.detect_smoke)
        self.layout.addWidget(self.detect_button)

        self.model = YOLO('runs/train/yolov8_smoke/weights/best.pt')

    def load_image(self):
        file_dialog = QFileDialog()
        file_dialog.setFileMode(QFileDialog.ExistingFile)
        if file_dialog.exec_():
            file_name = file_dialog.selectedFiles()[0]
            self.image = cv2.imread(file_name)
            self.update_image()

    def update_image(self):
        if self.image is not None:
            height, width, channel = self.image.shape
            bytes_per_line = 3 * width
            q_image = QImage(self.image.data, width, height, bytes_per_line, QImage.Format_BGR888)
            self.image_label.setPixmap(QPixmap.fromImage(q_image))

    def detect_smoke(self):
        if self.image is not None:
            results = self.model(self.image)
            for result in results:
                boxes = result.boxes
                for box in boxes:
                    x1, y1, x2, y2 = box.xyxy[0].tolist()
                    label = box.cls[0].item()
                    confidence = box.conf[0].item()

                    # 绘制边界框
                    cv2.rectangle(self.image, (int(x1), int(y1)), (int(x2), int(y2)), (0, 255, 0), 2)
                    cv2.putText(self.image, f"{self.model.names[int(label)]}: {confidence:.2f}", (int(x1), int(y1) - 10), cv2.FONT_HERSHEY_SIMPLEX, 0.9, (0, 255, 0), 2)

            self.update_image()

if __name__ == "__main__":
    app = QApplication(sys.argv)
    window = SmokeDetectionApp()
    window.show()
    sys.exit(app.exec_())
3. YOLOv8推理和可视化
在上述代码中,我们已经包含了YOLOv8的推理和可视化代码。具体来说:
总结
通过上述步骤,你可以使用YOLOv8训练烟雾检测模型,并使用PyQt5创建一个简单的前端界面来显示实时检测结果。确保数据集结构正确,标注文件格式正确,并且路径配置正确
好的,让我们详细地介绍如何使用YOLOv8训练烟雾检测数据集,并附上完整的代码。我们将从数据集准备、模型训练、模型测试和推理等方面进行详细介绍。
1. 数据集准备
确保你的数据集已经按照YOLO格式标注,并且数据集结构如下:
smoke_dataset/
│
├── images/
│   ├── train/
│   ├── val/
│   └── test/
│
├── labels/
│   ├── train/
│   ├── val/
│   └── test/
│
└── data.yaml
数据配置文件 (data.yaml)
创建一个data.yaml文件,用于配置数据集:
train: ./smoke_dataset/images/train
val: ./smoke_dataset/images/val
test: ./smoke_dataset/images/test

nc: 3  # 类别数量(3类)
names: ['fire', 'smoke', 'normal']  # 类别名称
2. 安装依赖
确保你已经安装了ultralytics库。如果没有安装,可以使用以下命令安装:
pip install ultralytics
3. 训练模型
使用以下命令训练YOLOv8模型:
python train.py --data ./smoke_dataset/data.yaml --img 640 --batch 16 --epochs 100 --name yolov8_smoke --weights yolov8n.pt
4. 训练代码
为了更好地管理和跟踪训练过程,我们可以编写一个简单的Python脚本来执行训练:
import os

def train_yolo():
    # 检查YOLOv8是否已经安装
    try:
        from ultralytics import YOLO
    except ImportError:
        print("YOLOv8 not found. Installing...")
        os.system("pip install ultralytics")
        from ultralytics import YOLO

    # 检查数据集路径
    data_path = './smoke_dataset/data.yaml'
    if not os.path.exists(data_path):
        print(f"Data configuration file {data_path} not found.")
        return

    # 检查权重文件路径
    weights_path = 'yolov8n.pt'
    if not os.path.exists(weights_path):
        print(f"Weights file {weights_path} not found.")
        return

    # 训练模型
    model = YOLO(weights_path)
    model.train(data=data_path, imgsz=640, batch=16, epochs=100, name='yolov8_smoke')

if __name__ == "__main__":
    train_yolo()
5. 模型测试
训练完成后,你可以使用以下命令测试模型:
python val.py --data ./smoke_dataset/data.yaml --weights runs/train/yolov8_smoke/weights/best.pt
6. 模型推理
使用训练好的模型进行推理:
python detect.py --weights runs/train/yolov8_smoke/weights/best.pt --source path/to/image_or_video
7. PyQt5前端界面
接下来,我们将使用PyQt5创建一个简单的前端界面,用于显示实时检测结果。
PyQt5界面代码
import sys
from PyQt5.QtWidgets import QApplication, QMainWindow, QLabel, QVBoxLayout, QWidget, QPushButton, QFileDialog
from PyQt5.QtGui import QImage, QPixmap
from PyQt5.QtCore import QTimer
import cv2
from ultralytics import YOLO

class SmokeDetectionApp(QMainWindow):
    def __init__(self):
        super().__init__()
        self.setWindowTitle("Smoke Detection System")
        self.setGeometry(100, 100, 800, 600)

        self.central_widget = QWidget(self)
        self.setCentralWidget(self.central_widget)

        self.layout = QVBoxLayout(self.central_widget)

        self.image_label = QLabel(self)
        self.layout.addWidget(self.image_label)

        self.load_button = QPushButton("Load Image", self)
        self.load_button.clicked.connect(self.load_image)
        self.layout.addWidget(self.load_button)

        self.detect_button = QPushButton("Detect", self)
        self.detect_button.clicked.connect(self.detect_smoke)
        self.layout.addWidget(self.detect_button)

        self.model = YOLO('runs/train/yolov8_smoke/weights/best.pt')

    def load_image(self):
        file_dialog = QFileDialog()
        file_dialog.setFileMode(QFileDialog.ExistingFile)
        if file_dialog.exec_():
            file_name = file_dialog.selectedFiles()[0]
            self.image = cv2.imread(file_name)
            self.update_image()

    def update_image(self):
        if self.image is not None:
            height, width, channel = self.image.shape
            bytes_per_line = 3 * width
            q_image = QImage(self.image.data, width, height, bytes_per_line, QImage.Format_BGR888)
            self.image_label.setPixmap(QPixmap.fromImage(q_image))

    def detect_smoke(self):
        if self.image is not None:
            results = self.model(self.image)
            for result in results:
                boxes = result.boxes
                for box in boxes:
                    x1, y1, x2, y2 = box.xyxy[0].tolist()
                    label = box.cls[0].item()
                    confidence = box.conf[0].item()

                    # 绘制边界框
                    cv2.rectangle(self.image, (int(x1), int(y1)), (int(x2), int(y2)), (0, 255, 0), 2)
                    cv2.putText(self.image, f"{self.model.names[int(label)]}: {confidence:.2f}", (int(x1), int(y1) - 10), cv2.FONT_HERSHEY_SIMPLEX, 0.9, (0, 255, 0), 2)

            self.update_image()

if __name__ == "__main__":
    app = QApplication(sys.argv)
    window = SmokeDetectionApp()
    window.show()
    sys.exit(app.exec_())
总结
通过上述步骤,你可以使用YOLOv8训练烟雾检测模型,并使用PyQt5创建一个简单的前端界面来显示实时检测结果。确保数据集结构正确,标注文件格式正确,并且路径配置正确。

技术共进,成长同行——讯飞AI开发者社区
更多推荐
 9
9 0
0- 0


 已为社区贡献132条内容

所有评论(0)