
【ESP32连接485温湿度传感器】
使用ESP32连接485温湿度传感器
目录
一. 获取485传感器的Modbus报文
如果你没有传感器的文档,本章介绍如何获取RS485 传感器 Modbus 报文,如果已知传感器报文可直接转至第二章。本章参考博客: 获取485温湿度传感器的Modbus报文
1.1 硬件准备
- USB 转 RS485 模块:这是连接电脑与传感器的桥梁,能将电脑的 USB 接口转换为 RS485 通信接口 。
- RS485 温湿度传感器:确认传感器型号与线序
- 电源模块:12V 独立电源,注意不同型号传感器的供电要求可能存在差异。


1.2 软件准备
- 串口调试工具
- 485传感器配置软件
- 串口监视器
各类工具可自行下载,亦可使用本文提供的链街下载:
链接: 百度网盘
提取码:yuv8
1.3 硬件连接
| 传感器引脚 | USB 转 RS485 模块引脚 |
|---|---|
| 485A | A |
| 485B | B |
| 传感器引脚 | 直流电源 |
|---|---|
| 电源正 | 12V |
| 电源负 | GND |

将转换模块的USB连接至电脑,打开设备管理器查看设备COM号,记住自己的COM号,例如我的是COM16。(下载文件中有CH341驱动,未安装过的提前安装)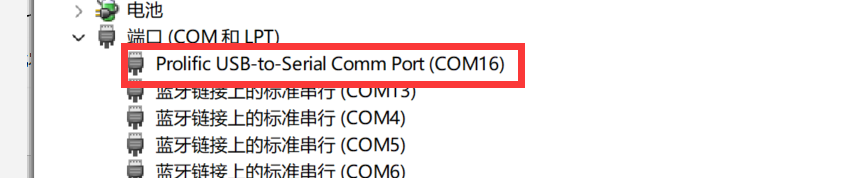
注:可能不同电脑此处略有差异,例如下图为COM6

(此处图片来源: 获取485温湿度传感器的Modbus报文)
打开软件中的串口监视精灵,文件->新建会话
选择刚才查看的串口,进行如下设置
打开485送变器配置软件,选择自己的传感器串口号,点击测试波特率,显示波特率(注:485传感器波特率可能有所不同,但是可以在此软件中更改,在设备波特率更改成自己想要的值,然后点击设置即可更改成功,为方便后面使用ESP32开发连接,这里我将波特率改成了9600)

点击确定后,在传感器可测定的项目后点击查询可获取数值,
返回串口精灵,可看到对应的Modbus报文

指令解析
此款传感器具备温湿度以及二氧化碳浓度的测定,其中温湿度测定发送的报文格式是:01 03 00 00 00 02 C4 0B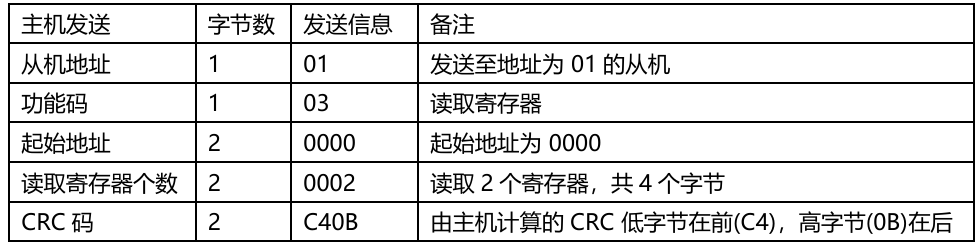
返回的报文格式是: 01 03 04 湿度(16位) 温度(16位) CRC校验码
以一组数据为例::01 03 04 01 D7 00 D6 CA 69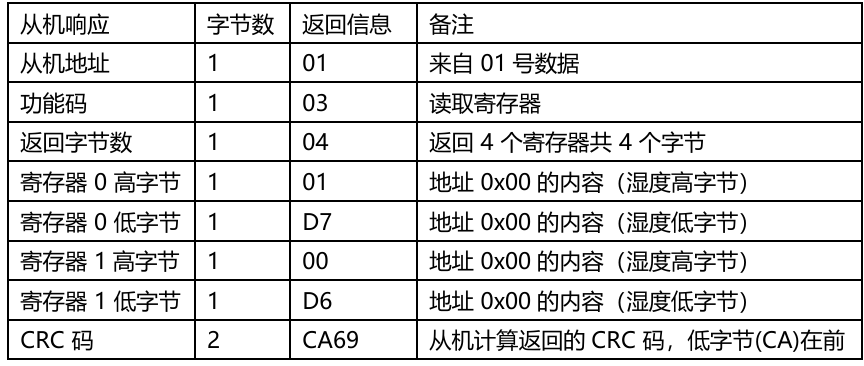
温湿度输出格式及计算示例 :
温湿度分辨率是 16Bit,温湿度以实际的正负数格式输出,且串出的数值是实际温湿度值的 10 倍
(湿度):01 D7 → 471(十六进制 → 十进制 471)=>湿度=256÷10=47.1%RH
(温度):00 D6 → 214(十六进制 → 十进制 214)=>温度=275÷10=21.4℃
(传感器的二氧化碳测试发送的报文格式可看出是01 03 00 02 00 01 25 CA
以一个返回例子:01 03 02 03 06 38 B6,其中03 06是寄存器的数据位,将03 06转换成十进制为774,此时二氧化碳浓度为774ppm)
二. ESP32 连接 RS485 温湿度传感器
2.1 硬件准备
- ESP32 开发板
- RS485 温湿度传感器
- TTL 转 RS485 模块
- 电源模块


2.2 软件准备
- Arduino IDE:安装 Arduino IDE,并添加 ESP32 开发板支持。具体步骤可参考
参考: ArduinoIDE安装ESP32
或者: 搭建ESP32-Arduino开发环境(离线一键安装超级好用)
2.3 硬件连接
| ESP32 | TTL 转 RS485 模块 |
|---|---|
| GND | GND |
| GPIO17 | RXD |
| GPIO16 | TXD |
| 3.3V | VCC |
| RS485 温湿度传感器 | TTL 转 RS485 模块 |
|---|---|
| 485A | A+ |
| 485A | B- |
最后将485温湿度传感器连直接12v电源,如1.3章节。
2.4 程序编写
完整代码
#include <SoftwareSerial.h>

unsigned char item[8] = {0x01, 0x03, 0x00, 0x00, 0x00, 0x02, 0xC4, 0x0B}; // 温湿度传感器的16进制命令
String data = ""; // 接收到的数据
SoftwareSerial tempSerial(16, 17);  // RX, TX

struct SensorData {
 float temperature;
 float humidity;
};

SensorData parseSensorData(String data) {
 SensorData result;

 // 去掉末尾的逗号
 if (data.endsWith(",")) {
   data = data.substring(0, data.length() - 1);
 }

 // 分割数据
 String info[9];
 int commaPosition = -1;
 for (int i = 0; i < 9; i++) {
   commaPosition = data.indexOf(',');
   if (commaPosition != -1) {
     info[i] = data.substring(0, commaPosition);
     data = data.substring(commaPosition + 1);
   } else {
     if (data.length() > 0) {
       info[i] = data;
     }
   }
 }

 // 解析湿度值(第四和第五位)
 int humidityHigh = info[3].toInt(); // 使用16进制解析
 int humidityLow = info[4].toInt();  // 使用16进制解析
 result.humidity = (humidityHigh * 256 + humidityLow) / 10.0; // 假设湿度值以百分比形式返回

 // 解析温度值(第六和第七位)
 int temperatureHigh = info[5].toInt(); // 使用16进制解析
 int temperatureLow = info[6].toInt();  // 使用16进制解析
 result.temperature = (temperatureHigh * 256 + temperatureLow) / 10.0; // 假设温度值以10倍形式存储

 return result;
}

void setup() {
 tempSerial.begin(9600);
 Serial.begin(9600);
}

void loop() {
 delay(500);  // 放慢输出频率

 // 发送测温命令
 for (int i = 0 ; i < 8; i++) {
   tempSerial.write(item[i]);
 }

 delay(100);  // 等待数据返回

 data = "";
 while (tempSerial.available()) { // 读取数据
   unsigned char in = (unsigned char)tempSerial.read();
   Serial.print(in, HEX);
   Serial.print(',');
   data += in;
   data += ',';
 }

 if (data.length() > 0) {
   Serial.println();
   Serial.println(data);

   SensorData sensorData = parseSensorData(data);
   Serial.print("Temperature: ");
   Serial.print(sensorData.temperature);
   Serial.println(" °C");
   Serial.print("Humidity: ");
   Serial.print(sensorData.humidity);
   Serial.println(" %");
 }
}
打开Arduino IDE的串口监视器,波特率设置为9600,即可看到输出的温湿度数值。
使用Arduino IDE编写ESP32代码过程可以看我之前的文章。
附录
顺便一提,如果想要同时测量二氧化碳的浓度,代码如下
#include <SoftwareSerial.h>

unsigned char tempHumidityItem[8] = {0x01, 0x03, 0x00, 0x00, 0x00, 0x02, 0xC4, 0x0B}; // 温湿度传感器的16进制命令
unsigned char co2Item[8] = {0x01, 0x03, 0x00, 0x02, 0x00, 0x01, 0x25, 0xCA}; // 二氧化碳传感器的16进制命令
String tempHumidityData = ""; // 接收到的温湿度数据
String co2Data = ""; // 接收到的二氧化碳数据
SoftwareSerial tempSerial(16, 17);  // RX, TX

struct SensorData {
  float temperature;
  float humidity;
  float co2;
};

SensorData parseSensorData(String data) {
  SensorData result;

  // 去掉末尾的逗号
  if (data.endsWith(",")) {
    data = data.substring(0, data.length() - 1);
  }

  // 分割数据
  String info[9];
  int commaPosition = -1;
  for (int i = 0; i < 9; i++) {
    commaPosition = data.indexOf(',');
    if (commaPosition != -1) {
      info[i] = data.substring(0, commaPosition);
      data = data.substring(commaPosition + 1);
    } else {
      if (data.length() > 0) {
        info[i] = data;
      }
    }
  }

  // 解析湿度值(第四和第五位)
  int humidityHigh = info[3].toInt(); // 使用16进制解析
  int humidityLow = info[4].toInt();  // 使用16进制解析
  result.humidity = (humidityHigh * 256 + humidityLow) / 10.0; // 假设湿度值以百分比形式返回

  // 解析温度值(第六和第七位)
  int temperatureHigh = info[5].toInt(); // 使用16进制解析
  int temperatureLow = info[6].toInt();  // 使用16进制解析
  result.temperature = (temperatureHigh * 256 + temperatureLow) / 10.0; // 假设温度值以10倍形式存储

  return result;
}

float parseCO2Data(String data) {
  // 去掉末尾的逗号
  if (data.endsWith(",")) {
    data = data.substring(0, data.length() - 1);
  }

  // 分割数据
  String info[7];
  int commaPosition = -1;
  for (int i = 0; i < 7; i++) {
    commaPosition = data.indexOf(',');
    if (commaPosition != -1) {
      info[i] = data.substring(0, commaPosition);
      data = data.substring(commaPosition + 1);
    } else {
      if (data.length() > 0) {
        info[i] = data;
      }
    }
  }

  // 解析二氧化碳值(第四和第五位)
  int co2High = info[3].toInt(); // 使用16进制解析
  int co2Low = info[4].toInt();  // 使用16进制解析
  return co2High * 256 + co2Low; // 假设二氧化碳值以整数形式返回
}

void setup() {
  tempSerial.begin(9600);
  Serial.begin(9600);
}

void loop() {
  delay(500);  // 放慢输出频率

  // 发送测温湿度命令
  for (int i = 0; i < 8; i++) {
    tempSerial.write(tempHumidityItem[i]);
  }

  delay(100);  // 等待数据返回

  tempHumidityData = "";
  while (tempSerial.available()) { // 读取数据
    unsigned char in = (unsigned char)tempSerial.read();
    Serial.print(in, HEX);
    Serial.print(',');
    tempHumidityData += in;
    tempHumidityData += ',';
  }

  if (tempHumidityData.length() > 0) {
    Serial.println();
    Serial.println(tempHumidityData);

    SensorData sensorData = parseSensorData(tempHumidityData);
    Serial.print("Temperature: ");
    Serial.print(sensorData.temperature);
    Serial.println(" °C");
    Serial.print("Humidity: ");
    Serial.print(sensorData.humidity);
    Serial.println(" %");
  }

  // 发送测CO2命令
  for (int i = 0; i < 8; i++) {
    tempSerial.write(co2Item[i]);
  }

  delay(100);  // 等待数据返回

  co2Data = "";
  while (tempSerial.available()) { // 读取数据
    unsigned char in = (unsigned char)tempSerial.read();
    Serial.print(in, HEX);
    Serial.print(',');
    co2Data += in;
    co2Data += ',';
  }

  if (co2Data.length() > 0) {
    Serial.println();
    Serial.println(co2Data);

    float co2 = parseCO2Data(co2Data);
    Serial.print("CO2: ");
    Serial.print(co2);
    Serial.println(" ppm");
  }
}

技术共进,成长同行——讯飞AI开发者社区
更多推荐
 11
11 0
0- 0


 已为社区贡献3条内容

所有评论(0)