
图像分类:VGG 网络、pytorch
这里写自定义目录标题一、VGG 网络结构介绍功能快捷键合理的创建标题,有助于目录的生成如何改变文本的样式插入链接与图片如何插入一段漂亮的代码片生成一个适合你的列表创建一个表格设定内容居中、居左、居右SmartyPants创建一个自定义列表如何创建一个注脚注释也是必不可少的KaTeX数学公式新的甘特图功能,丰富你的文章UML 图表FLowchart流程图导出与导入导出导入一、VGG 网络结构介绍VG
·
推荐参考视频:使用pytorch搭建VGG网络
一、VGG 网络结构和特点
VGG网络有以下几个配置,最常用的是D型,即我们熟悉的VGG16,共有16层网络结构。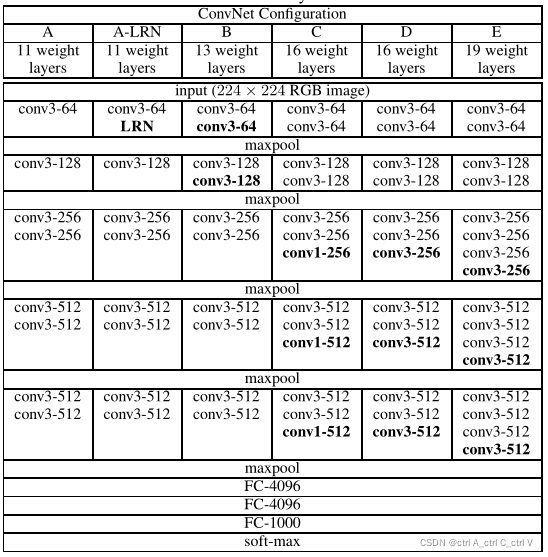
VGG网络中采用的 Conv均为小尺寸卷积核(Kernal Size=3*3,Stride=1,Padding=1),则根据 output_size = (input_size - K + 2P) /S+1,输出特征矩阵的大小为 (input_size - 3 + 2) /1+1 = input_size ,即经过卷积层之后,特征矩阵的尺寸不变。
VGG网络中的 MaxPool的 Kernal Size=2*2,Stride=2,即经过池化层后,特征矩阵大小变为原来的一半。
VGG 网络是为了参加图像分类比赛而生了,比赛采用的 ImageNet数据集有 1000个分类,所以VGG网络最后一层全连接层的节点数为1000。
VGG16 的网络结构如下图所示:

二、VGG 网络搭建
model.py:
import torch.nn as nn
import torch

# official pretrain weights
model_urls = {
    'vgg11': 'https://download.pytorch.org/models/vgg11-bbd30ac9.pth',
    'vgg13': 'https://download.pytorch.org/models/vgg13-c768596a.pth',
    'vgg16': 'https://download.pytorch.org/models/vgg16-397923af.pth',
    'vgg19': 'https://download.pytorch.org/models/vgg19-dcbb9e9d.pth'
}


class VGG(nn.Module):
    def __init__(self, features, num_classes=1000, init_weights=False):
        super(VGG, self).__init__()
        self.features = features
        self.classifier = nn.Sequential(
            nn.Linear(512 * 7 * 7, 4096),
            nn.ReLU(inplace=True),
            nn.Dropout(p=0.5),
            nn.Linear(4096, 4096),
            nn.ReLU(inplace=True),
            nn.Dropout(p=0.5),
            nn.Linear(4096, num_classes)
        )
        if init_weights:
            self._initialize_weights()

    def forward(self, x):
        # x: [N ,3 ,224 ,224]
        x = self.features(x)  # [N ,512 ,7 ,7]

        # torch.flatten(x, start_dim=1) 表示从第一维开始将 x 展平为一维向量
        x = torch.flatten(x, start_dim=1)  # [N ,512 * 7 * 7]

        x = self.classifier(x)  # [N ,1000]
        return x

    def _initialize_weights(self):
        for m in self.modules():
            if isinstance(m, nn.Conv2d):
                # nn.init.kaiming_normal_(m.weight, mode='fan_out', nonlinearity='relu')
                nn.init.xavier_uniform_(m.weight)
                if m.bias is not None:
                    nn.init.constant_(m.bias, 0)
            elif isinstance(m, nn.Linear):
                nn.init.xavier_uniform_(m.weight)
                # nn.init.normal_(m.weight, 0, 0.01)
                nn.init.constant_(m.bias, 0)


def make_features(config: list):
    layers = []
    in_channels = 3
    for v in config:
        if v == "M":
            layers += [nn.MaxPool2d(kernel_size=2, stride=2)]
        else:
            conv2d = nn.Conv2d(in_channels, out_channels=v, kernel_size=3, padding=1)
            layers += [conv2d, nn.ReLU(inplace=True)]
            in_channels = v
    return nn.Sequential(*layers)  # 非关键字参数layers可以是列表


# 不同模型的配置参数,其中64、128、256等表示卷积核的数量,'M'表示MaxPool2d
configs = {
    'vgg11': [64, 'M', 128, 'M', 256, 256, 'M', 512, 512, 'M', 512, 512, 'M'],
    'vgg13': [64, 64, 'M', 128, 128, 'M', 256, 256, 'M', 512, 512, 'M', 512, 512, 'M'],
    'vgg16': [64, 64, 'M', 128, 128, 'M', 256, 256, 256, 'M', 512, 512, 512, 'M', 512, 512, 512, 'M'],
    'vgg19': [64, 64, 'M', 128, 128, 'M', 256, 256, 256, 256, 'M', 512, 512, 512, 512, 'M', 512, 512, 512, 512, 'M'],
}


def vgg(model_name="vgg16", **kwargs):
    assert model_name in configs, "Warning: model number {} not in cfgs dict!".format(model_name)
    cfg = configs[model_name]
    model = VGG(make_features(cfg), **kwargs)
    return model


# 用随机生成的数据简单测试一下
if __name__ == "__main__":
    model_name = "vgg16"
    batch_size = 8
    # vgg()中的非关键字参数是**kwargs,所以必须以 ’num_classes=10‘ 这种形式传参,不能省略‘num_classes=’
    model = vgg(model_name=model_name, num_classes=10, init_weights=True)
    input = torch.rand(batch_size, 3, 224, 224)
    output = model(input)
    print(output.size())    # torch.Size([8, 10])
如果需要训练完整网络的话用AlexNet的五分类 flower 数据集即可:图像分类:AlexNet网络、五分类 flower 数据集、pytorch

技术共进,成长同行——讯飞AI开发者社区
更多推荐


 0
0 0
0- 0


 已为社区贡献16条内容

所有评论(0)