
【FCL学习第二讲】使用Assimp库导入外部模型碰撞检测
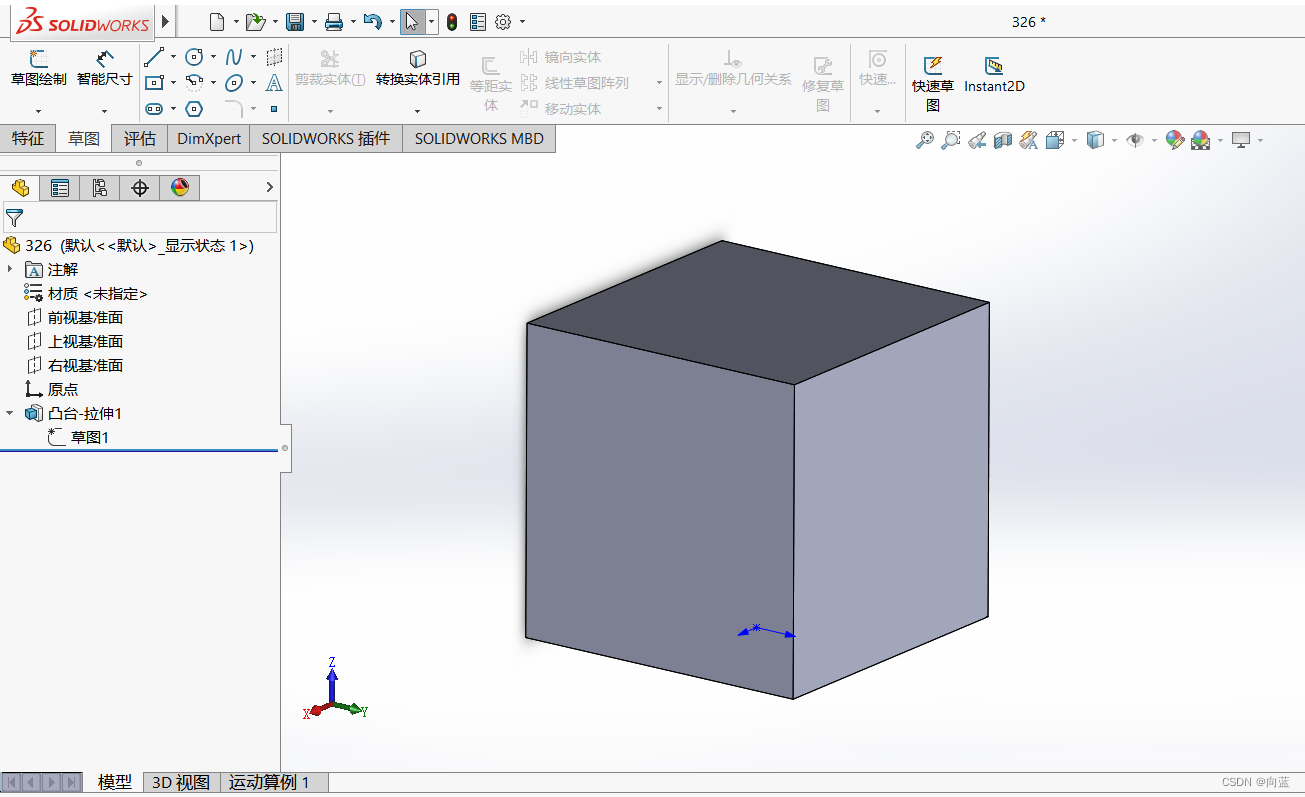
测试模型首先,使用Solidworks新建一个正方体,边长20mm,另存为stl格式使用Assimp库加载模型。
·
测试模型
首先,使用Solidworks新建一个正方体,边长20mm,另存为stl格式
使用Assimp库Assimp - LearnOpenGL CN (learnopengl-cn.github.io)加载模型
Mesh理解
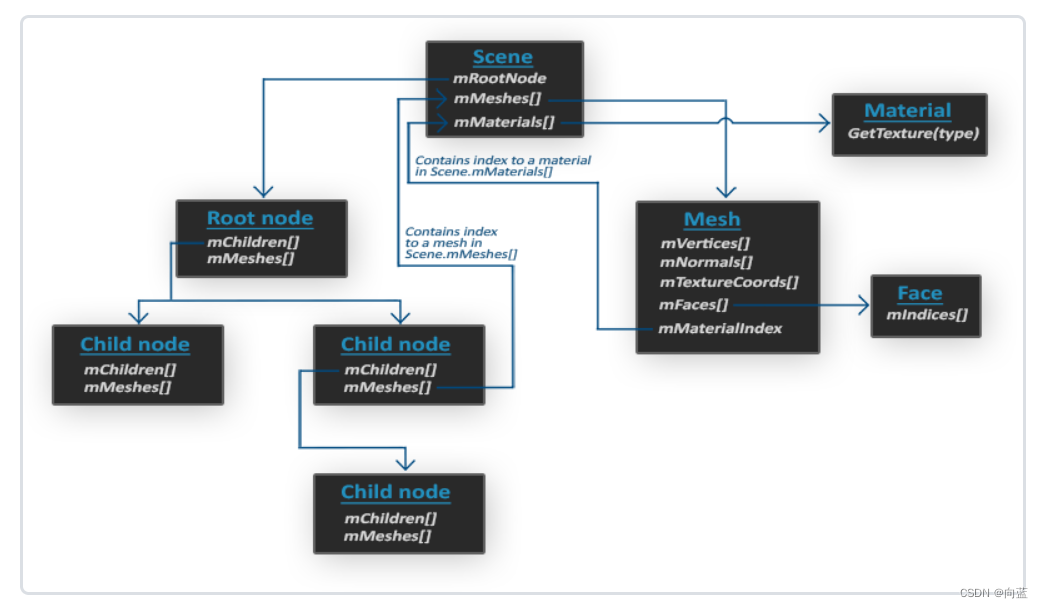
一个模型可以由一个或多个mesh组成,具体取决于该模型的复杂程度和需要表达的细节。复杂的模型可能由多个mesh组成,每个mesh都代表模型的不同部分或细节。 例如,一个简单的立方体模型可以由一个mesh组成,但是一个人物模型通常需要更多的细节,例如头部、身体、手臂和腿部等部位,因此可能由多个mesh组成。
在实际应用中,为了方便管理和渲染,通常将一个模型划分为多个mesh。每个mesh都包含一部分几何信息,并且可以单独进行渲染或者组合成完整的模型进行渲染。这种方式也便于开发者对模型进行维护和修改。
新建一个bvhModel类,用于转换顶点和索引
stl----> Assimp的Scene数据----> 自己的bhvModel的数据---->fcl::BVHModel数据
.h文件
#ifndef BVHMODEL_H
#define BVHMODEL_H
#include<Eigen/Core>
#include<ccd/ccd.h>
#define FCL_EXPORT
#include <fcl/fcl.h>
#include <fcl/narrowphase/collision.h>
#include <iostream>
#include <fstream>
#include <sstream>
#include <vector>
#include <string>
#include <assimp/Importer.hpp>
#include <assimp/scene.h>
#include <assimp/postprocess.h>
using namespace   fcl;
using namespace   std;
struct Mesh{
    vector<Vector3d> vertices;
    vector<Triangle> indices;
    Mesh( vector<Vector3d> vertices,vector<Triangle> indices){
        this->vertices = vertices;
        this->indices = indices;
    }
};

class bvhModel
{
public:

    bvhModel();
     void loadModel(const std::string& filename);
     void processNode(aiNode *node, const aiScene *scene);
     Mesh processMesh(aiMesh *mesh, const aiScene *scene);
     std::shared_ptr<fcl::BVHModel<fcl::OBBRSSd>> creatBVHModel_mesh(const std::string& filename);
private:
     vector<Mesh> meshes;
};

#endif // BVHMODEL_H
.cpp文件
#include "bvhmodel.h"


void bvhModel::loadModel(const std::string &filename)
{
    Assimp::Importer import;
    const aiScene *scene = import.ReadFile(filename, aiProcess_Triangulate | aiProcess_FlipUVs);
    if(!scene || scene->mFlags & AI_SCENE_FLAGS_INCOMPLETE || !scene->mRootNode) {
        std::cout<< "ERROR::ASSIMP::" << import.GetErrorString()<<std::endl;
        return;
    }
    //directory = path.substr(0, path.find_last_of('/'));
    processNode(scene->mRootNode, scene);///开始遍历scene
}

void bvhModel::processNode(aiNode *node, const aiScene *scene)
{
    // 处理节点所有的网格(如果有的话)
    for(unsigned int i = 0; i < node->mNumMeshes; i++){
        aiMesh *mesh = scene->mMeshes[node->mMeshes[i]];    ///一个节点有多个mesh
        meshes.push_back(processMesh(mesh, scene));
    }
    // 接下来对它的子节点重复这一过程
    for(unsigned int i = 0; i < node->mNumChildren; i++) {    ///一个节点有多个子节点
        processNode(node->mChildren[i], scene);
    }
}

////核心函数***访问网格的相关属性并将它们储存到我们自己的对象中
Mesh bvhModel::processMesh(aiMesh *mesh, const aiScene *scene)
{
    vector<Vector3d> vertices;    ///一个mesh中有许多顶点和同样数量的索引、纹理
    vector<Triangle> triangles; //索引
    //遍历顶点,只存位置
    for(unsigned int i = 0; i < mesh->mNumVertices; i++) {

        Eigen::Vector3d vector;
        vector<<(mesh->mVertices[i].x),
                (mesh->mVertices[i].y),
                (mesh->mVertices[i].z);
        cout<<"Point:"<<vector<<endl;
        vertices.push_back(vector); ///把顶点存放的vector
    }
    // 处理索引
    for(unsigned int i = 0; i < mesh->mNumFaces; i++) {  ///索引数量mNumFaces
        aiFace face = mesh->mFaces[i];
        for(unsigned int j = 0; j < face.mNumIndices; j+=3) {
            Triangle triangle(face.mIndices[j], face.mIndices[j+1],face.mIndices[j+2]);
            cout<<"triangle:"<<face.mIndices[j]<<face.mIndices[j+1]<<face.mIndices[j+2]<<endl;
            triangles.push_back(triangle);
        }
    }

    //构建mesh并作为返回值
    return Mesh(vertices, triangles);

}

//创建BVHModel,返回智能指针
std::shared_ptr<fcl::BVHModel<OBBRSSd> > bvhModel::creatBVHModel_mesh(const string &filename)
{
    loadModel(filename);
    std::shared_ptr<fcl::BVHModel<fcl::OBBRSSd>> mesh_model(new fcl::BVHModel<fcl::OBBRSSd>());
     mesh_model->beginModel();
     for(unsigned int i=0;i<meshes.size();i++){
         vector<Vector3d> vertices=meshes[i].vertices;
         vector<Triangle> triangles=meshes[i].indices;
         cout<<"vertices.size="<<vertices.size()<<endl;
         cout<<"triangles.size="<<triangles.size()<<endl;
        mesh_model->addSubModel(vertices,triangles);
     }
     mesh_model->endModel();
     return mesh_model;
}
测试代码
void test04()
{
cout<<"test04 start!"<<endl;
bvhModel bhvMmodle;
shared_ptr<BVHModel<OBBRSSd>> mesh_model=bhvMmodle.creatBVHModel_mesh("D:/326.STL");
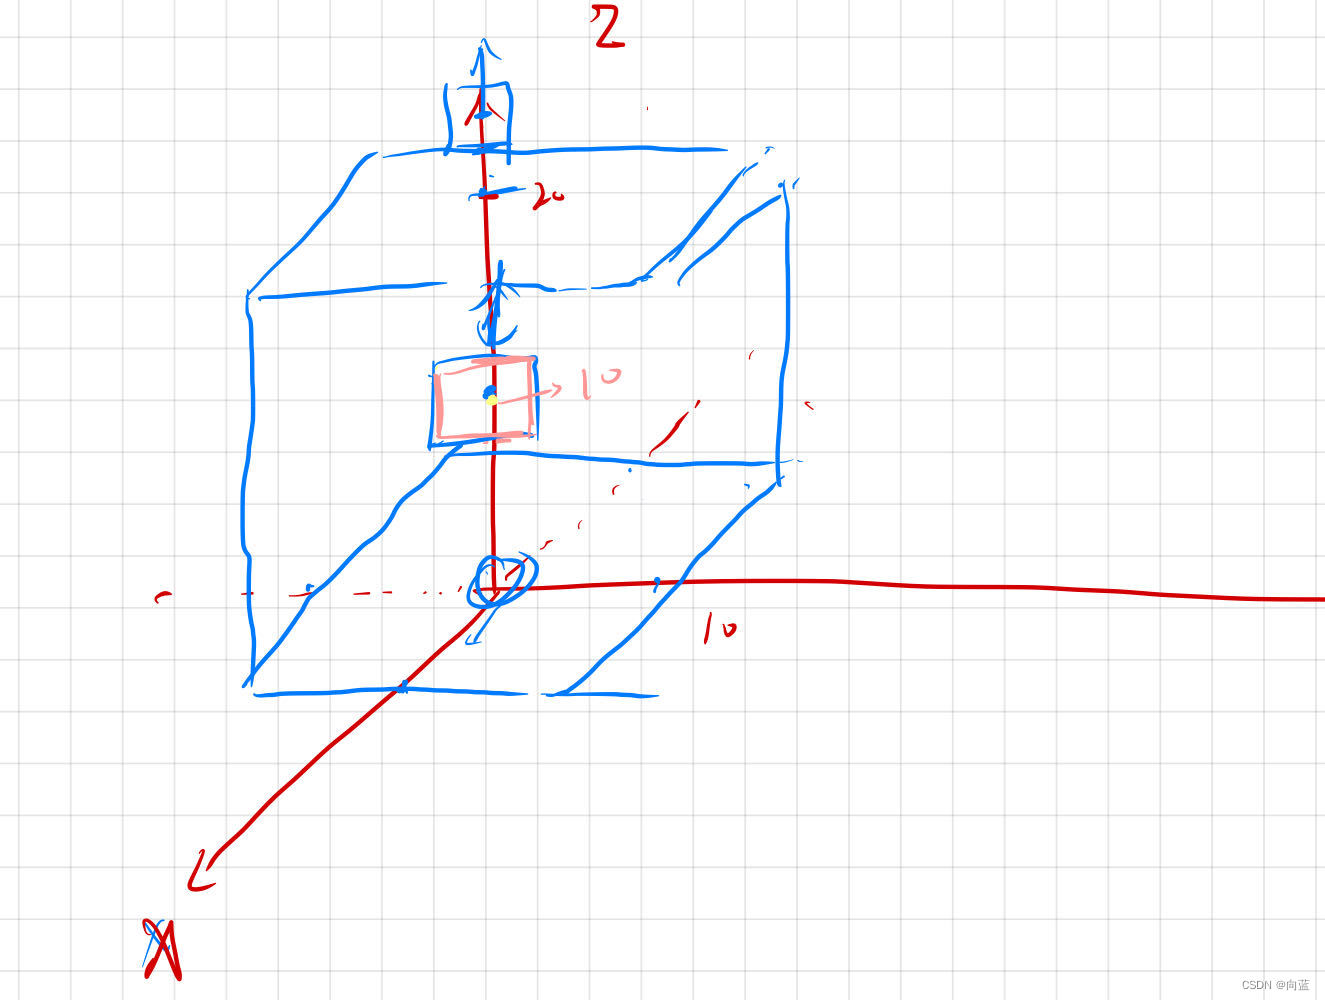
///建立碰撞对象-stl ,并添加CollisionGeometry,坐标位置(0,0,0)
CollisionObjectd obj(mesh_model);
///建立碰撞对象-box ,坐标位置(0,0,10)
shared_ptr<Boxd> box1 = make_shared<Boxd>(2.0, 2.0, 2.0);
CollisionObjectd box(box1);
obj1.setTranslation(Vector3d(0, 0,20));
CollisionRequestd request;
CollisionResultd result;
/// 进行碰撞检测
collide(&obj, &obox, request, result);
/// 输出碰撞结果
if (result.isCollision()) {
cout << "Collision detected!" << endl;
} else {
cout << "No collision detected." << endl;
}
///距离检测
DistanceRequestd requestd;
DistanceResultd resultd;
distance(&obj, &obj1, requestd, resultd);
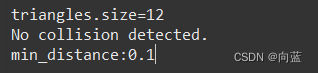
cout << "min_distance:" << resultd.min_distance<<endl;
}我们使用FCL内置shape新建了一个box1正方体,边长2mm;正方体位置为几何中心(0,0,0),我们使用obj1.setTranslation(),移动到(0, 0, 10)位置。
然后导入stl模型创建了另一个对象obj,位置不变,现在运行程序
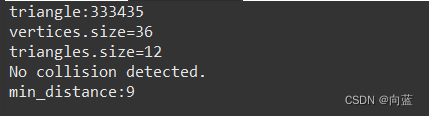
这时,我们的stl模型包围了box,最短距离为9
再次测试

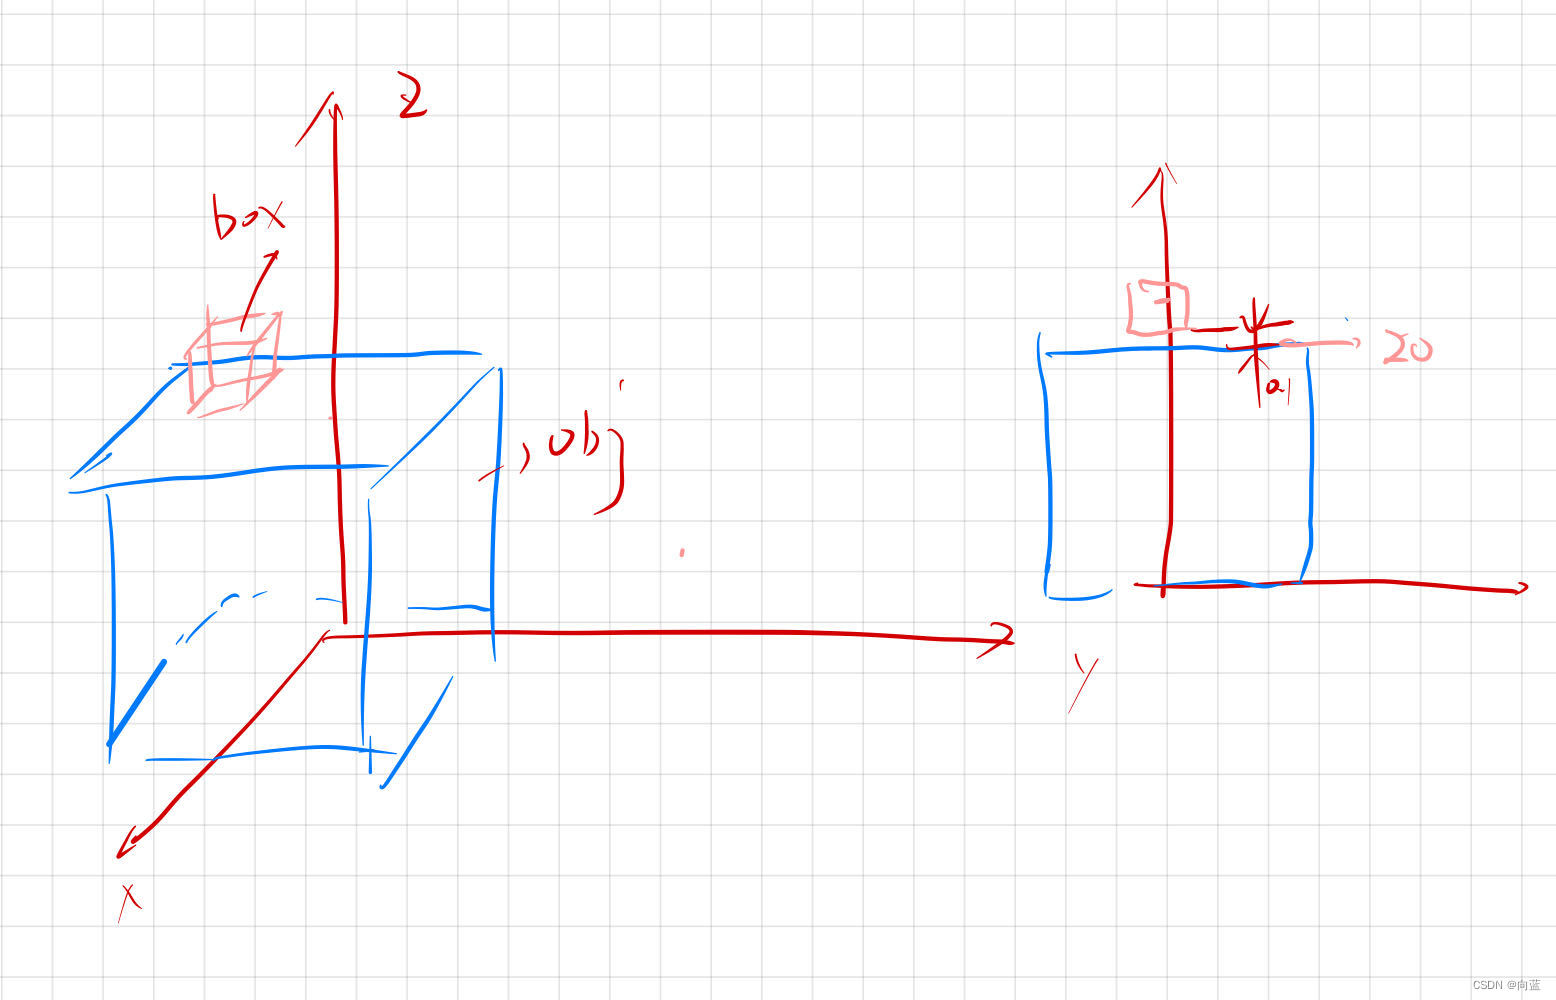
完美,下一节开始学习使用碰撞组绑定多个model。

技术共进,成长同行——讯飞AI开发者社区
更多推荐

 11
11 0
0- 0


 已为社区贡献1条内容

所有评论(0)