
Three.js 实现全景浏览,兼顾性能优化(全景图+透明模型)
使用threeJs展示模型直接展示位全景展厅时也遇到了不少问题,比如解决摄像机与各种物体的碰撞,解决移动端上如何控制移动等问题,最后决定放弃的原因也是最致命的,当解决完碰撞人物移动,环境贴图后,整个demo变得臃肿不堪,模型是低模但材质都不小,再算上碰撞计算,对于客户端的压力太大,不能正常展示。其实在这里新建全景盒的地方写的有点啰嗦了,name、textureUrl 和 roomIndex 是相同
少说废话,先看东西
技术栈:
- Vue2
- ThreeJs
- gsap
历程
想要实现全景展厅的浏览与编辑,对于用户来说需要有简易的编辑流程,需要有快速的渲染速度。全景图片的方式实现了解过krpano、Three.js、marzipano。
全景图实现无疑是相对比较简单快速的实现方式。利用生成好的图片(一张全景或六张分镜)包裹球形或立方体,实现了简单的全景展示。
但是在俯瞰图的设置上略微繁琐,以及更换动态展示图片时由于没有空间信息,不能直接获取到视觉偏移角度。对于图片的展示效果调整不便。
最终决定向能直接获取到视觉偏移角度的三维模型展示研究。
使用threeJs展示模型直接展示位全景展厅时也遇到了不少问题,比如解决摄像机与各种物体的碰撞,解决移动端上如何控制移动等问题,最后决定放弃的原因也是最致命的,当解决完碰撞人物移动,环境贴图后,整个demo变得臃肿不堪,模型是低模但材质都不小,再算上碰撞计算,对于客户端的压力太大,不能正常展示。故放弃。
利用ThreeJs的模型展示结合全景图的方案
最后选择使用将低模直接透明渲染在全景图上,前后进行空间对齐,即全景图摄像机的位置与ThreeJs中的控件位置一致,不但解决了材质压力,由于使用了全景图不能够自由移动,也就不需要解决碰撞问题。在编辑展示图时也因为整体是空间对齐的,所以可以直接拿到图片所在墙面的偏移。不需要过多调整。
代码及思路
定义展示div
<template>
  <div class="about">
    <div id="container" ref="container"></div>
  </div>
</template>
ThreeJs初始化,场景、相机、模型、渲染器
script:
import * as THREE from "three";
import {OrbitControls} from "three/examples/jsm/controls/OrbitControls";
import {GLTFLoader} from "three/addons/loaders/GLTFLoader";
import gsap from "gsap";

// 设置全局参数
let scene, camera, renderer,
    controls,wallsList = [],
    courseMesh,
    imgBuffer = null,
    mouseMove={
      x: 0,
      y: 0,
    },
    sphereList = [],
    modelList = []
;

// 为控件添加重新渲染
function animate() {
  requestAnimationFrame(animate);
  renderer.render(scene, camera);
  controls.update();
};

export default {
  data() {
    return {
      currentPoint: '',
      cubeList: [],
      inputFileName: '',
      mouseDown: false,
      mouseX: 0,
      mouseY: 0,
      cameraP: null,
      cameraT: null
    };
  },
  mounted() {
    this.init();
  },
  method: {
    init() {
      this.createSecne();
	  this.addModel();
	  this.addLight();

	  animate();
    },
    createSecne() {
	  const container = this.$refs.container;
	  // 场景
	  scene = new THREE.Scene();
	  // 相机
	  camera = new THREE.PerspectiveCamera(
	      75,
	      container.clientWidth / container.clientHeight,
	      0.1,
	      100
	  );
	  // 坐标轴
	  // const axesHelper = new THREE.AxesHelper(5);
	  // scene.add(axesHelper);

	  // 渲染器
	  renderer = new THREE.WebGLRenderer();
	  // renderer.autoClear = false;
	  renderer.setSize(container.clientWidth, container.clientHeight);
	  this.$refs.container.appendChild(renderer.domElement);

	  // 控制器
	  controls = new OrbitControls(camera, renderer.domElement);
	  controls.enablePan = false;

	  // 相机位置
	  camera.position.set(0, 0, 5);
	  controls.target.set(0, 0, 0);

	  // 动画
	  // animate();
	},
	addModel() {
	  const loader = new GLTFLoader();
	  let modelUrl = "../fullImg/model/scene.glb";
	  loader.load(modelUrl, (gltf) => {
	    // 获取模型后的操作
	    gltf.scene.traverse(child => {
	      // 模型透明度
	      if(child.isMesh){
	        modelList.push(child);
	        if(child.name.indexOf("wall")!=-1 || child.name.indexOf("ground")!=-1){
	          wallsList.push(child);
	        }
	        child.material = new THREE.MeshStandardMaterial({
	          // wireframe: true,
	          transparent: true,
	          opacity: 0.5,
	        })
	      }
		})
		scene.add(gltf.scene)
	  })
	},
	addLight() {
	  const pointLight1 = new THREE.PointLight(0xffffff, 0.1, 20);
	  const pointLight2 = new THREE.PointLight(0xffffff, 0.1, 20);
	  const pointLight3 = new THREE.PointLight(0xffffff, 0.1, 20);
	  const pointLight4 = new THREE.PointLight(0xffffff, 0.1, 20);
	  const pointLight5 = new THREE.PointLight(0xffffff, 0.1, 20);
	  const pointLight6 = new THREE.PointLight(0xffffff, 0.1, 20);
	  const pointLight7 = new THREE.PointLight(0xffffff, 0.1, 20);
	  const pointLight8 = new THREE.PointLight(0xffffff, 0.1, 20);
	  const pointLight9 = new THREE.PointLight(0xffffff, 0.1, 20);
	  const pointLight10 = new THREE.PointLight(0xffffff, 0.1, 20);
	  const pointLight11 = new THREE.PointLight(0xffffff, 0.1, 20);
	  pointLight1.position.set(-1, 4, 2)
	  pointLight2.position.set(-1, 4, -3)
	  pointLight3.position.set(-12, 4, 6)
	  pointLight4.position.set(-12, 4, -2)
	  pointLight5.position.set(-1, 4, 8)
	  pointLight6.position.set(10, 4, -2)
	  pointLight7.position.set(10, 4, 8)
	  pointLight8.position.set(0, -2, -10)
	  pointLight9.position.set(-15, -2, 2)
	  pointLight10.position.set(-1, -2, 12)
	  pointLight11.position.set(14, -2, 2)

	  scene.add(pointLight1);
	  scene.add(pointLight2);
	  scene.add(pointLight3);
	  scene.add(pointLight4);
	  scene.add(pointLight5);
	  scene.add(pointLight6);
	  scene.add(pointLight7);
	  scene.add(pointLight8);
	  scene.add(pointLight9);
	  scene.add(pointLight10);
	  scene.add(pointLight11);
	},
  }
}
此时应该可以看到一个半透明的模型在画面中。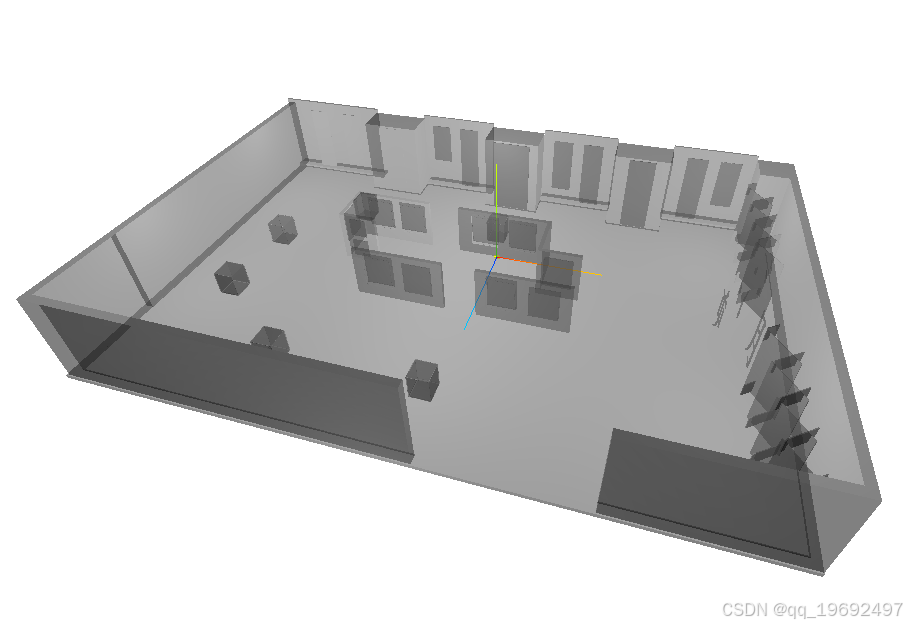
下边添加外部的全景盒,
script:
init() {

this.addCube();

},
addCube() {
  let cubeInfo = [
    {
	  name: "n2p1d5p2",
      position: {
        x: -2,
        y: 2,
        z: -1.5
      }
    },
    {
      name: "n4n3d65p2",
      position: {
        x: -4,
        y: 2,
        z: 3.65
      }
    },
    {
      name: "n5n7p2",
      position: {
        x: -5,
        y: 2,
        z: 7
      }
    },
    {
      name: "n5p1d5p2",
      position: {
        x: -5,
        y: 2,
        z: -1.5
      }
    },
    {
      name: "n6n1d65p2",
      position: {
        x: -6,
        y: 2,
        z: 1.65
      }
    },
    {
      name: "n9n1d65p2",
      position: {
        x: -9,
        y: 2,
        z: 1.65
      }
    },
    {
      name: "n9p1d5p2",
      position: {
        x: -9,
        y: 2,
        z: -1.5
      }
    },
    {
      name: "n11n7p2",
      position: {
        x: -11,
        y: 2,
        z: 7
      }
    },
    {
      name: "p1d5p1d5p2",
      position: {
        x: 1.5,
        y: 2,
        z: -1.5
      }
    },
    {
      name: "p1n3d65p2",
      position: {
        x: 1,
        y: 2,
        z: 3.65
      }
    },
    {
      name: "p2n7p2",
      position: {
        x: 2,
        y: 2,
        z: 7
      }
    },
    {
      name: "p5n3p2",
      position: {
        x: 5,
        y: 2,
        z: 3
      }
    },
    {
      name: "p6p1d5p2",
      position: {
        x: 6,
        y: 2,
        z: -1.5
      }
    },
    {
      name: "p7n7p2",
      position: {
        x: 7,
        y: 2,
        z: 7
      }
    }
   ]
  cubeInfo.forEach(i=>{
    this.cubeList.push(new Room(
        i.name,
        i.name,
        i.name,
        new THREE.Vector3(i.position.x, i.position.y, i.position.z)));
    // 创建一个热点 作为场景盒的中心点(偏下)显示场景盒所在位置
    const geometry1 = new THREE.SphereGeometry( 0.1, 20, 20 );
    const material1 = new THREE.MeshBasicMaterial( {color: 0x00ae86} );
    let sphere = new THREE.Mesh( geometry1, material1 );
    sphere.position.set(i.position.x, 0.5, i.position.z);
    sphere.name = i.name;
    sphereList.push(sphere);
    scene.add( sphere );
  })
},
上方的代码中使用了一个类Room,用来定义一个全景盒,我们在script标签内,export default {} 外部编写
class Room {
  constructor(
      name,
      roomIndex,
      textureUrl,
      position = new THREE.Vector3(0, 0, 0),
      euler = new THREE.Euler(0, 0, 0)
  ) {
    this.name = name;
    this.roomIndex = roomIndex;
    this.textureUrl = textureUrl;
    this.position = position;
    // 添加立方体
    const geometry = new THREE.BoxGeometry(50,50,50);
    geometry.scale(1, 1, -1);

    // 4_b,
    var arr = [
      `${roomIndex}_l`,
      `${roomIndex}_r`,
      `${roomIndex}_u`,
      `${roomIndex}_d`,
      `${roomIndex}_b`,
      `${roomIndex}_f`,
    ];
    var boxMaterials = [];


    arr.forEach((item) => {
      let t = `${textureUrl}/${item}.jpg`
      let temp = require("@/assets/fullImg/"+ t);
      // 纹理加载
      let texture = new THREE.TextureLoader().load(temp);
      // 创建材质
      if (item === `${roomIndex}_u` || item === `${roomIndex}_d`) {
        texture.rotation = Math.PI;
        texture.center = new THREE.Vector2(0.5, 0.5);
        boxMaterials.push(new THREE.MeshBasicMaterial({ map: texture, depthWrite:false }));
      } else {
        boxMaterials.push(new THREE.MeshBasicMaterial({ map: texture, depthWrite:false }));
      }
    });

    const cube = new THREE.Mesh(geometry, boxMaterials);
    cube.material.forEach((item) => {
      item.transparent = true;
      item.opacity = 0.5;
    });
    cube.position.copy(position);
    cube.rotation.copy(euler);
    cube.rotateY(Math.PI/2);
    cube.name = "full_"+name;
	scene.add(cube);
  }
}
其实在这里新建全景盒的地方写的有点啰嗦了,name、textureUrl 和 roomIndex 是相同的,不需要创建这么多的字段来接收,分别对应的意思是全景盒名称、图片存放地址、图片前缀。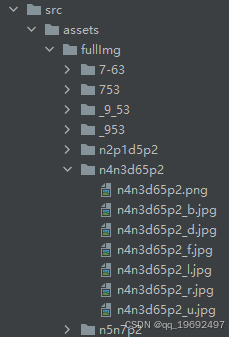
由于在场景中添加全景图盒子时将材质设置为透明0.5,所以目前是所有盒与模型全部半透明展示。
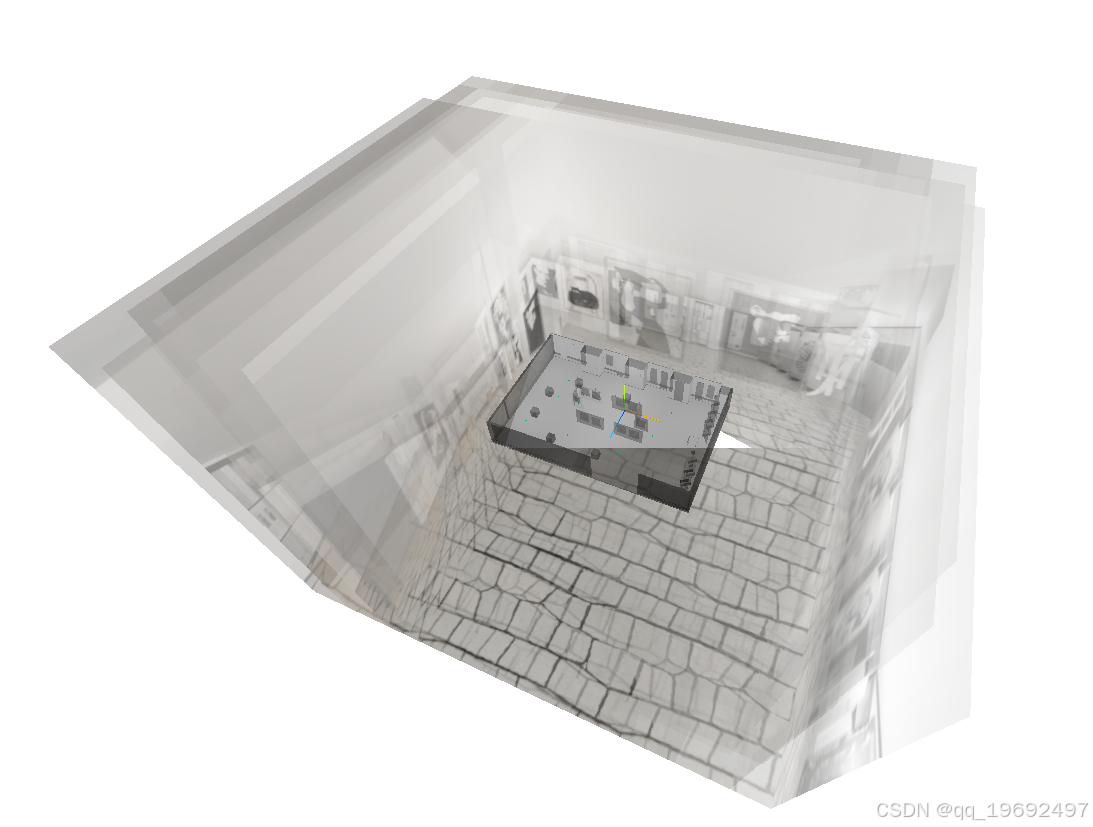
const geometry = new THREE.BoxGeometry(50,50,50); 这里将盒子大小设置为了50单位,大于模型中任何一点到模型边界的距离的2倍,这样可以避免在同一场景中因为模型与全景盒穿模而导致的在全景盒外部的素材无法正常查看的问题(挖坑,后续会填……)
然后我们修改模型、场景盒透明度为0(opacity: 0),添加点击事件,将传入场景名称修改对应场景的透明度为1。
init() {
	this.changeCamera('p2n7p2')
},
changeCamera(name) {
  let point = this.cubeList.find(item => item.name === name);
  let cameraTowards = new THREE.Vector3();
  camera.getWorldDirection(cameraTowards);
  cameraTowards.normalize();
  // 乘负数是为了相机的朝向一致
  cameraTowards.multiplyScalar(-0.01).add(point.position);

  // 获取当前立方体和下一个立方体
  let currentCube, nextCube;
  scene.traverse(child => {
    if (child.isMesh) {
      // 重置立方体的透明度
      if(child.name.indexOf("full_")!=-1){
        if(child.name === "full_"+name) {
          nextCube = child;
        }else if(child.name === "full_"+this.currentPoint) {
          currentCube = child;
        }
      }
    }
  });
  let topacity = {opacity: 1};
  // gsap 动画 修改相机位置、朝向、立方体透明度
  gsap.timeline()
      .add("start")
      .to(topacity, {
        duration: 1,
        opacity: 0,
        onUpdate: () => {
          if(currentCube){
            currentCube.material.forEach(i=>{
              i.opacity = topacity.opacity;
            });
          }
          nextCube.material.forEach(i=>{
            i.opacity = 1 - topacity.opacity;
          });
        },
      }, "start")
      .to(camera.position, {
            duration: 1,
            x: cameraTowards.x,
            y: cameraTowards.y,
            z: cameraTowards.z,
          },
          "start")
      .to(controls.target, {
            duration: 1,
            x: point.position.x,
            y: point.position.y,
            z: point.position.z,
          },
          "start")
      .add("end");
  this.currentPoint = name;
}
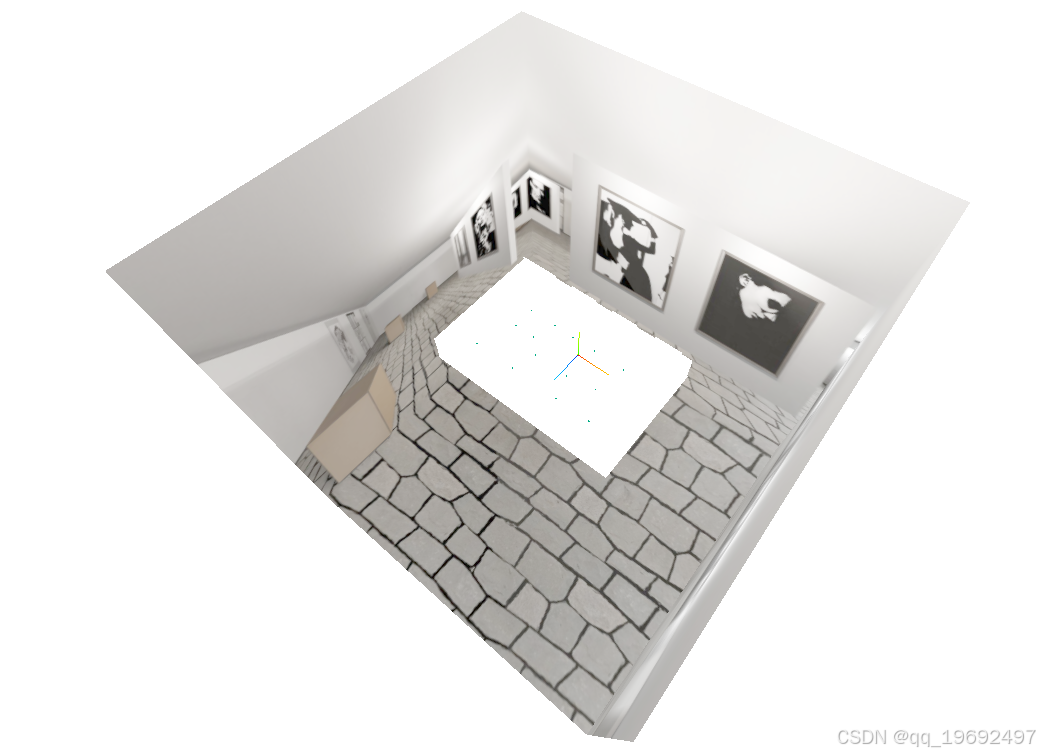
可以看到 模型虽然透明了,但是依旧在渲染时没有渲染后方的全景盒,将模型材质的depthWrite设置为false即可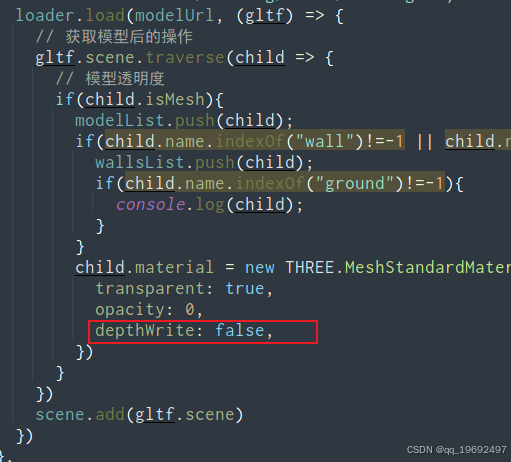
给鼠标加移动效果,与模型产生交互,添加点击事件,进行场景转换。
init() {
  this.addEvent();
},
addEvent() {
  const container = this.$refs.container;
  // 虽然不用自己写控制相机移动的代码,但是需要判断鼠标按下后是拖动还是点击,这里使用了mouseDown mouseX mouseY 三个参数控制,判断鼠标抬起时与鼠标按下时的绝对移动距离,大于10则判断是移动,不做点击鼠标的操作。
  container.addEventListener("mousedown", this.mouseDownFunc);
  container.addEventListener("mousemove", this.onDocumentMouseMove);
  container.addEventListener("mouseup", this.mouseUpFunc);
},
mouseDownFunc(event) {
  this.mouseDown = true;
  this.mouseX = event.layerX;
  this.mouseY = event.layerY;
},
onDocumentMouseMove(event) {
  if(this.mouseDown) {
    // 获取鼠标拖动的距离
    mouseMove.x = event.layerX - this.mouseX;
    mouseMove.y = event.layerY - this.mouseY;
  }
  const container = this.$refs.container;
  var mouse = new THREE.Vector2();
  mouse.x = (event.layerX / container.clientWidth) * 2 - 1;
  mouse.y = -(event.layerY / container.clientHeight) * 2 + 1;
  let raycaster = new THREE.Raycaster();
  raycaster.setFromCamera(mouse, camera);
  var intersects = raycaster.intersectObjects(wallsList);
  if (intersects.length > 0) {
    courseMesh.position.copy(intersects[0].point);
    // 根据射线与模型相交的面的法向量,设置模型的朝向
    courseMesh.lookAt(intersects[0].face.normal.add(intersects[0].point));
  }
},
mouseUpFunc(event) {
  if(
      Math.abs(mouseMove.x) < 10 &&
      Math.abs(mouseMove.y) < 10
  ) {
    // 获取鼠标点击是否点击到移动热点
    const container = this.$refs.container;
    let mouse = new THREE.Vector2();
    mouse.x = (event.layerX / container.clientWidth) * 2 - 1;
    mouse.y = -(event.layerY / container.clientHeight) * 2 + 1;
    let raycaster = new THREE.Raycaster();
    raycaster.setFromCamera(mouse, camera);
    var intersects = raycaster.intersectObjects(sphereList);
    if (intersects.length > 0) {
      // 获取点击的热点的名称
      let name = intersects[0].object.name;
      // 根据热点的名称,切换场景
      this.changeCamera(name);
    }
  }  this.mouseDown = false;
},
这时应该就可以实现上图的效果了。为什么说是应该呢,因为这里边的代码我没有按步骤写,截图用的演示代码是另一份,如果有跟到这里的朋友可以反馈一下具体哪里少了什么东西,我后续补充。
然后就有伙伴要说了,这鼠标拖动有点反直觉啊,向左拖动,场景右转;向上拖动,相机低头,这不妥妥晕3D招待么?
可能有细心的伙伴已经看到前边的controls.controlMode = 'opposite'了,然后各种网站上找了一圈 也没发现OrbitControls有controlMode属性,嘿嘿,是我改的源码,来源,找到OrbitControls源码复制一份
import {OrbitControls} from "@/assets/js/OrbitControls";
// import {OrbitControls} from "three/examples/jsm/controls/OrbitControls";
文件开始添加this.controlMode = 'original';属性,rotateLeft和rotateUp两个方法修改为如下,0.3是系数,因为转动不需要那么快,所以乘了一个系数。
function rotateLeft( angle ) {

   if ( scope.controlMode === 'original' ) {
      sphericalDelta.theta -= angle;
   } else {
      sphericalDelta.theta += angle*0.3;
   }


}

function rotateUp( angle ) {

   if ( scope.controlMode === 'original' ) {
      sphericalDelta.phi -= angle;
   } else {
      sphericalDelta.phi += angle*0.3;
   }

}
还记得前边挖的坑么,盒子设置的太大了,而且在相机移动时模型与全景盒有很大偏差,我们来解决这个问题,我们先看一篇Stack Overflow上的回答 我们只需要把模型和全景盒场景分开,然后把全景盒的scene向下设置、也就是第一次渲染,然后再在上层渲染透明模型就可以了。最后再将全景盒缩小至一倍大就可以了,这样在切换时基本也可以对齐了。
项目的源码在gitee,目前好像还是没有开放访问。有需要的伙伴可以给我发邮件索要。
gaofer-chou@ QQ的

技术共进,成长同行——讯飞AI开发者社区
更多推荐

 22
22 0
0- 0


 已为社区贡献1条内容

所有评论(0)