
大数据4_01_hive实战操作大全
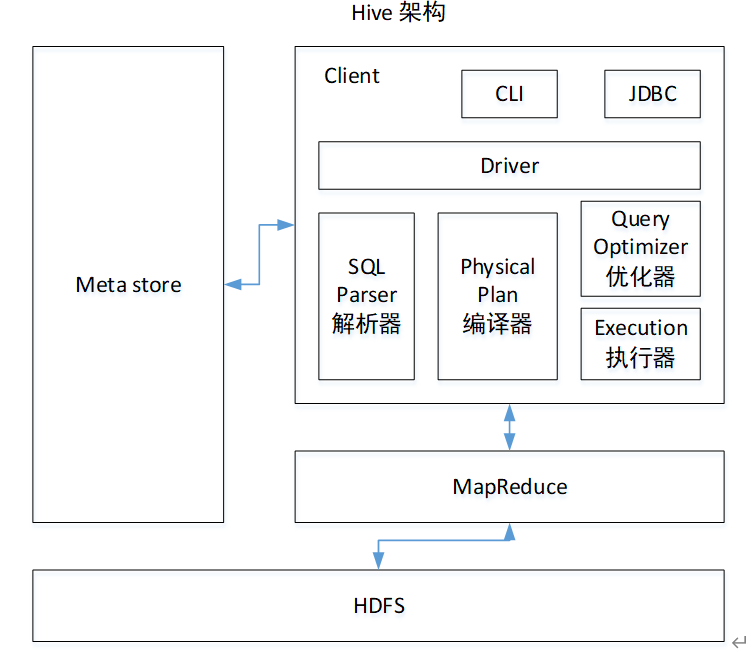
1 Hive基本概念hive是什么?hive是基于hadoop的一个数据仓库工具,可以将结构化的数据文件映射为一张表,并且提供类SQL的查询功能。其本质是将HQL转化成MapReduce程序。hive处理的数据存储在HDFS,hive的底层数据分析实现是MapReduce,程序运行在Yarn上。2 Hive安装部署2.1 安装mysql步骤1:centos7卸载mariadbrpm -qa | g
1 Hive基本概念
hive是什么?
hive是基于hadoop的一个数据仓库工具,可以将结构化的数据文件映射为一张表,并且提供类SQL的查询功能。
其本质是将HQL转化成MapReduce程序。
hive处理的数据存储在HDFS,hive的底层数据分析实现是MapReduce,程序运行在Yarn上。
2 Hive安装部署
2.1 安装mysql
步骤1:centos7卸载mariadb
rpm -qa | grep mariadb
sudo rpm -e --nodeps mariadb
步骤2:上传mysql的rpm包到/opt/software
01_mysql-community-common-5.7.29-1.el7.x86_64.rpm
02_mysql-community-libs-5.7.29-1.el7.x86_64.rpm
03_mysql-community-libs-compat-5.7.29-1.el7.x86_64.rpm
04_mysql-community-client-5.7.29-1.el7.x86_64.rpm
05_mysql-community-server-5.7.29-1.el7.x86_64.rpm
mysql-connector-java-5.1.48.jar
步骤3:安装mysql(按照顺序安装)
# 前三个是mysql依赖
sudo rpm -ivh 01_mysql-community-common-5.7.29-1.el7.x86_64.rpm
sudo rpm -ivh 02_mysql-community-libs-5.7.29-1.el7.x86_64.rpm
sudo rpm -ivh 03_mysql-community-libs-compat-5.7.29-1.el7.x86_64.rpm
# 安装mysql客户端
sudo rpm -ivh 04_mysql-community-client-5.7.29-1.el7.x86_64.rpm
# 安装mysql服务器端
sudo rpm -ivh 05_mysql-community-server-5.7.29-1.el7.x86_64.rpm
centos7最小化安装mysql服务端会出现缺少libaio的依赖。安装libaio后再安装server
# 安装libaio的依赖,yum需要联网下载,-y表示提示全部yes
sudo yum install -y libaio
步骤4:删除mysql本地内容(如果第一次安装不用操作)
# 查看mysql本地存储路径
cat /etc/my.cnf
# 指明mysql存储路径:
datadir=/var/lib/mysql
# 删除这个路径里面所有内容
sudo rm -rf /var/lib/mysql/*
步骤5:初始化mysql
因为我是第一次安装mysql,忘记初始化mysql了,也没有什么问题。也有初始密码。
sudo mysqld --initialize --user=mysql
步骤6:查看mysql临时密码
sudo cat /var/log/mysqld.log | grep -i password
步骤7:开启mysql服务
centos7默认开机自启mysql服务,但是当前初次安装mysql服务是关闭的。
sudo systemctl start mysqld
步骤8:用上述临时密码登录mysql
mysql -uroot -p临时密码
步骤9:修改临时密码
使用临时密码登录进去之后,无法执行mysql操作,会提示修改密码
如果密码太简单可以调低密码等级
mysql> set global validate_password_length=4;
mysql> set global validate_password_policy=0;
set password=password('密码');
# 设置好新密码后退出
quit;
步骤10:修改其他用户远程登录mysql
# 进入mysql
mysql -uroot -p新密码
# 进入系统的mysql库
use mysql;
# 查询user表
select user, host from user;
# 修改user表的把host内容改为%,表示任何用户都可以远程登录mysql
update user set host="%" where user='root';
步骤11:刷新数据库,退出
flush privileges;
quit;
2.2 安装hive
步骤1:将下载好的hive安装包,放到/opt/software/下
步骤2:解压hive安装包
tar -zxvf /opt/software/apache-hive-3.1.2-bin.tar.gz -C /opt/module/
# 为了方便修改hive文件夹的名称
mv /opt/module/apache-hive-3.1.2-bin /opt/module/hive
步骤3:修改环境变量
sudo vim /etc/profile.d/my_env.sh
# 添加如下内容
# HIVE_HOME
export HIVE_HOME=/opt/module/hive
export PATH=$PATH:$HIVE_HOME/bin

# 让环境变量生效
source /etc/profile.d/my_env.sh
步骤4:解决日志jar包冲突
mv $HIVE_HOME/lib/log4j-slf4j-impl-2.10.0.jar $HIVE_HOME/lib/log4j-slf4j-impl-2.10.0.jar.bak
步骤5:拷贝mysql的jdbc驱动去hive的lib目录下
cp /opt/software/mysql-connector-java-5.1.48.jar $HIVE_HOME/lib
2.3 配置hive
步骤1:在$HIVE_HOME/conf目录下新建hive-site.xml文件
vim $HIVE_HOME/conf/hive-site.xml
步骤2:在里面添加以下配置
<?xml version="1.0"?>
<?xml-stylesheet type="text/xsl" href="configuration.xsl"?>
<configuration>
    <!-- jdbc连接的URL -->
    <property>
        <name>javax.jdo.option.ConnectionURL</name>
        <value>jdbc:mysql://hadoop102:3306/metastore?useSSL=false</value>
    </property>
    <!-- jdbc连接的Driver-->
    <property>
        <name>javax.jdo.option.ConnectionDriverName</name>
        <value>com.mysql.jdbc.Driver</value>
    </property>
    <!-- jdbc连接的用户名-->
    <property>
        <name>javax.jdo.option.ConnectionUserName</name>
        <value>root</value>
    </property>
	<!-- jdbc连接的密码-->
    <property>
        <name>javax.jdo.option.ConnectionPassword</name>
        <value>root</value>
</property>
	<!-- Hive默认在HDFS的工作目录 -->
    <property>
        <name>hive.metastore.warehouse.dir</name>
        <value>/user/hive/warehouse</value>
    </property>
	<!-- Hive元数据存储版本的验证 -->
    <property>
        <name>hive.metastore.schema.verification</name>
        <value>false</value>
    </property>
	<!-- 指定存储元数据要连接的地址 -->
    <property>
        <name>hive.metastore.uris</name>
        <value>thrift://hadoop102:9083</value>
    </property>
	<!-- 指定hiveserver2连接的端口号 -->
    <property>
    <name>hive.server2.thrift.port</name>
    <value>10000</value>
    </property>
	<!-- 指定hiveserver2连接的host -->
    <property>
        <name>hive.server2.thrift.bind.host</name>
        <value>hadoop102</value>
    </property>
	<!-- 元数据存储授权  -->
    <property>
        <name>hive.metastore.event.db.notification.api.auth</name>
        <value>false</value>
    </property>
    <!-- 打印表头  -->
    <property>
        <name>hive.cli.print.header</name>
        <value>true</value>
    </property>
	<!-- 打印当前所在的库  -->
    <property>
        <name>hive.cli.print.current.db</name>
        <value>true</value>
    </property>
</configuration>
2.4 启动hive
步骤1:登录mysql
mysql -uroot -p密码
步骤2:新建hive元数据库
create database metastore;
quit;
步骤3:初始化hive元数据库
初始化完之后就可以,看到在metastore里面有一个DBS表,存放元数据在HDFS上的信息。
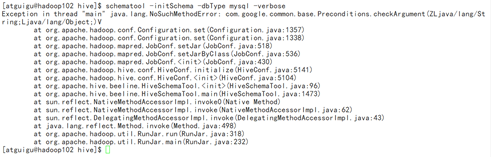
[atguigu@hadoop102 software]$ schematool -initSchema -dbType mysql -verbose
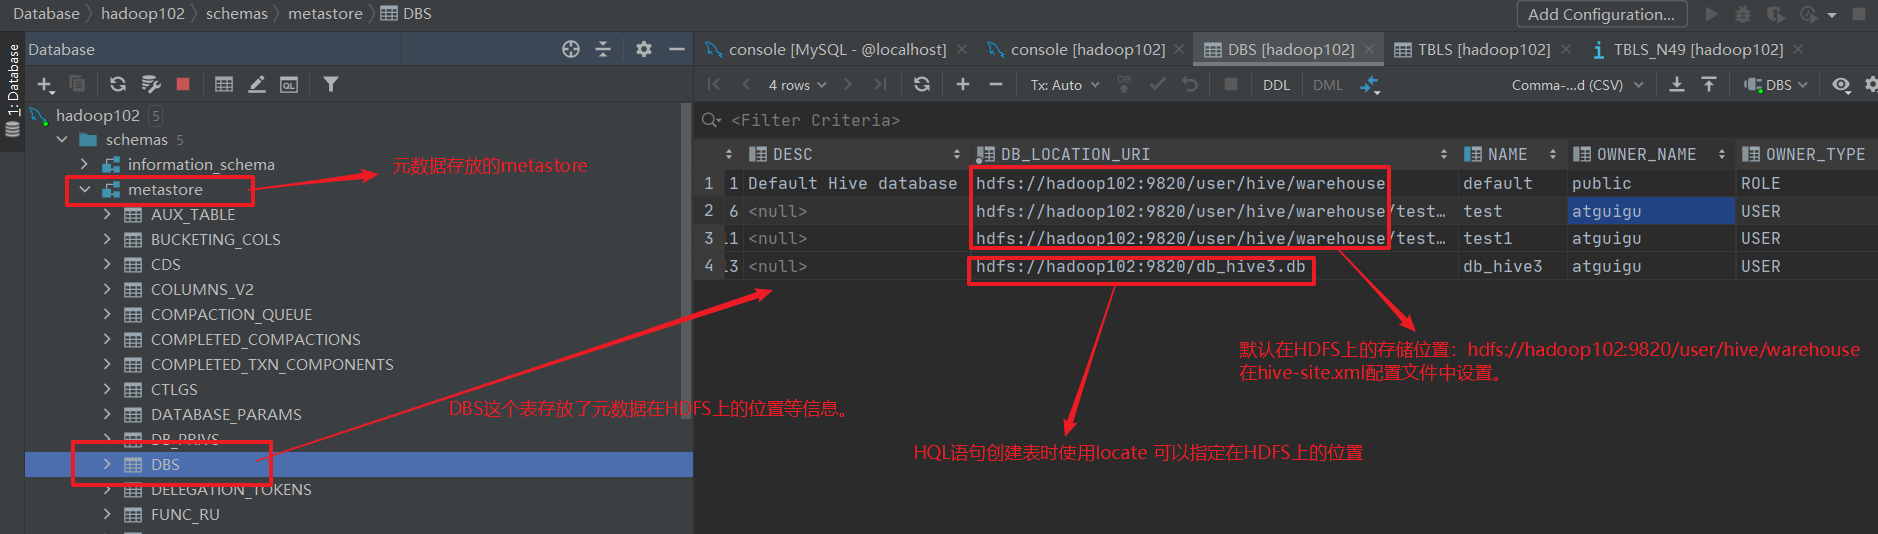
metastore中的TBLS表,存放了所有的表。

如果初始化出现下面的异常:
需要查看/opt/module/hadoop-3.1.3/share/hadoop/common/lib下的guava.jar 和 /opt/module/hive/lib下的guava.jar的版本,删除其中低版本的,选择新的版本进行复制。
步骤4:启动metastore和hiveserver2
hive2.0版本以上要先启动这两个服务。否则会报错
FAILED: HiveException java.lang.RuntimeException: Unable to instantiate org.apache.hadoop.hive.ql.metadata.SessionHiveMetaStoreClient
# 启动metastore(启动后窗口不能再操作,需要重新打开一个新的shell窗口进行其他操作)
hive --service metastore
# 启动hiveserver2(启动后窗口不能再操作,需要重新打开一个新的shell)
hive --service hiveserver2
步骤5:编写hive服务启动的脚本
前台启动metastore和hivestore2两个服务需要打开多个窗口,
nohup放在命令开头,表示不挂起,也就是关闭终端进程也继续保持运行状态。
vim $HIVE_HOME/bin/myhive.sh
chmod +x $HIVE_HOME/bin/myhive.sh
#!/bin/bash
HIVE_LOG_DIR=$HIVE_HOME/logs

mkdir -p $HIVE_LOG_DIR

#检查进程是否运行正常,参数1为进程名,参数2为进程端口
function check_process()
{
    pid=$(ps -ef 2>/dev/null | grep -v grep | grep -i $1 | awk '{print $2}')
    ppid=$(netstat -nltp 2>/dev/null | grep $2 | awk '{print $7}' | cut -d '/' -f 1)
    echo $pid
    [[ "$pid" =~ "$ppid" ]] && [ "$ppid" ] && return 0 || return 1
}

function hive_start()
{
    metapid=$(check_process HiveMetastore 9083)
    cmd="nohup hive --service metastore >$HIVE_LOG_DIR/metastore.log 2>&1 &"
    cmd=$cmd" sleep 4; hdfs dfsadmin -safemode wait >/dev/null 2>&1"
    [ -z "$metapid" ] && eval $cmd || echo "Metastroe服务已启动"
    server2pid=$(check_process HiveServer2 10000)
    cmd="nohup hive --service hiveserver2 >$HIVE_LOG_DIR/hiveServer2.log 2>&1 &"
    [ -z "$server2pid" ] && eval $cmd || echo "HiveServer2服务已启动"
}

function hive_stop()
{
    metapid=$(check_process HiveMetastore 9083)
    [ "$metapid" ] && kill $metapid || echo "Metastore服务未启动"
    server2pid=$(check_process HiveServer2 10000)
    [ "$server2pid" ] && kill $server2pid || echo "HiveServer2服务未启动"
}

case $1 in
"start")
    hive_start
    ;;
"stop")
    hive_stop
    ;;
"restart")
    hive_stop
    sleep 2
    hive_start
    ;;
"status")
    check_process HiveMetastore 9083 >/dev/null && echo "Metastore服务运行正常" || echo "Metastore服务运行异常"
    check_process HiveServer2 10000 >/dev/null && echo "HiveServer2服务运行正常" || echo "HiveServer2服务运行异常"
    ;;
*)
    echo Invalid Args!
    echo 'Usage: '$(basename $0)' start|stop|restart|status'
    ;;
esac
步骤6:启动hive服务
myhive.sh start
2.5 hiveJDBC启动
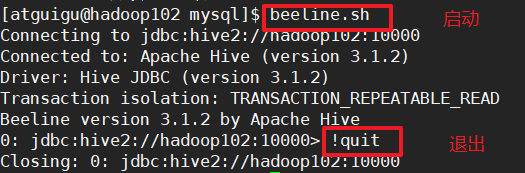
步骤1:启动beeline客户端
启动beeline客户端需要等一会,当使用myhive.sh start查看到hive服务启动正常才能进入。

beeline -u jdbc:hive2://hadoop102:10000 -n atguigu
每次登录beeline要输入这么多太麻烦了,可以写一个脚本。vim $HIVE_HOME/bin/beeline.sh
#!/bin/bash
beeline -u jdbc:hive2://hadoop102:10000 -n atguigu
步骤2:退出beeline客户端
!quit
2.6 hive常见属性配置
log日志位置
hive的log默认存放在/tmp/atguigu/hive.log目录下,修改hive的log存放在/opt/module/hive/logs下
步骤1:修改hive-log4j2.properties.template
mv /opt/module/hive/conf/hive-log4j2.properties.template /opt/module/hive/conf/hive-log4j2.properties
步骤2:修改hive-log4j2.properties文件中log存放位置
hive.log.dir=/opt/module/hive/logs
参数配置方式
方式1:hive-site.xml文件
用户自定义的hive-site.xml文件会覆盖默认配置的hive-default.xml
方式2:命令行参数方式(仅对本次启动有效)
[atguigu@hadoop102 hive]$ bin/hive -hiveconf mapred.reduce.tasks=10;
# 查看参数设置:
hive (default)> set mapred.reduce.tasks;
方式3:hive内设置(仅对本次hive有效)
hive (default)> set mapred.reduce.tasks=100;
# 查看参数设置
hive (default)> set mapred.reduce.tasks;
3 Hive数据类型
3.1 基本数据类型
hive中没有char和varchar类型,取代的是string类型。
| HIVE | MySQL | JAVA | 长度 | 例子 |
|---|---|---|---|---|
| TINYINT | TINYINT | byte | 1byte有符号整数 | 2 |
| SMALINT | SMALINT | short | 2byte有符号整数 | 20 |
| INT | INT | int | 4byte有符号整数 | 20 |
| BIGINT | BIGINT | long | 8byte有符号整数 | 20 |
| BOOLEAN | 无 | boolean | 布尔类型,true或者false | TRUE FALSE |
| FLOAT | FLOAT | float | 单精度浮点数 | 3.14159 |
| DOUBLE | DOUBLE | double | 双精度浮点数 | 3.14159 |
| STRING | VARCHAR | string | 字符系列。可以指定字符集。可以使用单引号或者双引号。 | ‘now is the time’ “for all good men” |
| TIMESTAMP | TIMESTAMP | 时间类型 | ||
| BINARY | BINARY | 字节数组 |
3.2 集合数据类型
struct,map,array的元素之间都可以用一种符号进行分割。
| 数据类型 | 描述 | 语法示例 |
|---|---|---|
| STRUCT | 和c语言中的struct类似,都可以通过“点”符号访问元素内容。例如,如果某个列的数据类型是STRUCT{first STRING, last STRING},那么第1个元素可以通过字段.first来引用。 | struct() 例如struct<street:string, city:string> |
| MAP | MAP是一组键-值对元组集合,使用数组表示法可以访问数据。例如,如果某个列的数据类型是MAP,其中键->值对是’first’->’John’和’last’->’Doe’,那么可以通过字段名[‘last’]获取最后一个元素 | map() 例如map<string, int> |
| ARRAY | 数组是一组具有相同类型和名称的变量的集合。这些变量称为数组的元素,每个数组元素都有一个编号,编号从零开始。例如,数组值为[‘John’, ‘Doe’],那么第2个元素可以通过数组名[1]进行引用。 | Array() 例如array |
实例操作:
{
    "name": "songsong",
    "friends": ["bingbing" , "lili"] ,       //列表Array,
    "children": {                      //键值Map,
        "xiao song": 18 ,
        "xiaoxiao song": 19
    }
    "address": {                      //结构Struct,
        "street": "hui long guan" ,
        "city": "beijing"
    }
}
步骤1:创建本地测试文件/opt/module/datas/test.txt
songsong,bingbing_lili,xiao song:18_xiaoxiao song:19,hui long guan_beijing
yangyang,caicai_susu,xiao yang:18_xiaoxiao yang:19,chao yang_beijing
步骤2:在hive上创建表test
create table test(
name string,
friends array<string>,
children map<string, int>,
address struct<street:string, city:string>
)
row format delimited fields terminated by ','	#列分隔符
collection items terminated by '_'		# struct,map,array的分隔符
map keys terminated by ':'		# map中key与value的分隔符
lines terminated by '\n';		# 行分隔符
步骤3:导入数据到测试表
load data local inpath '/opt/module/datas/test.txt' into table test;
步骤4:查询结果
3.3 类型转换
小范围的转大范围的:自动转换
# 1
tinyint-->int-->bigint
# 2
tinyint/int/bigint/float/string --> double
# 3
tinyint/smallint/int --> float
# 4
boolean 不能转换成任何类型
大范围的转小范围的:强转cast
select '1'+2;
# 结果=3.0,string转成了double
select cast('1' as int) + 2;
# 结果=3,将string强转成了int
4 DDL数据定义
4.1 创建数据库
# 语法:
create database [if not exists] database_name
	[comment database_comment]	# 注释
	[location hdfs_path]	# 默认数据库的位置为:/user/hive/warehouse/数据库的名字
	# 指定hdfs_path时,需要注意!!!
	[whit dbproperties (property_name=property_value, ...)];	# 数据库属性
# 实例
create database if not exists test3
	comment 'aaa'
	location '/db_myhive/test3'
	with dbproperties('name'='aaa');
4.2 显示数据库
查看所有数据库
show databases;
过滤显示查询的数据库
# 查询所有test开头的数据库
show databases like 'test*';
查看数据库的信息
desc database test3;

查看数据库的详细信息(显示parameters)
desc database extended test3;

使用数据库:use
4.3 修改数据库
数据库中除了key-value形式的parameters属性可以修改。其他的元数据信息不可变。
alter database test3 set dbproperties('name'='aaa');
4.4 删除数据库
# 删除空的数据库
drop database test1;、
# 删除非空的数据库
drop database test2 cascade;
4.5 创建表
# 语法
create [external] table [if not exists] table_name		# external表示创建外部表,默认创建的是管理表。外部表drop table时不会删除HDFS上的数据。
	(col_name data_type [comment col_comment], ...)		# 可以给字段(列)添加注释
	[comment table_comment]		# 给表加注释
	[PARTITIONED BY (col_name data_type [COMMENT col_comment], ...)] 	# PARTITIONED BY创建分区表
	[CLUSTERED BY (col_name, col_name, ...) 	# CLUSTERED BY创建分桶表
	[SORTED BY (col_name [ASC|DESC], ...)] INTO num_buckets BUCKETS] 	# 不常用,对桶中的一个或多个列另外排序
	[ROW FORMAT row_format] 	# 以某种方式分割
	[STORED AS file_format] 	# 指定存储文件类型
	[LOCATION hdfs_path]		# 指定HDFS上存储的位置
	[TBLPROPERTIES (property_name=property_value, ...)]
	[AS select_statement]		# as后面接查询结果,以查询结果创建表;like 复制表的结构

# row_format的方式
	DELIMITED
	[FIELDS TERMINATED BY char] 	# 以'char'分割
	[COLLECTION ITEMS TERMINATED BY char]
    [MAP KEYS TERMINATED BY char] [LINES TERMINATED BY char]
# 常用创建表实例1
create external table if not exists test3
	(id int, name string, salary double)
	row format delimited fields terminated by '\t'
	stored as textfile
	location '/user/hive/warehouse/test3';

# 创建表的实例2:根据查询结果创建表
create external table if not exists test3
	as select id, name from student;
# 创建表的实例3:复制表的结构
create external table if not exists test3
	like student;
4.6 修改表
如何查看表的类型呢?
# 查看表的基本信息
desc student;
# 查询表的详细信息
desc formatted student;

修改表的类型
alter table student set tblproperties('EXTERNAL'='TRUE');
alter table student set tblproperties('EXTERNAL'='FALSE');
修改表的名字
alter table student rename to stu;
这时候web端的hdfs://hadoop102:9820/user/hive/warehouse/test.db/student也更改为stu。
添加列
alter table stu add columns(school string);
# 注意!这个时候新添加的字段school不能带''
更新列
在更新列的时候,可以修改列的名称,也可以列的类型
alter table stu change column school school_name int;
替换列
替换列会将原来的所有列替换为新输入的所有列。
alter table stu replace columns(id int, name string, school string);
4.7 删除表
# 删除表a,同时HDFS上的文件夹也会没有
drop table aaa;
# 清空表的内容,实际是删除drop表aaa后,重新创建表aaa
truncate table aaa;
5 DML数据操作
5.1 数据导入
创建表,装载数据
步骤1:首先本地有一个emp文件
7369	SMITH	CLERK	7902	1980-12-17	800.00		20
7499	ALLEN	SALESMAN	7698	1981-2-20	1600.00	300.00	30
7521	WARD	SALESMAN	7698	1981-2-22	1250.00	500.00	30
7566	JONES	MANAGER	7839	1981-4-2	2975.00		20
7654	MARTIN	SALESMAN	7698	1981-9-28	1250.00	1400.00	30
7698	BLAKE	MANAGER	7839	1981-5-1	2850.00		30
7782	CLARK	MANAGER	7839	1981-6-9	2450.00		10
7788	SCOTT	ANALYST	7566	1987-4-19	3000.00		20
7839	KING	PRESIDENT		1981-11-17	5000.00		10
7844	TURNER	SALESMAN	7698	1981-9-8	1500.00	0.00	30
7876	ADAMS	CLERK	7788	1987-5-23	1100.00		20
7900	JAMES	CLERK	7698	1981-12-3	950.00		30
7902	FORD	ANALYST	7566	1981-12-3	3000.00		20
7934	MILLER	CLERK	7782	1982-1-23	1300.00		10
8888	CLS	TEACHER	7900	2020-08-27	10000.00	null	null
步骤2:根据文件内容创建表
此时会在web端的默认路径(hadoop102://user/hive/warehouse/)下创建一个文件夹。
create external table if not exists emp(eid int, ename string ,ejob string, emgr string, hiredate string, sal double, comm double, deptno int)
	row format delimited fields terminated by '\t';
步骤3:加载数据到表中
load data local inpath '/opt/module/hive/datas/emp.txt' into table emp;

row format delimited fields terminated by '\t';
步骤4:查看结果,查看web
加载完数据会在web端的(hadoop102://user/hive/warehouse/emp)下生成一个emp.txt文件。

上传数据,location定位
步骤1:将文件上传到HDFS上
HDFS的位置可以是hive默认路径,也可以是随便的一个路径。
hadoop fs -put /opt/module/hive/datas/dept.txt /db_myhive/dept
步骤2:创建表location定位到数据
create external table if not exists dept(deptno int, dname string, loc int)
	row format delimited fields terminated by '\t'
	location '/db_myhive/dept';
步骤3:查看结果
5.2 数据导出
insert将查询数据导出到表
# 追加
insert into table emp2 select * from emp;
# 覆盖
insert overwrite table emp2 select * from emp;
insert导出到本地
这样导出到本地无格式。
insert overwrite local directory '/opt/module/hive/datas/export/emp' select * from emp;
查询结果格式化到本地
这样导出到本地,有格式
insert overwrite local directory '/opt/module/hive/datas/export/dept'
	row format delimited fields terminated by '\t'
	select * from dept;
查询结果格式化到HDFS
上传到HDFS不加local,‘HDFS的路径’
insert overwrite directory '/datas/emp'
	row format delimited fields terminated by '\t'
	select * from emp;
hadoop命令导出到本地
hadoop fs -get /datas/emp/000000_0 /opt/module/hive/datas/emp.txt
hive Shell命令导出到本地
hive -e 'select * from default.emp' > /opt/module/hive/datas/emp2.txt
export导出到HDFS
export table default.emp to '/datas/emp2';

6 DQL数据查询
6.1 基本查询
select * from emp;
select * from dept;

# 1 列起别名
select sal as salary from emp;
select sal salary from emp;

# 2 算术运算
select sal+100 from emp;

# 3 常用函数
select count(*) from emp;
select max(sal) max_sal from emp;
select min(sal) min_sal from emp;
select avg(sal) avg_sal from emp grop by job order by avg_sal limit 5;
select sum(sal) sum_sal from emp;

# 4 limit语句
select * from emp order by sal desc limit 5;

# 5 where语句
# 查询工资大于平均工资的员工信息
select * from emp where sal > (select avg(sal) from emp);

# 6 比较运算符
# 查询薪水等于5000的所有员工
select * from emp where sal = 5000;
# 查询工资在500到1000的员工信息
select * from emp where sal between 500 and 1000;
# 查询comm为空的所有员工信息
select * from emp where comm is null;
# 查询工资是1500或5000的员工信息
select * from emp where sal in (1500, 5000);
select * from emp where sal=1500 or sal=5000;

# 7 模糊查询like
# 查询以2开头薪水的员工信息
select * from emp where sal like '2%';
# 查找第二个数值为2的薪水的员工信息
select * from emp where sal like '_2%';
# 查找薪水种中含有2的员工信息
select * from emp where sal like '%2%';

# 8 逻辑运算符
# 查询薪水大于1000,部门是30的员工信息
select * from emp where sal>1000 and deptno=30;
# 查询薪水大于1000,或者部门是30
select * from emp where sal>1000 or deptno=30;
# 查询除了20部门和30部门以外的员工信息
select * from emp where deptno not in (30, 20);
6.2 分组查询
分组查询需要注意select后面只能跟分组条件的字段,以及聚合函数
# 1 group by 语句
# 查询emp表每个部门的平均工资
select deptno, avg(sal) avg_sal from emp group by avg_sal;
# 注意下面的写法就错了!!
select * from emp group by avg(sal);

# 计算每个部门中每个岗位的最高薪水
select deptno, job, max(sal) max_sal from emp group by deptno, job;

# having语句
# 求每个部门的平均薪水大于2000的部门
select deptno, avg(sal) avg_sal from emp group by deptno having avg_sal > 2000;
6.3 连接查询
内连接,左外连接,右外连接,满外连接(mysql不支持,hive支持),多表连接
# 1 内连接
select e.*, d.* from emp e join dept d on e.deptno=d.deptno;

# 2 左外连接
select e.*, d.* from emp e left join dept d on e.deptno=d.deptno;

# 3 右外连接
select e.empno, e.ename, d.deptno from emp e right join dept d on e.deptno = d.deptno;

# 4 满外连接
select  e.empno, e.ename, d.deptno from emp e full join dept d on e.deptno=d.deptno;

# 5 多表连接
# 首先创建location表,加载数据
create table if not exists location (loc int,loc_name string)
	row format delimited fields terminated by '\t';
load data local inpath '/opt/module/hive/datas/location.txt' into table location;
# 连接三个表
select e.ename, d.dname, l.loc_name from emp e join dept d on e.deptno=d.deptno join location l on d.loc=l.loc;
6.4 排序
①全局排序 order by
order by 全局排序只有一个reducer。
asc 默认升序;desc降序
# 查询所有员工信息按照工资升序排列
select * from emp order by sal asc;
# 查询所有员工信息按照工资降序排序
select * from emp order by sal desc;

# 2 按照别名排序
# 按照员工薪水的2倍排序
select *, sal*2 double_sal from emp order by double_sal;

# 3 多个列排序
# 按照部门和工资升序排序
select * from emp order by deptno,sal;
②每个mapreduce内部排序 sort by
需要设置reducer的个数,对每一个reducer进行排序,可以使用insert overwrite local directory ‘/本地路径’设置结果输出路径。
# mapreduces的默认个数是-1,为一个reducer,只有一个输出文件;设置为3个
set mapreduce.job.mapreduces=3;
# 查看mapreduces的个数
set mapreduce.job.mapreduces;

# 根据部门编号降序查看员工信息
insert overwrite local directory '/opt/module/hive/datas/sortby_result'
	# 输出格式
	row format delimited fields terminated by '\t'
	select * from emp sort by deptno desc;
③分区排序 distribute by
distribute类似于mapreduce中的partition自定义分区,进行分区排序,结合sort by使用。
- distribute by 的分区规则是根据分区字段的hash码和reduce的个数进行模除后,余数相同的分到一个区内。
- distribute by要在sort by 之前,distribute by 分区排序,然后sort by区内排序。
# 设置mapreduce的个数
set mapreduce.job.reduces=3;
# 按照部门编号分区,然后按照员工编号降序排序
insert overwrite local directory '/opt/module/hive/datas/distribute_result'
	row format delimited fields terminated by '\t'
	select * from emp distribute by deptno sort by empno desc;
④cluster by
当distribute by 和 sort by 字段相同时,可以使用cluster by。
cluster by除了具有distribute by 的功能外还能sort by。但是排序只能是升序排序,不能指定acs或desc。
- 排序是根据指定的字段的哈希值模余reduce的个数。根据余数进行分区。
# 按照部门编号进行分区,按照部门编号进行排序
insert overwrite local directory '/opt/module/hive/datas/clusterby_result'
	row fromat delimited fields terminated by '\t'
	select * from emp cluster by deptno;

# 另一种写法:
insert overwrite local directory '/opt/module/hive/datas/clusterby_resulet2'
	row format delimited fields terminated by '\t'
	select * from emp distribute by deptno sort by distribute deptno asc;
7 分区表和分桶表
分区是分目录;分桶是分表(文件)。
7.1 分区表
一个表在HDFS上就是一个文件夹,表内的数据是该文件夹下的文件。
分区表就是该文件夹下的子文件夹,也就是分目录,可以把一个大的数据集分割成小的数据集。
①分区表基本操作
步骤1:创建分区表
- 注意!分区表的partition by()内的分区字段不能是表中的字段。
create table log_partition(id int, name string, site string)
	partitioned by(day string)
	row format delimited fields terminated by '\t';
步骤2:加载数据到分区表
分区表加载数据的时候必须指定分区。
加载数据时如果分区表中没有指定分区,,会自动创建分区。
load data local inpath '/opt/module/hive/datas/day_20200626.log'
	into table log_partition
	partition(day='20200626');
load data local inpath '/opt/module/hive/datas/day_20200627.log'
	into table log_partition
	partition(day='20200627');
load data local inpath '/opt/module/hive/datas/day_20200628.log'
	into table log_partition
	partition(day='20200628');
# 加载数据不指定分区,自动创建分区。
load data local inpath '/opt/module/hive/datas/day_20200628.log'
	into table log_partition;
步骤3:查看web端结果
步骤4:查看表中的数据
# 查看表中的所有数据
select * from log_partition;
# 按照分区,查看表中指定分区的数据
select * from log_partition where day='20200626';
步骤5:增加分区
# 增加一个分区
alter table log_partition add partition(day='20200629');
# 向这个分区内添加本地数据
load data local inpath '/opt/module/hive/datasday_20200627.log'
	into table log_partition
	partition(day='20200629');
# 增加多个分区
alter table log_partition add partition(day='20200630') partition(day='20200701');
步骤6:删除分区
# 删除单个分区
alter table log_partition drop partition(day=20200701);
# 删除多个分区
alter table log_partition drop partition(day=20200630), partition(day=20200629);
步骤7:查看有哪些分区
show partitions log_partition;
步骤8:查看分区表的详细信息
desc formatted log_partition;

② 二级分区
步骤1:创建二级分区表
create table log_partition2(id int, ctime string, site string)
	partitioned by (day string, hour string)
	row format delimited fields terminated by '\t';
步骤2:加载数据到分区表
load data local inpath '/opt/module/hive/datas/day_20200626.log' into table log_partition2
	partition(day='20200626', hour='06');

load data local inpath '/opt/module/hive/datas/day_20200627.log' into table log_partition2
	partition(day='20200627', hour='07');
步骤3:查看查询结果
select * from log_partition where day='20200626' and hour='07';

把数据直接上传到分区目录,让分区表和数据产生关联的三种方式。
方式1:上传数据后修复
dfs -mkdir -p /user/hive/warehouse/db_hive.db/log_partition2/day=20200626/hour=07;
dfs -put /opt/module/datas/day_20200627.log /user/hive/warehouse/db_hive.db/log_partition2/day=20200626/hour=07;

# 指定修复命令
msck repair table log_partition2;
方式2:创建HDFS目录,上传数据文件到HDFS,更改表添加分区
# 1 创建目录
dfs -mkdir -p/user/hive/warehouse/db_hive.db/log_partition2/day=20200627/hour=10;
# 2 上传数据文件
dfs -put /opt/module/hive/datas/day_20200628.log /user/hive/warehouse/db_hive.db/log_partition2/day=20200627/hour=10;
# 3 更改表,添加分区
alter table log_partition2 add partition(day=20200627, hour=10);
# 4 查看数据
select * from log_partition2 where day=20200627 and hour=10;
方式3:创建HDFS目录,load数据。
# 1 创建目录
dfs -mkdir -p /user/hive/warehouse/db_hive.db/log_partition2/day=20200627/hour=11;
# 2 load本地数据到表
load data local inpath '/opt/module/hive/datas/day_20200628.log' into table log_partition2 partition(day=20200627,hour=11);
# 3 查看数据
select * from log_partition2 where day=20200627 and hour=11;
③ 动态分区
对分区表insert数据的时候,自动的根据分区字段的值,将数据插入到相应的分区中。(Dynamic Partition)
步骤1:开启动态分区功能(默认true,开启)
hive.exec.dynamic.partition=true
步骤2:设置为非严格模式(动态分区的模式,默认strict)
strict,表示必须指定至少一个分区为静态分区;
nonstrict,表示允许所有的分区字段都可以使用动态分区。
hive.exec.dynamic.partition.mode=nonstrict
步骤3:在所有执行mr的节点上,最大一共可以创建多少个动态分区。默认1000个。
hive.exec.max.dynamic.partitions=1000
步骤4:在每个执行mr的节点上,最大可以创建多少个动态分区。
根据实际的数据来设定,默认100。
步骤5:整个mr.job中,最大可以创建多少个HDFS文件。默认是100000
hive.exec.max.created.files=100000
步骤6:当有空分区生成时,是否抛出异常。默认false
hive.error.on.empty.partition=false
实例操作:
# 1 创建目标分区表
create table dept_partition(id int, name string)
partitioned by (loc int)
row format delimited fields terminated by '\t';

# 2 设置动态分区
set hive.exec.dynamic.partition.mode = nonstrict;
# 3 加载数据到分区表
insert into table dept_partition partition(loc)
	select deptno, dname, loc from dept;
# 4 查看目标分区表的分区情况
show partitions dept_partition;
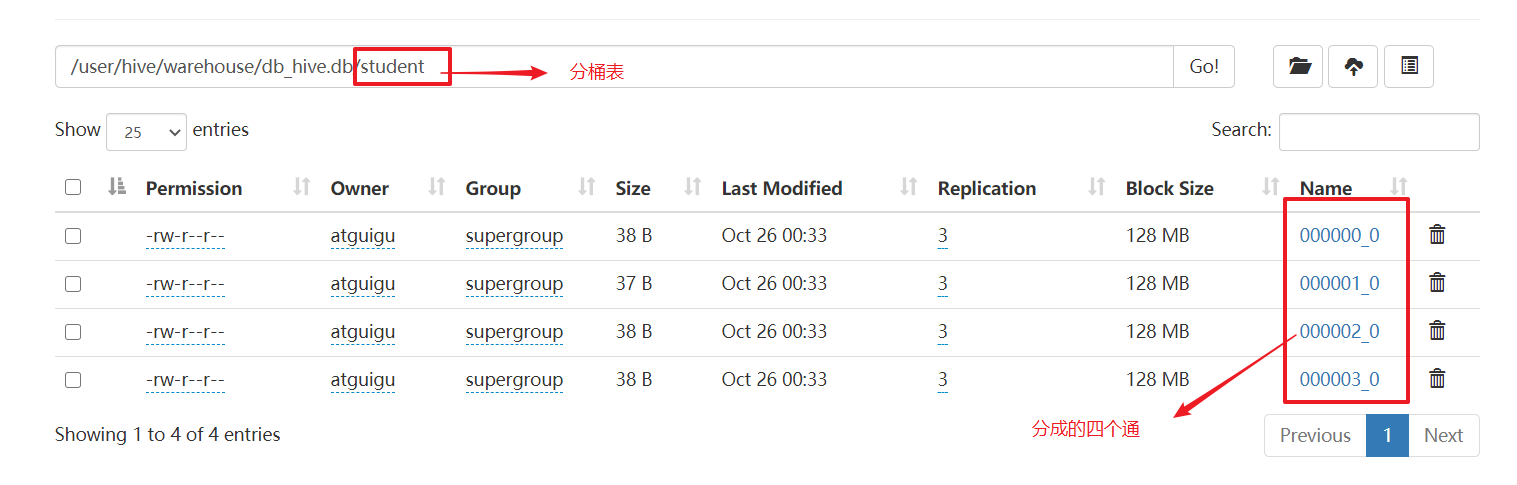
7.2 分桶表
分桶表是将表分割成多个桶。
步骤1:创建分桶表
create table stu_bucket(id int, name string)
	clustered by(id)
	into 4 buckets
	row format delimited fields terminated by '\t';
步骤2:查看表结构
desc formatted stu_bucket;

步骤3:导入数据到分桶表
导入数据经常会下面的错误:
Error: Error while processing statement: FAILED: Execution Error, return code 2 from org.apache.hadoop.hive.ql.exec.mr.MapRedTask (state=08S01,code=2)解决的方法是:退出beeline,重新进入beeline。
load data local inpath '/opt/module/hive/datas/student.txt' into table student;
7.3 抽样查询
tablesample(bucket A out of B on C) 假设分桶表分为16桶
- A表示从第几桶开始,B表示每隔B桶取下一桶,C表示以什么进行分桶
- 桶数/B=取几份,比如A=1,B=4,16/4表示取四份。取1,5,9,13这四份。
- 其中A的值必须小于等于B的值。
随机抽样
select * from student tablesample (bucket 1 out of 4 on rand()) stu;
根据某一字段抽样
根据id进行分桶。分成4份,取第1份。
select * from student tablesample (bucket 1 out of 4 on id);
8 函数
8.1
8.2 常用内置函数
①空字段赋值
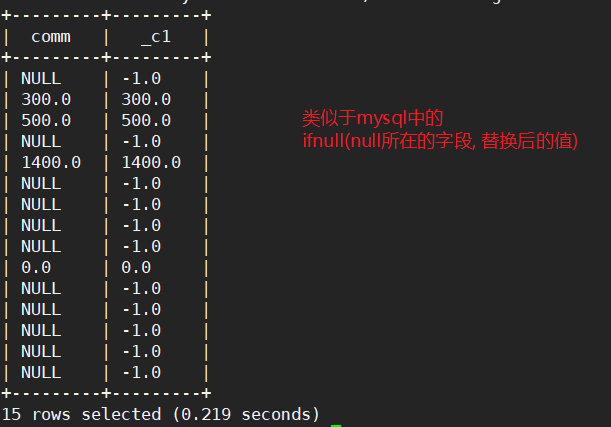
# 查询员工的comm,如果为null,用-1代替
select comm, nvl(comm, -1) from emp;

# 查询员工的comm,如果为null用领导id来替代
select comm, nvl(comm, mgr) from emp;
②case when then else end
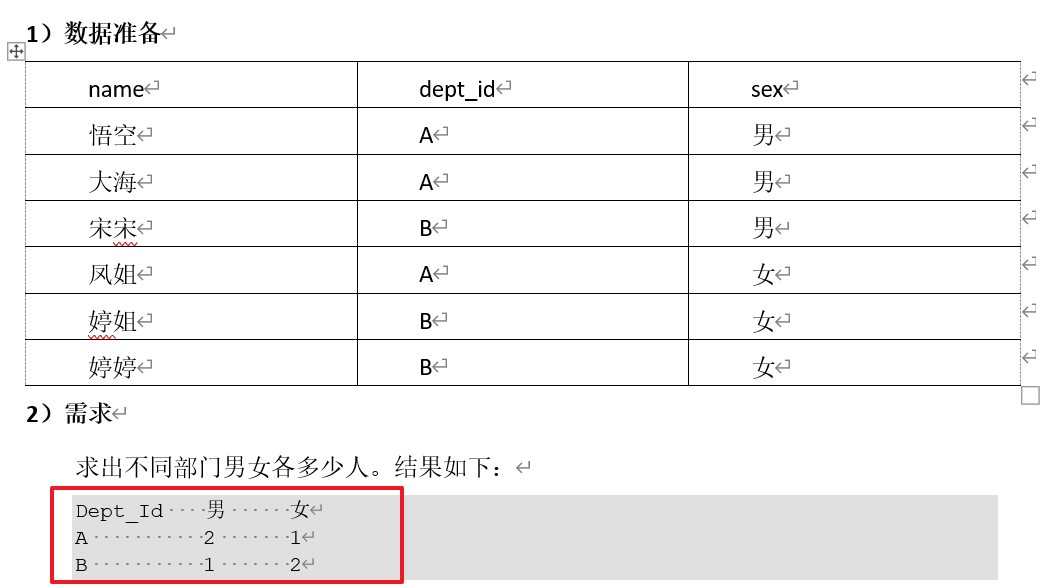
# 步骤1:根据dept_id分组
select dept_id from emp_sex group by dept_id;

# 步骤2:计算不同部门的男女人数
select dept_id,
sum(case sex when '男' then 1 else 0 end) men,
sum(case sex when '女' then 1 else 0 end) women
from emp_sex
group by dept_id;
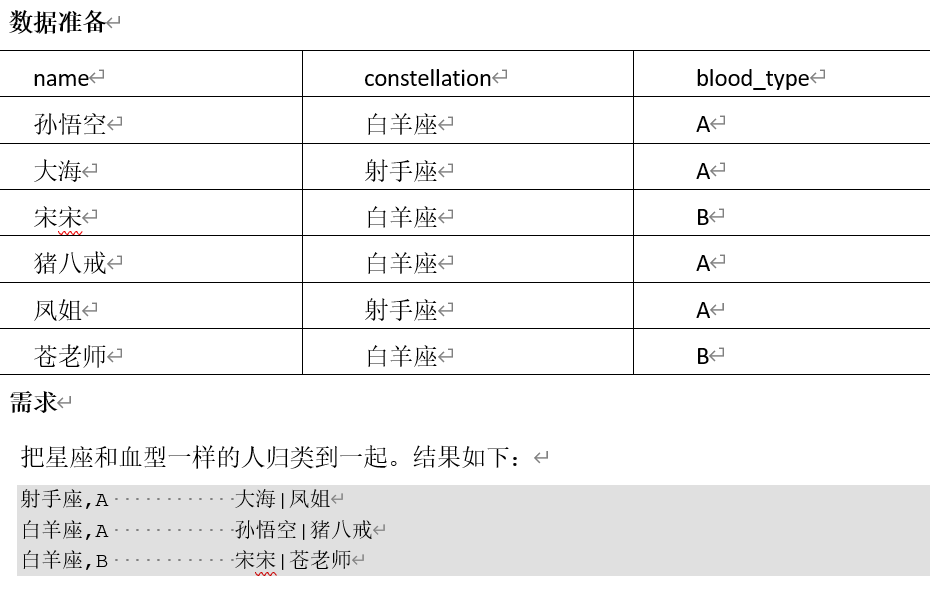
③行转列
- concat(string a, string b …) 拼接字符串
- concat_wc(‘字符’, string a, string b …) 指定字符连接string
- collect_set(col),去重汇总,产生array类型字段。仅支持基本数据类型
# 1 concat()使用
select concat(name, '-', constellation, '-', boold_type) from person_info;

# 2 concat_ws()使用
select concat_ws('-', name, constellation, blood_type) from person_info;

# 3 collect_set()使用
select collect_set(name) from person_info;

+-------------------------------------+
|                 _c0                 |
+-------------------------------------+
| ["孙悟空","大海","宋宋","猪八戒","凤姐","苍老师"]  |
+-------------------------------------+
# 步骤1,查询姓名,(星座,血型)
select name, concat_ws(',', constellation, blood_type) info
from person_info;

+-------+--------+
| name  |  info  |
+-------+--------+
| 孙悟空   | 白羊座,A  |
| 大海    | 射手座,A  |
| 宋宋    | 白羊座,B  |
| 猪八戒   | 白羊座,A  |
| 凤姐    | 射手座,A  |
| 苍老师   | 白羊座,B  |
+-------+--------+

# 步骤2,根据info进行分组;然后name使用collect_set()
select t1.info, collect_set(t1.name) name
from (select name, concat_ws(',', constellation, blood_type) info
from person_info) t1
group by t1.info;

+----------+----------------+
| t1.info  |      name      |
+----------+----------------+
| 射手座,A    | ["大海","凤姐"]    |
| 白羊座,A    | ["孙悟空","猪八戒"]  |
| 白羊座,B    | ["宋宋","苍老师"]   |
+----------+----------------+

# 步骤3:,修改name字段的格式
select t1.info, concat_ws('|', collect_set(t1.name)) name
from (select name, concat_ws(',', constellation, blood_type) info
from person_info) t1
group by t1.info;
+----------+----------+
| t1.info  |   name   |
+----------+----------+
| 射手座,A    | 大海|凤姐    |
| 白羊座,A    | 孙悟空|猪八戒  |
| 白羊座,B    | 宋宋|苍老师   |
+----------+----------+
④列转行
- split(‘字符’, string),使用指定的字符将string分割,结果是一个string类型的array
- explode(),将array炸裂成多个元素
- LATERAL VIEW udtf(expression) tableAlias AS columnAlias,侧写表,写在from的最后面,通过侧写表的别名和侧写表列的别名,去和其他的列进行映射。
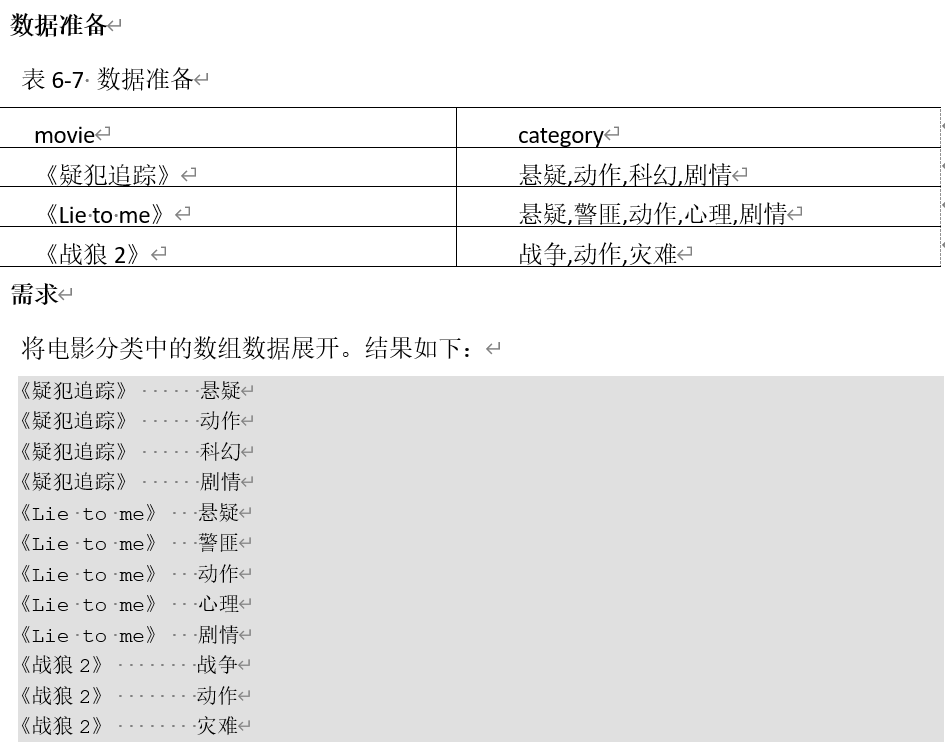
# 1 split()的使用
select split(category, ',') from movie_info;
+-----------------------------+
|             _c0             |
+-----------------------------+
| ["悬疑","动作","科幻","剧情"]       |
| ["悬疑","警匪","动作","心理","剧情"]  |
| ["战争","动作","灾难"]            |
+-----------------------------+
# 2 explode()的使用
select explode(splite(category, ',')) from movie_info;
+------+
| col  |
+------+
| 悬疑   |
| 动作   |
| 科幻   |
| 剧情   |
| 悬疑   |
| 警匪   |
| 动作   |
| 心理   |
| 剧情   |
| 战争   |
| 动作   |
| 灾难   |
+------+

# 3 lateral view explode(split(要分割的列, '分割的字符')) 侧写表别名 as 侧写表列的别名;
# 将string类型的列用split分割,分割成一个string类型的array,然后将array炸裂成多个string。
lateral view explode(split(category, ',')) tbl as site

# 最后结果语句
select m.movie, tbl.site
from movie_info m
lateral view explode(split(category, ',')) tbl as site;

8.3 开窗函数
什么是开窗函数?
开窗函数就是分组加求和,增加一列。
over():指定分析函数工作的数据窗口大小,这个窗口大小会随着行的变化而变化。
- over():窗口的大小就是当前结果集的大小。
- over(partition by ):窗口的大小就是当前分区的结果集的大小。
- over(order by ):窗口的大小就是从起始位置到当前行。
- over(partition by order by ): 窗口的大小就是当前分区中从起始位置到当前行。
案例实操:
步骤1:数据准备
create table business(name string, orderdate string, cost int)
	row format delimited fields terminated by ',';
load data local inpath '/opt/module/hive/datas/business.txt' into table business;
需求一:查询2017年4月份购买过的顾客及总人数。
# 步骤一:查询2017年4月份购买过的顾客
# 方式1:like
select * from business where orderdate like '2017-04%'
# 方式2:substring
select * from business where substring(orderdate, 1, 7)='2017-04'
# 方式3:month
select * from business where month(orderdate)='04'

+----------------+---------------------+----------------+
| business.name  | business.orderdate  | business.cost  |
+----------------+---------------------+----------------+
| jack           | 2017-04-06          | 42             |
| mart           | 2017-04-08          | 62             |
| mart           | 2017-04-09          | 68             |
| mart           | 2017-04-11          | 75             |
| mart           | 2017-04-13          | 94             |
+----------------+---------------------+----------------+

# 步骤二:去重
方式1:distinct()
select distinct(name) from business where month(orderdate)='04'
方式2:group by
select name from business where month(orderdate)='04' group by name;

# 统计总人数
#方式1:
select t1.name, count(*) over() from (select distinct(name) from business where month(orderdate)='04')t1;

# 结果:
+----------+-----------------+
| t1.name  | count_window_0  |
+----------+-----------------+
| mart     | 2               |
| jack     | 2               |
+----------+-----------------+
需求二:查询顾客的购买明细及月购买总额
如果使用group by orderdate
# 查询每个月的购买综合
select month(orderdate) morder, sum(cost) scost from business group by month(orderdate);

+---------+--------+
| morder  | scost  |
+---------+--------+
| 1       | 205    |
| 2       | 23     |
| 4       | 341    |
| 5       | 12     |
| 6       | 80     |
+---------+--------+
使用开窗函数,可以查看顾客的购买明细,以及所有顾客每个月的购买总和。
select name, orderdate, cost, sum(cost) over(partition by month(orderdate)) total_count
from business;

+-------+-------------+-------+--------------+
| name  |  orderdate  | cost  | total_count  |
+-------+-------------+-------+--------------+
| jack  | 2017-01-01  | 10    | 205          |
| jack  | 2017-01-08  | 55    | 205          |
| tony  | 2017-01-07  | 50    | 205          |
| jack  | 2017-01-05  | 46    | 205          |
| tony  | 2017-01-04  | 29    | 205          |
| tony  | 2017-01-02  | 15    | 205          |
| jack  | 2017-02-03  | 23    | 23           |
| mart  | 2017-04-13  | 94    | 341          |
| jack  | 2017-04-06  | 42    | 341          |
| mart  | 2017-04-11  | 75    | 341          |
| mart  | 2017-04-09  | 68    | 341          |
| mart  | 2017-04-08  | 62    | 341          |
| neil  | 2017-05-10  | 12    | 12           |
| neil  | 2017-06-12  | 80    | 80           |
+-------+-------------+-------+--------------+
需求二扩展:查询顾客的购买明细及每个顾客的月购买总额
select name, orderdate, cost, sum(cost) over(partition by name, month(orderdate)) pre_total_count
from business;

+-------+-------------+-------+------------------+
| name  |  orderdate  | cost  | pre_total_count  |
+-------+-------------+-------+------------------+
| jack  | 2017-01-05  | 46    | 111              |
| jack  | 2017-01-08  | 55    | 111              |
| jack  | 2017-01-01  | 10    | 111              |
| jack  | 2017-02-03  | 23    | 23               |
| jack  | 2017-04-06  | 42    | 42               |
| mart  | 2017-04-13  | 94    | 299              |
| mart  | 2017-04-11  | 75    | 299              |
| mart  | 2017-04-09  | 68    | 299              |
| mart  | 2017-04-08  | 62    | 299              |
| neil  | 2017-05-10  | 12    | 12               |
| neil  | 2017-06-12  | 80    | 80               |
| tony  | 2017-01-04  | 29    | 94               |
| tony  | 2017-01-02  | 15    | 94               |
| tony  | 2017-01-07  | 50    | 94               |
+-------+-------------+-------+------------------+
需求三:(查询顾客的购买明细), 将所有顾客的cost按照日期进行累加
方式1:使用order by+默认规则
select name, orderdate, cost, sum(cost) over(order by orderdate) sum_cost
from business;

+-------+-------------+-------+-----------+
| name  |  orderdate  | cost  | sum_cost  |
+-------+-------------+-------+-----------+
| jack  | 2017-01-01  | 10    | 10        |
| tony  | 2017-01-02  | 15    | 25        |
| tony  | 2017-01-04  | 29    | 54        |
| jack  | 2017-01-05  | 46    | 100       |
| tony  | 2017-01-07  | 50    | 150       |
| jack  | 2017-01-08  | 55    | 205       |
| jack  | 2017-02-03  | 23    | 228       |
| jack  | 2017-04-06  | 42    | 270       |
| mart  | 2017-04-08  | 62    | 332       |
| mart  | 2017-04-09  | 68    | 400       |
| mart  | 2017-04-11  | 75    | 475       |
| mart  | 2017-04-13  | 94    | 569       |
| neil  | 2017-05-10  | 12    | 581       |
| neil  | 2017-06-12  | 80    | 661       |
+-------+-------------+-------+-----------+
方式2:order by+rows对窗口限制
select name, orderdate, cost, sum(cost) over(order by orderdate rows between unbounded preceding and current row) sum_cost
from business;
需求三扩展一:上述的场景(查询顾客的购买明细), 将每个顾客的cost按照日期进行累加
select name, orderdate, cost, sum(cost) over(partition by name order by orderdate) total_cost
from business;

+-------+-------------+-------+-------------+
| name  |  orderdate  | cost  | total_cost  |
+-------+-------------+-------+-------------+
| jack  | 2017-01-01  | 10    | 10          |
| jack  | 2017-01-05  | 46    | 56          |
| jack  | 2017-01-08  | 55    | 111         |
| jack  | 2017-02-03  | 23    | 134         |
| jack  | 2017-04-06  | 42    | 176         |
| mart  | 2017-04-08  | 62    | 62          |
| mart  | 2017-04-09  | 68    | 130         |
| mart  | 2017-04-11  | 75    | 205         |
| mart  | 2017-04-13  | 94    | 299         |
| neil  | 2017-05-10  | 12    | 12          |
| neil  | 2017-06-12  | 80    | 92          |
| tony  | 2017-01-02  | 15    | 15          |
| tony  | 2017-01-04  | 29    | 44          |
| tony  | 2017-01-07  | 50    | 94          |
+-------+-------------+-------+-------------+
需求三扩展二:查询顾客的购买明细,将所有顾客的cost按照日期
上一行和当前行进行累加
上一行、当前行、下一行进行累加
当前行、下一行进行累加
- current row,当前行
- n preceding,往前n行数据
- n following,往后n行数据
- unbounded,起点;unbounded preceding从前面的起点;unbounded following 到后面的终点。
# 1 查询顾客的购买明细,将所有顾客的cost按照日期进行累加
select name, orderdate, cost, sum(cost) over(order by orderdate) from business;
# 2 查询顾客的购买明细,将所有顾客的cost按照日期上一行和当前行进行累加
select name, orderdate, cost, sum(cost) over(order by orderdate rows between 1 preceding and current row) total_pre_cur from business;

# 3 查询顾客的购买明细,将所有顾客的cost按照日期上一行、当前行、下一行进行累加
select name, orderdate, cost, sum(cost) over(order by orderdate rows between 1 preceding and 1 following) total_pre_next from business;

# 4 查询顾客的购买明细,将所有顾客的cost按照日期当前行、下一行进行累加
select name, orderdate, cost, sum(cost) over(order by orderdate rows between current row and 1 following) total_cur_next from business;
需求三扩展三:查询顾客的购买明细,将所有顾客的cost按照日期上一行、下一行进行累加
# 1 将上一行和下一行的cost在当前行显示出来
select name, orderdate, cost,
lag(cost, 1, 0) over() pre_cost,
lead(cost, 1, 0) over() next_cost
from businsess
# 2 将所有顾客的cost按照日期上一行、下一行进行累加
select t1.name, t1.orderdate, t1.cost, t1.pre_cost, t1.next_cost, (t1.pre_cost+t1.next_cost) total_prev_next
from (select name, orderdate, cost,
lag(cost, 1, 0) over() pre_cost,
lead(cost, 1, 0) over() next_cost
from business)t1

+----------+---------------+----------+--------------+---------------+------------------+
| t1.name  | t1.orderdate  | t1.cost  | t1.pre_cost  | t1.next_cost  | total_prev_next  |
+----------+---------------+----------+--------------+---------------+------------------+
| mart     | 2017-04-13    | 94       | 0            | 80            | 80               |
| neil     | 2017-06-12    | 80       | 94           | 75            | 169              |
| mart     | 2017-04-11    | 75       | 80           | 12            | 92               |
| neil     | 2017-05-10    | 12       | 75           | 68            | 143              |
| mart     | 2017-04-09    | 68       | 12           | 62            | 74               |
| mart     | 2017-04-08    | 62       | 68           | 55            | 123              |
| jack     | 2017-01-08    | 55       | 62           | 50            | 112              |
| tony     | 2017-01-07    | 50       | 55           | 42            | 97               |
| jack     | 2017-04-06    | 42       | 50           | 46            | 96               |
| jack     | 2017-01-05    | 46       | 42           | 29            | 71               |
| tony     | 2017-01-04    | 29       | 46           | 23            | 69               |
| jack     | 2017-02-03    | 23       | 29           | 15            | 44               |
| tony     | 2017-01-02    | 15       | 23           | 10            | 33               |
| jack     | 2017-01-01    | 10       | 15           | 0             | 15               |
+----------+---------------+----------+--------------+---------------+------------------+
需求四:查询每个顾客上次的购买时间
- lag(‘字段名’, n, default_val),往前第n行数据,如果往前第n行没有数据,使用default_val默认值。
- lead(‘字段名’, n, defult_val),往后第n行数据,如果往后第n行没有数据,使用default_val默认值。
# 查询每个顾客上次的购买时间,和下一次的购买时间(上次没有以‘no_prev’表示;下次没有以‘no_next’表示)。
select name, orderdate, cost,
lag(orderdate, 1 , 'no prev') over(partition by name order by orderdate) pre_orederdate,
lead(orderdate, 1, 'no next') over(partition by name order by orderdate) next_orderdate
from business;

+-------+-------------+-------+----------------+-----------------+
| name  |  orderdate  | cost  | pre_orderdate  | next_orderdate  |
+-------+-------------+-------+----------------+-----------------+
| jack  | 2017-01-01  | 10    | no prev        | 2017-01-05      |
| jack  | 2017-01-05  | 46    | 2017-01-01     | 2017-01-08      |
| jack  | 2017-01-08  | 55    | 2017-01-05     | 2017-02-03      |
| jack  | 2017-02-03  | 23    | 2017-01-08     | 2017-04-06      |
| jack  | 2017-04-06  | 42    | 2017-02-03     | no next         |
| mart  | 2017-04-08  | 62    | no prev        | 2017-04-09      |
| mart  | 2017-04-09  | 68    | 2017-04-08     | 2017-04-11      |
| mart  | 2017-04-11  | 75    | 2017-04-09     | 2017-04-13      |
| mart  | 2017-04-13  | 94    | 2017-04-11     | no next         |
| neil  | 2017-05-10  | 12    | no prev        | 2017-06-12      |
| neil  | 2017-06-12  | 80    | 2017-05-10     | no next         |
| tony  | 2017-01-02  | 15    | no prev        | 2017-01-04      |
| tony  | 2017-01-04  | 29    | 2017-01-02     | 2017-01-07      |
| tony  | 2017-01-07  | 50    | 2017-01-04     | no next         |
+-------+-------------+-------+----------------+-----------------+
需求五:查询前20%时间的订单信息
- ntile(n),配合over(order by ‘字段名’)使用,指根据字段进行排序,排好序后分成n组。ntile返回组的id。
# 步骤1:使用ntile()按照orderdate排好序的订单分成五组。
select name, orderdate, cost,
ntile(5) over(order by orderdate) g_id
from business

+-------+-------------+-------+-------+
| name  |  orderdate  | cost  | g_id  |
+-------+-------------+-------+-------+
| jack  | 2017-01-01  | 10    | 1     |
| tony  | 2017-01-02  | 15    | 1     |
| tony  | 2017-01-04  | 29    | 1     |
| jack  | 2017-01-05  | 46    | 2     |
| tony  | 2017-01-07  | 50    | 2     |
| jack  | 2017-01-08  | 55    | 2     |
| jack  | 2017-02-03  | 23    | 3     |
| jack  | 2017-04-06  | 42    | 3     |
| mart  | 2017-04-08  | 62    | 3     |
| mart  | 2017-04-09  | 68    | 4     |
| mart  | 2017-04-11  | 75    | 4     |
| mart  | 2017-04-13  | 94    | 4     |
| neil  | 2017-05-10  | 12    | 5     |
| neil  | 2017-06-12  | 80    | 5     |
+-------+-------------+-------+-------+

# 步骤2:获取g_id为1的订单
select t1.name, t1.orderdate, t1.cost
from (select name, orderdate, cost,
ntile(5) over(order by orderdate) g_id
from business)t1
where t1.g_id = 1;

+----------+---------------+----------+
| t1.name  | t1.orderdate  | t1.cost  |
+----------+---------------+----------+
| jack     | 2017-01-01    | 10       |
| tony     | 2017-01-02    | 15       |
| tony     | 2017-01-04    | 29       |
+----------+---------------+----------+
思考:假设要取前30%怎么办?
可以使用ntile()分10组,取前3组,就是前30%。
select name, orderdate, cost,
ntile(10) over(order by orderdate) g_id
from business

select t1.name, t1.orderdate, t1.cost
from (select name, orderdate, cost,
ntile(10) over(order by orderdate) g_id
from business)t1
where t1.g_id in (1, 2, 3);
8.4 排序函数
三种排序函数的比较:
- rank(),排序相同会重复,总数不变
- dense_rank(),排序相同会重复,总数减少
- row_number(),根据顺序计算
number rank() dense_rank() row_number() 100 1 1 1 100 1 1 2 100 1 1 3 97 4 2 4 91 5 3 5
案例实操
# 步骤1 导入数据
# 步骤2 创建表
create table score(name string, subject string, score int)
	row format delimited fields terminated by '\t';
# 步骤3 load数据
load data local inpath '/opt/module/hive/datas/score.txt' into table score;
# 步骤4:查询score表,按照三种排序方式。
select name, subject, score,
	rank() over(parition by subject order by score desc) rk,
	dense_rank() over(parition by subject order by score desc) drk,
	row_number() over(partition by subject order by score desc) rnum
from score;

# 结果:
+-------+----------+--------+------+----------+---------+
| name  | subject  | score  | drp  | denserk  | rownum  |
+-------+----------+--------+------+----------+---------+
| 孙悟空   | 数学       | 95     | 1    | 1        | 1       |
| 宋宋    | 数学       | 86     | 2    | 2        | 2       |
| 婷婷    | 数学       | 85     | 3    | 3        | 3       |
| 大海    | 数学       | 56     | 4    | 4        | 4       |
| 宋宋    | 英语       | 84     | 1    | 1        | 1       |
| 大海    | 英语       | 84     | 1    | 1        | 2       |
| 婷婷    | 英语       | 78     | 3    | 2        | 3       |
| 孙悟空   | 英语       | 68     | 4    | 3        | 4       |
| 大海    | 语文       | 94     | 1    | 1        | 1       |
| 孙悟空   | 语文       | 87     | 2    | 2        | 2       |
| 婷婷    | 语文       | 65     | 3    | 3        | 3       |
| 宋宋    | 语文       | 64     | 4    | 4        | 4       |
+-------+----------+--------+------+----------+---------+
求出每门学科前三名的学生?
select name,subject,
row_number() over(partition by subject order by score) rnum
from score

select t1.name, t1.subject, t1.rnum
from (select name,subject,
row_number() over(partition by subject order by score) rnum
from score)t1
where t1.rnum < 4


select * from score distribute by subject sort by score; //根据字段hash值和reduce个数取余
8.5 日期相关函数
查询当前日期:
select current_date();
select current_date;
查询当前日期加时间:
select current_timestamp();
select current_timestamp;
查询当前日期以后几天,之前几天
select date_add(current_date(), 10);
select date_sub(current_date(), 10);
查询两个日期的差
select datediff(current_date(), "2020-09-30");
8.6 自定义函数
自定义函数分为:
UDF(user defined function):一进一出
UDTF(user defined table-generating function):一进多出
UDAF(user defined aggregation function):多进一出
其中
一和多指的是一行的数据输入,输出一行的数据。比如,upper(),查询某一个字段转为大写,按行输入数据,每行输出为大写。输入一行的数据,输出多行的,比如explode(),某一行的数据是[‘’hello’‘, ‘’world’‘, ‘’at’‘ , ‘’guigu’‘ ],炸裂成多行输出。
输入多行的数据,通过聚合,输出到一行,比如sum(),需要中间缓存,按行输入的数据,暂存到某个容器中,全部输入完后求和。
①自定义函数的步骤:
步骤1:创建maven工程,导入pom依赖。
<dependencies>
		<!-- https://mvnrepository.com/artifact/org.apache.hive/hive-exec -->
		<dependency>
			<groupId>org.apache.hive</groupId>
			<artifactId>hive-exec</artifactId>
			<version>3.1.2</version>
		</dependency>
</dependencies>
步骤2:创建自定义函数的类
- UDF,需要继承GenericUDF类
- UDTF,需要继承GenericUDTF类
步骤3:实现抽象方法
上述两个类都是抽象类,都需要实现抽象方法。
不同的是,GenericUDF需要实现三个抽象方法:initialize()、evaluate()、getDisplayString()
GenericUDTF需要实现两个抽象方法:process()、close(),GenericUDTF实现了initialize()方法,但是仅仅就是抛出一个异常,所以自定义的UDTF还需要重写initialize()方法。
//实现GenericUDF
public class MyLower extends GenericUDF {
    @Override//初始化的验证操作,如参数个数,参数类型,输出类型等。
    public ObjectInspector initialize(ObjectInspector[] arguments) throws UDFArgumentException {}
    @Override//逻辑方法,实现具体的一进一出的操作。
    public Object evaluate(DeferredObject[] arguments) throws HiveException {}
    @Override//在解释中显示的字符串
    public String getDisplayString(String[] children) {}
}

//实现GenericUDTF
public class MyExplode2 extends GenericUDTF {
    @Override
    public StructObjectInspector initialize(StructObjectInspector argOIs) throws UDFArgumentException {
        return super.initialize(argOIs);
    }
    @Override
    public void process(Object[] args) throws HiveException {}
    @Override
    public void close() throws HiveException {}
}
步骤4:将写好的代码,package打包,把jar包上传到hive,然后在hive中添加jar包
有两种方式添加jar包:
直接上传到linux系统的任意位置
add jar /opt/module/hive/datas/myupper.jar
# 这种方式是把jar包添加到hive的classpath环境变量中。
上传到hive的lib目录下
开启hive的时候会自动加载hive的lib内的jar包,开启hive默认会读取。
步骤5:创建函数
创建的函数在哪个库添加的只能在哪个库使用。一般创建函数需要加库名。
# 查看系统提供的289个函数
show functions;
# 创建临时函数,退出hive服务,函数消失。
create temporary function db_hive2.myupper as com.codejiwei.udf.MyUpper;
# 创建永久函数,对全局表有效。
create function db_hive2.myupper as com.codejiwei.udf.MyUpper;
步骤6:删除函数
drop [temporary] function [if exists] 库名.方法名;
②自定义UDF
package com.codejiwei.udf;

import org.apache.hadoop.hive.ql.exec.UDFArgumentException;
import org.apache.hadoop.hive.ql.exec.UDFArgumentLengthException;
import org.apache.hadoop.hive.ql.exec.UDFArgumentTypeException;
import org.apache.hadoop.hive.ql.metadata.HiveException;
import org.apache.hadoop.hive.ql.udf.generic.GenericUDF;
import org.apache.hadoop.hive.serde2.objectinspector.ObjectInspector;
import org.apache.hadoop.hive.serde2.objectinspector.primitive.PrimitiveObjectInspectorFactory;

/**
 * @ClassName MyUpper
 * @Description TODO自定义函数UDF
 * @Author codejiwei
 * @Date 2020/10/27 14:54
 * @Version 1.0
 **/
public class MyUpper extends GenericUDF {
    /*
     * @Description //TODO 初始化方法,用来验证参数的个数,参数的类型,设置返回值的类型
     * @Param [objectInspectors]
     * @return org.apache.hadoop.hive.serde2.objectinspector.ObjectInspector
     **/
    @Override
    public ObjectInspector initialize(ObjectInspector[] objectInspectors) throws UDFArgumentException {
        //判断传入参数的个数
        if (objectInspectors.length != 1){
            throw new UDFArgumentLengthException( "MyUpper only takes primitive types, got " + objectInspectors[0].getCategory());
        }
        //判断传入参数的类型
        if (objectInspectors[0].getCategory() != ObjectInspector.Category.PRIMITIVE){
            throw new UDFArgumentException("MyUpper only takes primitive type, got" + objectInspectors[0].getCategory());
        }
        //设置返回值的类型
        return PrimitiveObjectInspectorFactory.javaStringObjectInspector;
    }
    /*
     * @Description //TODO 逻辑方法,将输入的数据转大写
     * @Param [deferredObjects]
     * @return java.lang.Object
     **/
    @Override
    public Object evaluate(DeferredObject[] deferredObjects) throws HiveException {
        String param = deferredObjects[0].get().toString();
        return param.toUpperCase();
    }
    /*
     * @Description //TODO 要在解释中显示的字符串
     * @Param [strings]
     * @return java.lang.String
     **/
    @Override
    public String getDisplayString(String[] strings) {
        return "This is my function";
    }
}
③自定义UDTF
package com.codejiwei.udtf;

import org.apache.hadoop.hive.ql.exec.UDFArgumentException;
import org.apache.hadoop.hive.ql.metadata.HiveException;
import org.apache.hadoop.hive.ql.udf.generic.GenericUDTF;
import org.apache.hadoop.hive.serde2.objectinspector.ObjectInspector;
import org.apache.hadoop.hive.serde2.objectinspector.ObjectInspectorFactory;
import org.apache.hadoop.hive.serde2.objectinspector.StructField;
import org.apache.hadoop.hive.serde2.objectinspector.StructObjectInspector;
import org.apache.hadoop.hive.serde2.objectinspector.primitive.PrimitiveObjectInspectorFactory;

import java.util.ArrayList;
import java.util.List;

/**
 * @ClassName MyExplode
 * @Description TODO
 * @Author codejiwei
 * @Date 2020/10/27 15:18
 * @Version 1.0
 **/
public class MyExplode extends GenericUDTF {
    List<String> outList = new ArrayList<>();
    /*
     * @Description //TODO 初始化参数个数,输出字段的列名,输出的类型
     * @Param [argOIs]
     * @return org.apache.hadoop.hive.serde2.objectinspector.StructObjectInspector
     **/
    @Override
    public StructObjectInspector initialize(StructObjectInspector argOIs) throws UDFArgumentException {
        //获取参数
        List<? extends StructField> params = argOIs.getAllStructFieldRefs();
        //判断参数的个数
        if (params.size() != 2){
            throw new UDFArgumentException("MyExplode() takes two arguments");
        }
        //定义输出数据的列名
        //这个泛型string是列名为string类型
        List<String> fieldNames = new ArrayList<>();
        fieldNames.add("words");
        //定义输出数据的类型
        List<ObjectInspector> fieldOIs = new ArrayList<>();
        //这里设置的类型是输出数据的类型。
        fieldOIs.add(PrimitiveObjectInspectorFactory.javaStringObjectInspector);
        //fieldNames是输出数据的列名,fieldOIs是输出数据的类型
        return ObjectInspectorFactory.getStandardStructObjectInspector(fieldNames, fieldOIs);
    }

    /*
     * @Description //TODO 逻辑方法
     * @Param [args]
     * @return void
     **/
    @Override
    public void process(Object[] args) throws HiveException {
        //获取原始数据
        String string = args[0].toString();
        //获取切割符
        String splitKey = args[1].toString();
        //将原始数据进行切分
        String[] words = string.split(splitKey);

        //遍历切分后的结果,并写出
        for (String word : words) {
            //因为输出的类型是list,所以也要将切分结果放到list中
            //因为集合是复用的,首先要清空集合
            outList.clear();
            //为每一个单词添加到集合
            outList.add(word);
            //写出数据
            //GenericUDTF定义了一个forward方法,写出数据。
            forward(outList);
        }
    }
    @Override
    public void close() throws HiveException {

    }
}
9 压缩和存储
9.1 Hadoop压缩配置
mr支持的常见压缩编码格式和对应的编码/解码器:
压缩格式 对应的编码/解码器 DEFLATE org.apache.hadoop.io.compress.DefaultCodec gzip org.apache.hadoop.io.compress.GzipCodec bzip2 org.apache.hadoop.io.compress.BZip2Codec LZO com.hadoop.compression.lzo.LzopCodec Snappy org.apache.hadoop.io.compress.SnappyCodec
①mapred-site.xml参数配置文件:
| 参数 | 默认值 | 阶段 | 建议 |
|---|---|---|---|
| io.compression.codecs (在core-site.xml中配置) | org.apache.hadoop.io.compress.DefaultCodec, org.apache.hadoop.io.compress.GzipCodec, org.apache.hadoop.io.compress.BZip2Codec, org.apache.hadoop.io.compress.Lz4Codec | 输入压缩 | Hadoop使用文件扩展名判断是否支持某种编解码器 |
| mapreduce.map.output.compress | false | mapper输出 | 这个参数设为true启用压缩 |
| mapreduce.map.output.compress.codec | org.apache.hadoop.io.compress.DefaultCodec | mapper输出 | 使用LZO、LZ4或snappy编解码器在此阶段压缩数据 |
| mapreduce.output.fileoutputformat.compress | false | reducer输出 | 这个参数设为true启用压缩 |
| mapreduce.output.fileoutputformat.compress.codec | org.apache.hadoop.io.compress. DefaultCodec | reducer输出 | 使用标准工具或者编解码器,如gzip和bzip2 |
| mapreduce.output.fileoutputformat.compress.type | RECORD | reducer输出 | SequenceFile输出使用的压缩类型:NONE和BLOCK |
②编译配置snappy
将编译好的带有snappy的hadoop版本,在linux系统内解压。
将带有snappy的hadoop的/opt/module/hadoop-3.1.3/lib/native下的内容复制到没有snappy的对应位置。
然后重启hdfs
9.2 开启输出阶段的压缩
在哪些阶段可以用到压缩呢?
- 在Map的输出阶段压缩;开启map阶段的压缩能够减少job中map和reduce之间的数据传输量。io传输的能少。
- 在总的输出outputformat阶段压缩
开启map输出阶段的压缩
# 步骤1 开启全局的hive中间传输数据压缩功能
set hive.exec.compress.intermediate=true;
# 步骤2 开启mapreduce的map输出阶段的压缩功能
set mapreduce.map.output.compress=true;
# 步骤3 设置map输出阶段的压缩方式
set mapreduce.map.output.compress.codec=org.apache.hadoop.io.compress.SnappyCodec;
开启outputformat阶段的压缩
# 步骤1 开启全局的hive的最终数据压缩功能
set hive.exec.compress.output=true;
# 步骤2 开启mapreduce的outputformat阶段的压缩功能
set mapreduce.output.fileoutputformat.compress=true;
# 步骤3 设置outputformat阶段的数据输出压缩方式
set mapreduce.output.fileoutputformat.compress.codec=org.apache.hadoop.io.compress.SnappyCodec;
# 步骤4 设置mapreduce最终的输出压缩为块压缩(默认是行压缩)
set mapreduce.output.fileoutputformat.compress.type=BLOCK;
# 步骤5 测试输出结果是否是压缩文件
insert overwrite local directory '/opt/module/hive/datas/distribute-result'
	select * from emp distribute by deptno sort by empno desc;
9.3 文件存储格式
Hive支持的存储数据的格式有:TEXTFILE、SEQUENCEFILE、ORC、PARQUET(spark默认存储方式)
其中textfile和sequencefile是行式存储;
orc和parquet是列式存储(行列结合),parquet是以二进制的方式存储
textfile格式
默认的文件格式,数据不做压缩,磁盘开销大,可以结合Gzip和Bzip2使用。
orc格式
最流行的数据存储格式。orc格式的文件自带压缩(zlib压缩),可以使用orc格式+snappy压缩。
parquet格式
二进制方式存储,parquet格式文件是自解析的。
指定表的文件存储格式
# 创建表,存储数据格式为textfile
create table log_text(track_time string, url string, session_id string, referer string, ip string, end_user_id string, city_id string)
row format delimited fields terminated by '\t'
stored as textfile;
9.4 主流文件存储格式对比
几种文件存储格式的查询速度相近;
压缩大小:orc最小>parquet>textfile最大
text格式
# 步骤1 创建表,存储格式为textfile
create table log_text(track_time string, url string, session_id string, referer string, ip string, end_user_id string, city_id string)
row format delimited fields terminated by '\t'
stored as textfile
# 步骤2 向表中load数据
load data local inpath '/opt/module/hive/datas/log.data' into table log_text ;
# 步骤3 查看表中数据的大小
dfs -du -h /user/hive/warehouse/log_text/log.data

orc格式
因为orc格式自带zlib格式的压缩。比较待压缩和不带压缩的。
- 需要注意!存成orc格式不能用load data,因为load data 导入本地的是textfile格式,只能通过mapreduce将数据存储成orc格式。
# 步骤1 创建表,存储格式为orc
create table log_orc(track_time string, url string, session_id string, referer string, ip string, end_user_id string, city_id string)
row format delimited fields terminated by '\t'
stored as orc
tblproperties("orc.compress"="NONE");

# 步骤2 向orc格式不适用自带压缩的表中加载数据
insert into table log_orc select * from log_text;

# 步骤3 查看表中的数据的大小
dfs -du -h /user/hive/warehouse/db_hive2.db/log_orc;

使用orc自带的压缩格式。
# 步骤1 创建表,存储格式为orc
create table log_orc2(track_time string, url string, session_id string, referer string, ip string, end_user_id string, city_id string)
row format delimited fields terminated by '\t'
stored as orc;
# 步骤2 向orc格式自带压缩的表中 加载数据
insert into table log_orc2 select * from log_text;
# 步骤3 查看表中的数据大小
dfs -du -h /user/hive/warehouse/db_hive2.db/log_orc2;

parquet格式
# 步骤1 创建表,存储格式为parquet格式
create table log_parquet(
track_time string,url string,session_id string,referer string,ip string,end_user_id string,city_id string)
row format delimited fields terminated by '\t'
stored as parquet;

# 步骤2 向parquet格式的表中加载数据
insert into table log_parquet select * from log_text;
# 步骤3 查看表中的数据大小
dfs -du -h /user/hive/warehouse/db_hive2.db/log_parquet;

9.5 存储和压缩结合
实际的项目开发中,hive表的数据存储格式一般为:orc或parquet。
压缩方式一般为:snappy,lzo
结合1:默认压缩(zlib)的orc存储方式
# 步骤1 创建默认压缩(zlib)的orc存储的表
create table log_orc_zlib(track_time string,
url string,session_id string,referer string,ip string,end_user_id string,city_id string)
row format delimited fields terminated by '\t'
stored as orc
tblproperties("orc.compress"="ZLIB");
# 步骤2 加载数据
insert into table log_orc_zlib select * from log_text;
# 步骤3 查看数据大小
dfs -du -h /user/hive/warehouse/db_hive2.db/log_orc_zlib;

结合2:snappy压缩的orc存储方式
步骤1 创建snappy压缩的orc存储方式
create table log_orc_snappy(track_time string,
url string,session_id string,referer string,ip string,end_user_id string,city_id string)
row format delimited fields terminated by '\t'
stored as orc
tblproperties("orc.compress"="SNAPPY");

# 步骤2 插入数据
insert into table log_orc_snappy select * from loh_text;
# 步骤3 查看数据的大小
dfs -du -h /user/hive/warehouse/db_hive2.db/log_orc_snappy;

10 企业级调优
10.1 Fetch抓取
fetch抓取是指,Hive中对某些情况的查询可以不使用mapreduce计算。
fetch的等级有三个:more(默认)、minimal(老版本)、none
设置为more,在全局查找、字段查找、limit等都不走mapreduce。
hive-default.xml
<property>
    <name>hive.fetch.task.conversion</name>
    <value>more</value>
    <description>
      Expects one of [none, minimal, more].
      Some select queries can be converted to single FETCH task minimizing latency.
      Currently the query should be single sourced not having any subquery and should not have any aggregations or distincts (which incurs RS), lateral views and joins.
      0. none : disable hive.fetch.task.conversion
      1. minimal : SELECT STAR, FILTER on partition columns, LIMIT only
      2. more  : SELECT, FILTER, LIMIT only (support TABLESAMPLE and virtual columns)
    </description>
</property>
案例实操:
# 1 将hive.fetch.task.conversion设置成none,然后执行查询语句,都会执行mapreduce程序。
set hive.fetch.task.conversion=none;

# 2 设置成more格式(默认)
10.2 hive的本地模式
大多数的Hadoop Job是需要Hadoop集群提供完整的可扩展性来处理大数据集。不过有的hive的输入数据量是非常小的。在这种情况下,查询触发执行任务消耗的时间可能会比实际job的执行时间要多的多。
- Hive可以通过本地模式在单台机器上处理所有的任务。对于小数据集,执行时间可以明显缩短。
开启本地模式
set hive.exec.mode.local.auto=true; //开启本地mr
什么时候走本地模式?取决于输入数据量的大小(默认128M)、最大输入文件的个数(默认4个)
set hive.exec.mode.local.auto.inputbytes.max=50000000;
set hive.exec.mode.local.auto.input.files.max=10;
select * from emp cluster by deptno;
# 不开启本地模式
15 rows selected (29.498 seconds)
# 开启本地模式
15 rows selected (25.555 seconds)
10.3 表的优化
①小表、大表join
多大的表是小表呢?
- 系统默认25M以下是小表。
小表join大表可以减少内存溢出错误的几率,可以使用map join 让小的表先进内存,在map端完成reduce。
- 新版本的hive对小表join大表、大表join小表进行了优化。没有明显的区别。
操作步骤:
# 步骤1 创建大表
create table bigtable(id bigint, t bigint, uid string, keyword string, url_rank int, click_num int, click_url string) row format delimited fields terminated by '\t';
# 步骤2 创建小表
create table smalltable(id bigint, t bigint, uid string, keyword string, url_rank int, click_num int, click_url string) row format delimited fields terminated by '\t';
# 步骤3 创建join后的表
create table jointable(id bigint, t bigint, uid string, keyword string, url_rank int, click_num int, click_url string) row format delimited fields terminated by '\t';

# 步骤4 向大表导入数据
load data local inpath '/opt/module/hive/datas/bigtable' into table bigtable;
# 步骤5 向小表导入数据
load data local inpath '/opt/module/hive/datas/smalltable' into table smalltable;

# 步骤6 关闭mapjoin功能(默认开启的)
set hive.auto.convert.join = false;

# 步骤7 执行小表join大表
insert overwrite table jointable
select b.id, b.t, b.uid, b.keyword, b.url_rank, b.click_num, b.click_url
from smalltable s
join bigtable  b
on b.id = s.id;
# 时间:No rows affected (52.632 seconds)

# 步骤8 执行大表join小表
insert overwrite table jointable
select b.id, b.t, b.uid, b.keyword, b.url_rank, b.click_num, b.click_url
from bigtable  b
join smalltable  s
on s.id = b.id;
# 时间:No rows affected (52.258 seconds)
②大表join大表
空key过滤
join超时有可能是某些key’对应的数据太多,而相同的key对应的数据都会发送到相同的reducer上,从而导致内存不足。分析异常的key,比如null值,进行提前过滤。
# 步骤1 创建原始表
create table ori(id bigint, t bigint, uid string, keyword string, url_rank int, click_num int, click_url string) row format delimited fields terminated by '\t';
# 步骤2 创建空id表
create table nullidtable(id bigint, t bigint, uid string, keyword string, url_rank int, click_num int, click_url string) row format delimited fields terminated by '\t';
# 步骤3 创建join后的表
create table jointable(id bigint, t bigint, uid string, keyword string, url_rank int, click_num int, click_url string) row format delimited fields terminated by '\t';

# 步骤4 加载数据到原始表,空id表,join后的表
load data local inpath '/opt/module/hive/datas/ori' into table ori;
load data local inpath '/opt/module/hive/datas/nullid' into table nullidtable;

# 步骤5 测试不过滤空id
insert overwrite table jointable select n.* from nullidtable n
left join ori o on n.id = o.id;
# 时间 No rows affected (56.247 seconds)

# 步骤6 测试过滤空id
insert overwrite table jointable select n.* from (select * from nullidtable where id is not null ) n  left join ori o on n.id = o.id;
# 时间 No rows affected (49.802 seconds)
空key转换
对于很多的key为null值,但是该数据可能不是异常数据,所以不能使用空key过滤。为了能让数据均匀的分到不同的reducer上,需要给空key赋一个随机的值。
# 设置5个reduce个数
set mapreduce.job.reduces=5;
# join两张表
insert overwrite table jointable
select n.* from nullidtable n left join ori b on n.id = b.id;
# 时间 No rows affected (68.303 seconds)

数据倾斜
相同key太多了就会使得某个reduce的时间太长。
解决数据倾斜的方式:
- key值得处理
- 不进行reduce操作,操作在map阶段完成。
# 空key转换可以减少数据倾斜
set mapreduce.job.reduces=5;
# join两张表
insert overwrite table jointable
select n.* from nullidtable n full join ori o on
nvl(n.id,rand()) = o.id;
# 时间 No rows affected (61.956 seconds)

③Map join
map join可以把小表加载到内存在map端join,避免reduce处理。
- 多大的表是小表?
25M以下的认为是小表。
开启map join(默认true)
set hive.auto.convert.join = true;
设置小表的规定阈值(默认25M)
set hive.mapjoin.smalltable.filesize=25000000;
map端的聚合和map join区别?
④Group by
默认情况下,map阶段同一key会分发到一个reduce,当某个key数据太大就会发生数据倾斜。
可以在map端部分聚合,最后在reduce端得到最终结果。
开启map端聚合(默认true)
set hive.map.aggr = true;
设置map端聚合操作的条目数
set hive.groupby.mapaggr.checkinterval = 100000
有数据倾斜的时候进行负载均衡(默认false)
设置了负载均衡true会有两个mr job,第一个mr job中map的结果会随机分到reduce中,目的是相同的group by key 有可能会分到不同的reduce中,从而达到负载均衡的目的。第二个mr job在根据预处理的结果按照group by key分配到reduce中。
- 大数据效果明显。
set hive.groupby.skewindata = true
⑤关闭笛卡尔积
⑥行列过滤
行处理:少用select(*)
列处理:两个表join的时候,先条件过滤,在关联两个表。
⑦动态分区、分桶、分区
10.4 MR优化
①设置map个数
map的个数=切片数
map是越多越好吗?并不是!(减小map数)
如果一个文件有很多小文件,每一个小文件会被当做一个块,用一个map来完成,map的任务启动时间和初始化时间远远大于逻辑处理时间,就会造成资源的浪费。
那么是不是输入文件都是128M就高枕无忧了?并不是(增大map数)
如果有一个127M的文件,里面的每一行只有一个单词,那么map处理每行就特别耗时。
减少map数
小文件合并,Hive提供CombineHiveInputformat,对小文件合并,默认开启
set hive.input.format= org.apache.hadoop.hive.ql.io.CombineHiveInputFormat;
增大map数
computeSliteSize(Math.max(minSize,Math.min(maxSize,blocksize)))=blocksize=128M公式,调整maxSize最大值。让maxSize最大值低于blocksize就可以增加map的个数。
设置最大切片值(默认100字节)
set mapreduce.input.fileinputformat.split.maxsize=100;
②设置reduce个数
reduce的个数可以自己设置,默认为-1;
如果输入一个1G的文件,默认情况下会有几个reduce?
每个reduce处理的数据量默认是256M;那么1G/256M≈4个
每个任务的最大reduce个数=1009
真实的生产环境reduce的个数上千个。
方式1:
set mapreduce.job.reduces=15;
方式2:
# 每个reduce默认处理的数据量是256M
set hive.exec.reducers.bytes.per.reducer=256000000;
# 每个任务的最大reduce数,默认是1009
set hive.exec.reducers.max=1009;
# 计算reduce数的公式
N = min(1009, 总的输入量/256000000)
10.5 并行执行
并行执行就是map阶段没有完全完成的情况下,map处理的部分数据会传给reduce,reduce先聚合这一部分,最后在聚合所有的。
未开启并行执行:

开启并行执行:
开启并行阶段取决于资源量,同时进行map和reduce比较耗资源。
set hive.exec.parallel=true;		//打开任务并行度,默认false
set hive.exec.parallel.thread.number=16;		//同一个sql允许最大并行度,默认8

10.6 严格模式
Hive的严格模式具有以下功能(默认nonstrict),生产环境(开启strict)
<property>
    <name>hive.mapred.mode</name>
    <value>strict</value>
    <description>
      The mode in which the Hive operations are being performed.
      In strict mode, some risky queries are not allowed to run. They include:
        Cartesian Product.		//关闭笛卡尔积
        No partition being picked up for a query.		//分区表
        Comparing bigints and strings.			//比较
        Comparing bigints and doubles.			//比较
        Orderby without limit.			//使用order by必须还是不必须加limit
	</description>
</property>
动态分区默认是strict严格模式(是必须指定一个分区),设置成nonstrict非严格模式(不需要必须指定一个分区)
10.7 JVM重用
JVM重用是Hadoop调优参数的内容,对hive的性能具有非常大的影响,特别是对小文件场景或task特别多的场景,这类场景大多数执行时间都很短。
JVM重用可以使得JVM实例在同一个job中重新使用N次。N的值在Hadoop的mapred-site.xml文件中进行配置。通常在10-20之间。
<property>
  <name>mapreduce.job.jvm.numtasks</name>
  <value>10</value>
  <description>How many tasks to run per jvm. If set to -1, there is
  no limit.
  </description>
</property>
10.8 压缩
10.9 执行计划Explain
explain select * from emp;

explain select deptno, avg(sal) avg_sal from emp group by deptno;

# 查看详细执行计划
explain extended select * from emp;


技术共进,成长同行——讯飞AI开发者社区
更多推荐


 1
1 0
0- 0


 已为社区贡献4条内容

所有评论(0)