
阿里云配置https
阿里云配置https
·
1 Linux卸载Nginx
本机环境:centos7使用yum安装的Nginx
1.1 检查nginx服务是否在运行
ps -ef | grep nginx
[root@localhost /]# ps -ef | grep nginx
root       3163   2643  0 14:08 tty1     00:00:00 man nginx
root       5427      1  0 14:50 ?        00:00:00 nginx: master process nginx
nginx      5428   5427  0 14:50 ?        00:00:00 nginx: worker process
root       5532   2746  0 14:52 pts/0    00:00:00 grep --color=auto nginx
1.2 停止Nginx服务
nginx -s stop
[root@localhost /]# /usr/sbin/nginx -s stop
[root@localhost /]# netstat -lntp
Active Internet connections (only servers)
Proto Recv-Q Send-Q Local Address           Foreign Address         State       PID/Program name
tcp        0      0 0.0.0.0:111             0.0.0.0:*               LISTEN      1/systemd
tcp        0      0 0.0.0.0:22              0.0.0.0:*               LISTEN      1261/sshd
tcp6       0      0 :::111                  :::*                    LISTEN      1/systemd
tcp6       0      0 :::22                   :::*                    LISTEN      1261/sshd
1.3 查找/删除Nginx相关文件
- 查看Nginx相关文件:whereis nginx
[root@localhost /]# whereis nginx
nginx: /usr/sbin/nginx /usr/lib64/nginx /etc/nginx /usr/share/nginx /usr/share/man/man8/nginx.8.gz /usr/share/man/man3/nginx.3pm.gz
- find查找相关文件
[root@localhost /]# find / -name nginx
/usr/lib64/perl5/vendor_perl/auto/nginx
/usr/lib64/nginx
/usr/share/nginx
/usr/sbin/nginx
/etc/logrotate.d/nginx
/etc/nginx
/var/lib/nginx
/var/log/nginx
- 依次删除find查找到的所有目录:rm -rf /usr/sbin/nginx
1.4 再使用yum清理
yum remove nginx
2 CentOS7中使用yum安装Nginx
Nginx官方提供了Yum源
2.1 添加源
rpm -Uvh http://nginx.org/packages/centos/7/noarch/RPMS/nginx-release-centos-7-0.el7.ngx.noarch.rpm2.2 安装Nginx
通过yum search nginx看看是否已经添加源成功
yum install -y nginx2.3 标准安装目录介绍
2.4 Nginx常用命令
2.4.1 测试配置文件
nginx -t2.4.2 启动命令
nginx2.4.3 停止命令
# 快速关闭
nginx -s stop
# 优雅关闭
nginx -s quit2.4.4 重启命令
nginx -s reload2.4.5 查看进程命令
ps -ef | grep nginx3 在Nginx服务器上安装证书
https://help.aliyun.com/document_detail/98728.html?spm=5176.13854102.0.0.544056a7q3Hqx1
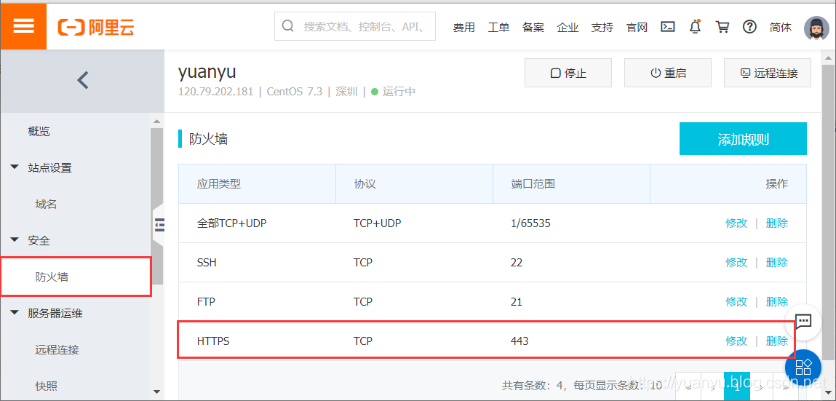
1 开放443端口
如果全部端口已经开放,这个时候可以跳过这一步
2 根据服务器类型下载证书
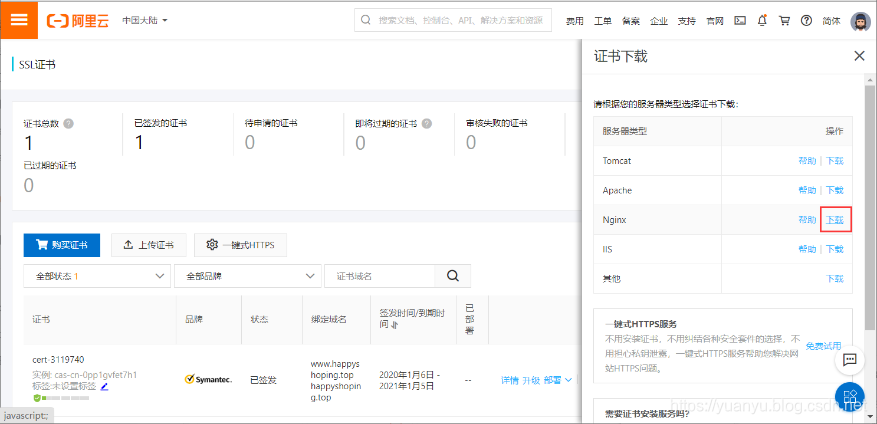
可以对证书重命名
- certificate.pem:证书文件
- certificate.key:证书的密钥文件
3 配置nginx.conf文件
创建 /etc/nginx/cert 目录,并将证书拷贝到这个目录
mkdir /etc/nginx/certuser nginx;
worker_processes 1;
error_log /var/log/nginx/error.log warn;
pid /var/run/nginx.pid;
events {
worker_connections 1024;
}
http {
# 以下属性中以ssl开头的属性代表与证书配置有关,其他属性请根据自己的需要进行配置。
server {
listen 443 ssl; #SSL协议访问端口号为443。此处如未添加ssl,可能会造成Nginx无法启动。
server_name www.happyshoping.top; #将localhost修改为您证书绑定的域名,例如:www.example.com。
root html;
index index.html index.htm;
ssl_certificate /etc/nginx/cert/certificate.pem; #将Xxx.pem替换成您证书的文件名。
ssl_certificate_key /etc/nginx/cert/certificate.key; #将Xxx.key替换成您证书的密钥文件名。
ssl_session_timeout 5m;
ssl_ciphers ECDHE-RSA-AES128-GCM-SHA256:ECDHE:ECDH:AES:HIGH:!NULL:!aNULL:!MD5:!ADH:!RC4; #使用此加密套件。
ssl_protocols TLSv1 TLSv1.1 TLSv1.2; #使用该协议进行配置。
ssl_prefer_server_ciphers on;
location / {
root html; #站点目录。
index index.html index.htm;
}
}
server {
listen 80;
server_name www.happyshoping.top; #将localhost修改为您证书绑定的域名,例如:www.example.com。
rewrite ^(.*)$ https://$host$1 permanent; #将所有http请求通过rewrite重定向到https。
location / {
index index.html index.htm;
}
}
}4 启动nginx
nginx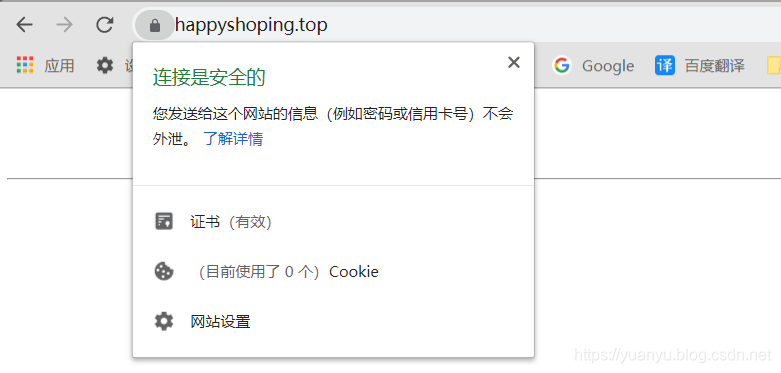
Linux彻底卸载Nginx:https://www.jianshu.com/p/c1ce9eec5fb2
CentOS7中使用yum安装Nginx的方法:https://www.cnblogs.com/songxingzhu/p/8568432.html

技术共进,成长同行——讯飞AI开发者社区
更多推荐

 5
5 0
0- 0


 已为社区贡献3条内容

所有评论(0)