
使用CMake和CTest自动测试代码
最近在研究高性能计算(HPC),恶补些代码方面的知识,顺便记录下,参考的书籍是算。高性能计算一般是基于的底层进行,国内大部分用的都是Windows系统,如果不想捣鼓双系统,就需要安装虚拟机。虚拟机一般有两种方法,要么使用虚拟化软件(推荐),要么使用微软的。
使用CMake和CTest自动测试代码
实际上,这些代码在github也存在,有梯子的可以去下面地址下载,但是从复现情况而言,有些地方还是需要修改(库里面代码版本比较老了):essentialsofparallelcomputing
最近在研究高性能计算(HPC),恶补些代码方面的知识,顺便记录下,参考的书籍是并行计算与高性能计算。
高性能计算一般是基于Linux的底层进行,国内大部分用的都是Windows系统,如果不想捣鼓双系统,就需要安装虚拟机。虚拟机一般有两种方法,要么使用虚拟化软件(推荐VMWare),要么使用微软的WSL子系统。
此处使用WSL子系统运行Ubuntun22.04的方式进行。
此种方法可以参考:Windows11离线安装wsl2(适用于 Linux 的 Windows 子系统)和Ubuntu
1、测试代码背景
进行代码测试的主要目的是比较修改版本和稳定版本之间的差异,此处假设一个简单的模拟场景。我在代码中开启一个计时器,并进行10s的睡眠,然后再读取定时器的值,理论上定时器的值就应该是10s。
- 启动定时器
- 睡眠10s
- 关闭定时器并记时
那么现在,我模拟对代码进行改进修改,我在启动程序时指定特定的处理器,理想情况下,不管使用哪个处理器,计时得到的数值应该都是10s才对。
总的来说,初始代码和模拟的修改代码(指定处理器执行)的返回结果应该一致,一致时认为测试通过。
对应的初始代码如下:
#include <unistd.h>
#include <stdio.h>
#include <time.h>
int main(int argc, char *argv[]){
   struct timespec tstart, tstop, tresult;
// Start timer, call sleep and stop timer
   clock_gettime(CLOCK_MONOTONIC, &tstart);
   sleep(10);
   clock_gettime(CLOCK_MONOTONIC, &tstop);
// Timer has two values for resolution and prevent overflows
   tresult.tv_sec = tstop.tv_sec - tstart.tv_sec;
   tresult.tv_nsec = tstop.tv_nsec - tstart.tv_nsec;
// Print calculated time from timers
   printf("Elapsed time is %f secs\n", (double)tresult.tv_sec +
      (double)tresult.tv_nsec*1.0e-9);
}
使用MPI指定运行CPU的代码如下:
#include <unistd.h>
#include <stdio.h>
#include <mpi.h>
int main(int argc, char *argv[]){
   int mype;
// Initialize MPI and get processor rank
   MPI_Init(&argc, &argv);
   MPI_Comm_rank(MPI_COMM_WORLD, &mype);
   double t1, t2;
// Start timer, call sleep and stop timer
   t1 = MPI_Wtime();
   sleep(10);
   t2 = MPI_Wtime();
// Print timing output from first processor
   if (mype == 0) printf( "Elapsed time is %f secs\n", t2 - t1 );
// Shutdown MPI
   MPI_Finalize();
}
2、提取结果中的数值进行比较
要进行比较,总是要有个结果的数值。在上面的两段代码中,都使用了Print函数对最终的计时结果进行打印。在执行程序时,我们可以将打印的输出指定为文件,然后对文件的内容进行比较:
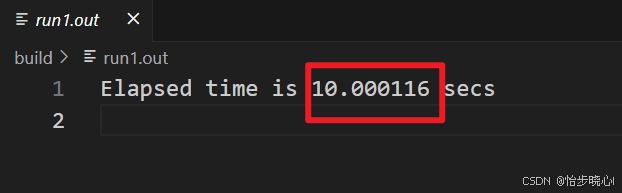
mpirun -n 1 ./MPITimeIt > run1.out
需要使用特定的工具来自动提取并比较文件中的数值字段,此处使用的是numdiff工具。这个工具在Ubuntu下可以使用apt命令进行安装:
sudo apt-get install numdiff
假设现在我们有两个文件,内容如下: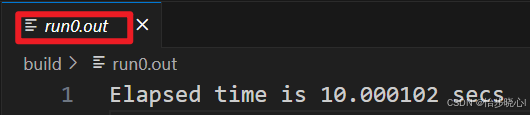

我可以使用如下numdiff命令进行对比,返回会显示当前的绝对误差和相对误差:
numdiff run0.out run1.out

3、编写自动测试脚本
我们可以按照上面手动执行程序并进行比较,但是这样比较麻烦。推荐的方法是写一个ctest脚本自动执行。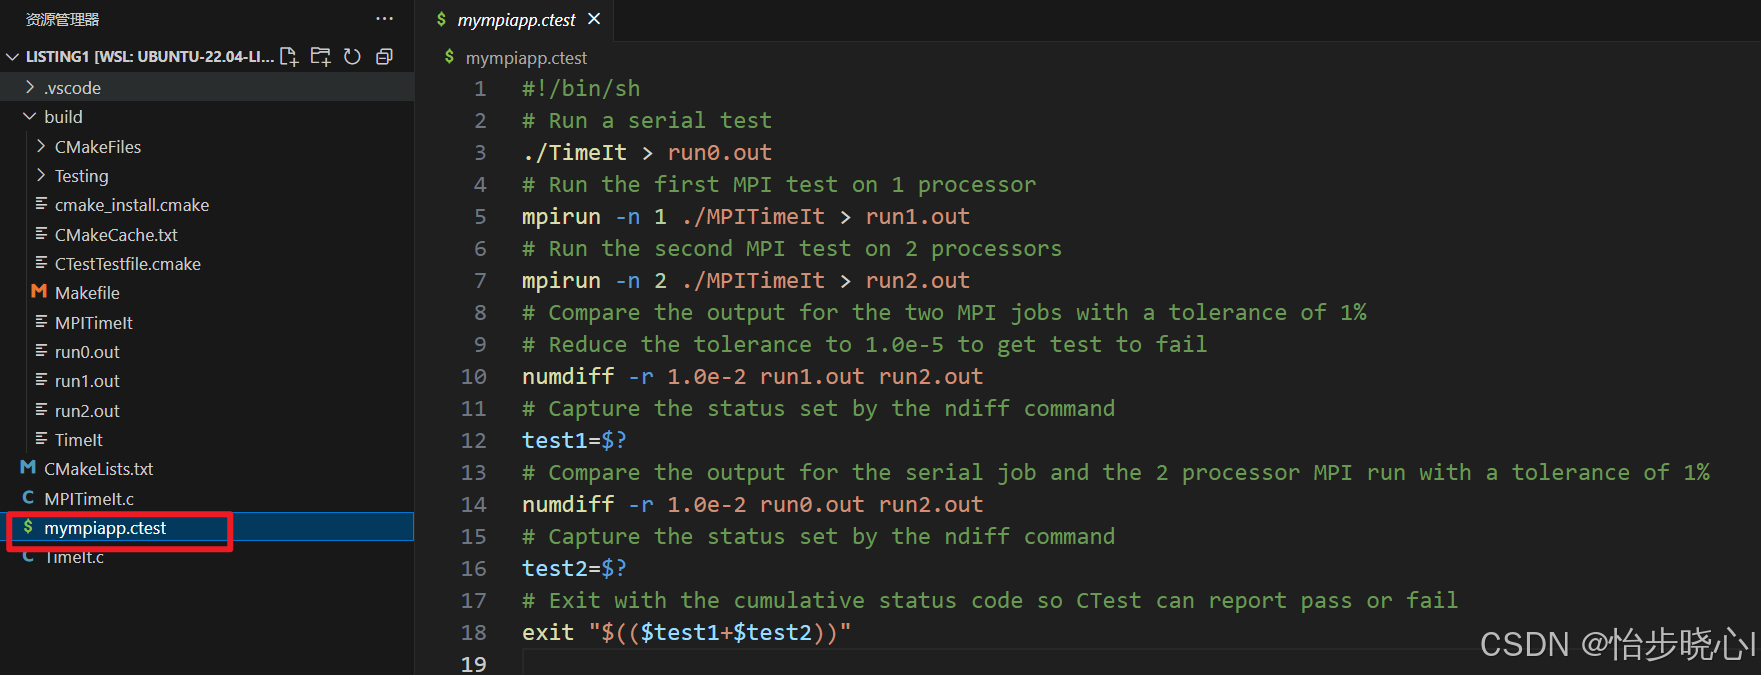
其中的一些代码解释如下。
1、[./TimeIt > run0.out]和[mpirun -n 1 ./MPITimeIt > run1.out]这些命令会执行代码,并将代码里面printf的内容存为out文件
2、[numdiff -r 1.0e-2 run1.out run2.out]命令会返回指定相对误差下两个文件中的数值字段是否相等,例如此处指定的相对误差为1.0e-2,因此如果实际的对比相对误差小于这个值,则会返回相等:
3、[test1=$?]命令会捕获命令行的输出,显而易见,当run1.out和run2.out的误差小于1.0e-2,且run0.out和run2.out的误差小于1.0e-2时,测试命令通过。
全部测试脚本如下:
#!/bin/sh
# Run a serial test
./TimeIt > run0.out
# Run the first MPI test on 1 processor
mpirun -n 1 ./MPITimeIt > run1.out
# Run the second MPI test on 2 processors
mpirun -n 2 ./MPITimeIt > run2.out
# Compare the output for the two MPI jobs with a tolerance of 1%
# Reduce the tolerance to 1.0e-5 to get test to fail
numdiff -r 1.0e-2 run1.out run2.out
# Capture the status set by the ndiff command
test1=$?
# Compare the output for the serial job and the 2 processor MPI run with a tolerance of 1%
numdiff -r 1.0e-2 run0.out run2.out
# Capture the status set by the ndiff command
test2=$?
# Exit with the cumulative status code so CTest can report pass or fail
exit "$(($test1+$test2))"
4、使用CMake和CTest链接测试脚本
主要包含这么几个关键字段,首先在CMakeList.txt中要允许测试:
# Enables CTest functionality in CMake
enable_testing()
在CMakeList.txt中循环获取当前目录下以ctest结尾的测试脚本文件,并加入到测试的脚本集合里面:
# This gets all files with the extension 'ctest' and adds it to the test list for CTest
# The ctest file needs to be executable or explicitly launched with the 'sh' command as below
file(GLOB TESTFILES RELATIVE "${CMAKE_CURRENT_SOURCE_DIR}" "*.ctest")
foreach(TESTFILE ${TESTFILES})
     add_test(NAME ${TESTFILE} WORKING_DIRECTORY ${CMAKE_BINARY_DIR}
              COMMAND sh ${CMAKE_CURRENT_SOURCE_DIR}/${TESTFILE})
endforeach()
全部的CMakeList.txt如下:
cmake_minimum_required (VERSION 3.0)
project (TimeIt)

# Enables CTest functionality in CMake
enable_testing()

# CMake has a built-in routine to find most MPI packages
# Defines MPI_FOUND if found
# MPI_INCLUDE_PATH (being replaced by MPI_<lang>_INCLUDE_PATH)
# MPI_LIBRARIES (being replaced by MPI_<lang>_LIBRARIES)
find_package(MPI)

# Adds build targets of TimeIt and MPITimeIt with source code file(s) TimeIt.c and MPITimeIt.c
add_executable(TimeIt TimeIt.c)

add_executable(MPITimeIt MPITimeIt.c)
# Need an include path to the mpi.h file and to the MPI library
target_include_directories(MPITimeIt PUBLIC ${MPI_INCLUDE_PATH})
target_link_libraries(MPITimeIt ${MPI_LIBRARIES})

# This gets all files with the extension 'ctest' and adds it to the test list for CTest
# The ctest file needs to be executable or explicitly launched with the 'sh' command as below
file(GLOB TESTFILES RELATIVE "${CMAKE_CURRENT_SOURCE_DIR}" "*.ctest")
foreach(TESTFILE ${TESTFILES})
     add_test(NAME ${TESTFILE} WORKING_DIRECTORY ${CMAKE_BINARY_DIR}
              COMMAND sh ${CMAKE_CURRENT_SOURCE_DIR}/${TESTFILE})
endforeach()

# A custom command, distclean, to remove files that are created
add_custom_target(distclean COMMAND rm -rf CMakeCache.txt CMakeFiles
                  CTestTestfile.cmake Makefile Testing cmake_install.cmake)
5、实际运行测试
0、要确保基础的包都安装过了,比如gcc, numdiff, cmake这些基础的package,或者等报错了自己研究缺啥也行
1、下载会得到名为Listing1的文件夹,cd到这个里面:
2、创建build文件夹并cd到build文件夹中:
mkdir build
cd build

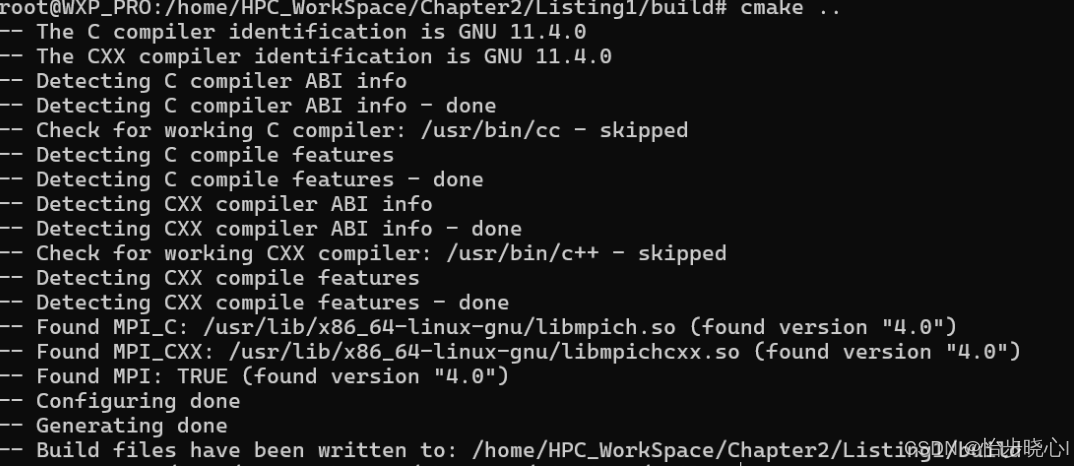
3、调用cmake生成makefile:
cmake ..
4、使用make命令完成对TimeIt.c和MPITimeIt.c文件的编译:
make

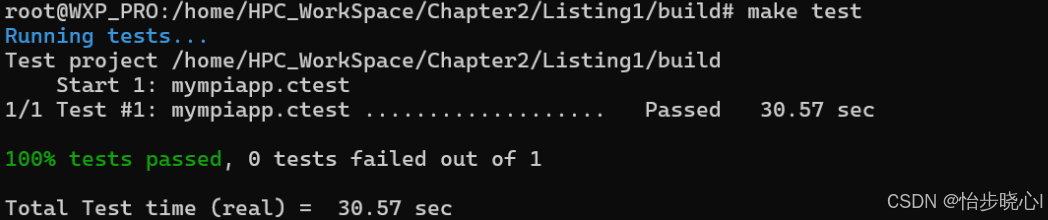
5、使用make test或者ctest命令进行测试,测试时会自动执行上面的ctest脚本:
make test
6、运行指定的测试项
这部分是后来添加的,因此不在上面的代码文件里面,但是也比较好理解。
我们可能有这样的场景,不需要运行全部的测试项目(这可能比较耗时),我们在简单测试时只运行其中部分的,而在时间充裕时考虑运行全部的测试。
此处,以指定只进行和commit相关的测试为例,编写CMakelist时,使用如下的字段:
此时,输入make commit_tests命令只会对第一个进行测试: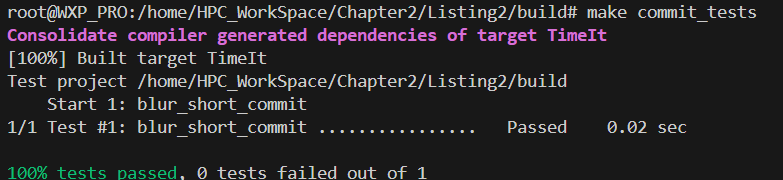
输入make test会运行全部的测试:
CMakelist的全部内容为:
cmake_minimum_required (VERSION 3.0)
project (TimeIt)

# Enables CTest functionality in CMake
enable_testing()

add_executable(TimeIt TimeIt.c)

# Add two tests, one with commit in the name
add_test(NAME blur_short_commit WORKING_DIRECTORY ${CMAKE_BINARY_DIRECTORY}
         COMMAND sh ${CMAKE_CURRENT_SOURCE_DIR}/blur_short.ctest)
add_test(NAME blur_long WORKING_DIRECTORY ${CMAKE_BINARY_DIRECTORY}
         COMMAND sh ${CMAKE_CURRENT_SOURCE_DIR}/blur_long.ctest)

# Custom target "commit_tests" to run all tests with commit in the name
add_custom_target(commit_tests COMMAND ctest -R commit DEPENDS TimeIt)

# A custom command, distclean, to remove files that are created
add_custom_target(distclean COMMAND rm -rf CMakeCache.txt CMakeFiles
                  CTestTestfile.cmake Makefile Testing cmake_install.cmake)

技术共进,成长同行——讯飞AI开发者社区
更多推荐
 8
8 0
0- 0


 已为社区贡献3条内容

所有评论(0)