
【人工智能】构建基于 Qwen1.5-7B-Chat 的轻量级 Python 对话助手
Qwen 系列语言模型提供了功能强大且开源的大型语言模型,可用于各种自然语言处理任务。本文将展示如何在 Python 中设置并运行一个由 Qwen 模型驱动的个人助理应用程序——具体使用 Qwen1.5-7B-Chat 模型。该模型是一个高效且相对轻量的 70 亿参数对话模型,专为会话场景优化。文中示例代码可直接在 Google Colab 等 Python 笔记本中运行,也可轻松适配在本地环境使
【精选优质专栏推荐】
- 《AI 技术前沿》 —— 紧跟 AI 最新趋势与应用
- 《网络安全新手快速入门(附漏洞挖掘案例)》 —— 零基础安全入门必看
- 《BurpSuite 入门教程(附实战图文)》 —— 渗透测试必备工具详解
- 《网安渗透工具使用教程(全)》 —— 一站式工具手册
- 《CTF 新手入门实战教程》 —— 从题目讲解到实战技巧
- 《前后端项目开发(新手必知必会)》 —— 实战驱动快速上手
每个专栏均配有案例与图文讲解,循序渐进,适合新手与进阶学习者,欢迎订阅。

前言
Qwen 系列语言模型提供了功能强大且开源的大型语言模型,可用于各种自然语言处理任务。
本文将展示如何在 Python 中设置并运行一个由 Qwen 模型驱动的个人助理应用程序——具体使用 Qwen1.5-7B-Chat 模型。该模型是一个高效且相对轻量的 70 亿参数对话模型,专为会话场景优化。文中示例代码可直接在 Google Colab 等 Python 笔记本中运行,也可轻松适配在本地环境使用。
实践教程
由于创建一个由 Qwen 驱动的助手需要安装多个依赖库,我们首先安装这些库并验证其版本,以尽可能保证与已安装版本的兼容性。
pip install -q transformers accelerate bitsandbytes einops ipywidgets
在可用的情况下,我们还会设置 GPU,以加快模型推理速度。模型在首次调用时会进行初始化。
以下代码展示了这些初始设置步骤:
import torch
from transformers import AutoModelForCausalLM, AutoTokenizer
import time
from IPython.display import display, HTML, clear_output
import ipywidgets as widgets
import sys
import os

# 验证已安装的软件包和依赖项
try:
    import bitsandbytes as bnb
    print("Successfully imported bitsandbytes")
except ImportError:
    print("Error importing bitsandbytes. Attempting to install again...")
    !pip install -q bitsandbytes --upgrade
    import bitsandbytes as bnb

# 安装所需软件包(如果已经安装,可以注释掉下面这行)
!pip install -q transformers accelerate bitsandbytes einops

# 设置设备,优先使用 GPU(如果可用)
device = "cuda" if torch.cuda.is_available() else "cpu"
print(f"Using device: {device}")
接下来是加载和配置模型。
我们使用 Qwen/Qwen1.5-7B-Chat,相较于更大型的模型(如 Qwen2.5-Omni),首次推理速度更快。虽然 Qwen2.5-Omni 性能更强,但不如该系列的轻量版本精简。
像往常一样,加载预训练语言模型时需要一个 tokenizer 将文本输入转换为模型可读取的格式。HuggingFace 的 AutoTokenizer 可以简化这一过程。
为提高效率,我们尝试启用 4-bit 量化,以优化内存使用。
因此代码如下所示:
# 加载 Qwen1.5-7B-Chat 模型 - 公开可用,并且在 Google Colab 的 T4 GPU 上运行效率较高
model_name = "Qwen/Qwen1.5-7B-Chat"

print(f"Loading {model_name}...")
start_time = time.time()

# 加载分词器
tokenizer = AutoTokenizer.from_pretrained(model_name, trust_remote_code=True)

# 尝试使用 4-bit 量化加载模型以提高效率
try:
    print("Attempting to load model with 4-bit quantization...")
    model = AutoModelForCausalLM.from_pretrained(
        model_name,
        torch_dtype=torch.bfloat16,  # 使用 bfloat16 以获得更好性能
        device_map="auto",
        trust_remote_code=True,
        quantization_config={"load_in_4bit": True}  # 使用 4-bit 量化以优化内存效率
    )
except Exception as e:
    print(f"4-bit quantization failed with error: {str(e)}")
    print("Falling back to 8-bit quantization...")
    try:
        model = AutoModelForCausalLM.from_pretrained(
            model_name,
            torch_dtype=torch.bfloat16,
            device_map="auto",
            trust_remote_code=True,
            load_in_8bit=True  # 尝试改用 8-bit 量化
        )
    except Exception as e2:
        print(f"8-bit quantization failed with error: {str(e2)}")
        print("Falling back to standard loading (will use more memory)...")
        model = AutoModelForCausalLM.from_pretrained(
            model_name,
            torch_dtype=torch.bfloat16,
            device_map="auto",
            trust_remote_code=True
        )

load_time = time.time() - start_time
print(f"Model loaded in {load_time:.2f} seconds")
在构建自定义对话助手时,通常的良好做法是设计一个默认提示词,该提示词会随每次具体请求一起使用,用于调整模型的行为并生成符合需求的回答。以下是一个示例默认提示词:
system_prompt = """You are a helpful, respectful and honest assistant. Always answer as helpfully as possible, while being safe. Your answers should be engaging and fun.
If a question does not make any sense, or is not factually coherent, explain why instead of answering something not correct. If you don't know the answer to a question, please don't share false information."""
接下来定义的函数封装了执行流程中最关键的部分:模型接收用户输入并生成回复。在此,我们将运行一个可连续发出多次请求的对话,因此需要妥善管理聊天历史,并将其作为每次新请求的一部分传入。
def generate_response(user_input, chat_history=None):
    if chat_history is None:
        chat_history = []

    # 格式化对话内容传递给模型
    messages = [{"role": "system", "content": system_prompt}]

    # 添加聊天历史,以提供完整上下文
    for message in chat_history:
        messages.append(message)

    # 添加当前用户输入
    messages.append({"role": "user", "content": user_input})

    # 分词处理:将消息转换为模型输入格式
    prompt = tokenizer.apply_chat_template(messages, tokenize=False, add_generation_prompt=True)
    inputs = tokenizer(prompt, return_tensors="pt").to(device)

    # 生成回复:第一次执行可能需要较长时间
    with torch.no_grad():
        outputs = model.generate(
            **inputs,
            max_new_tokens=512,
            do_sample=True,
            temperature=0.7,
            top_p=0.9,
            pad_token_id=tokenizer.pad_token_id or tokenizer.eos_token_id
        )

    # 解码生成的回复
    full_response = tokenizer.decode(outputs[0], skip_special_tokens=True)

    # 仅提取助手的回复,而不是完整的原始输出
    assistant_response = full_response.split(user_input)[-1].strip()

    # 如果回复中包含角色标记或其他无关信息,则进一步清理
    if "assistant" in assistant_response.lower()[:20]:
        assistant_response = assistant_response.split(":", 1)[-1].strip()

    return assistant_response
在定义好生成回复的关键函数后,我们可以构建一个简单的用户界面,用于运行并与助手交互。
该界面包含:
-
一个输出显示区域,用于展示对话内容
-
一个输入文本框,用户在其中输入问题
-
两个按钮:一个用于发送请求,一个用于清空聊天
这里使用 widgets 库来实现这些界面元素。
# 为个人助理创建一个简单的用户界面
def create_assistant_ui():
    output = widgets.Output()
    input_box = widgets.Text(
        value='',
        placeholder='Ask me anything...',   # 占位提示文字
        description='Question:',            # 输入框标签
        layout=widgets.Layout(width='80%')
    )
    send_button = widgets.Button(description="Send")         # 发送按钮
    clear_button = widgets.Button(description="Clear Chat")  # 清空聊天按钮

    chat_history = []

    # 处理“发送”按钮点击事件
    def on_send_button_clicked(b):
        user_input = input_box.value
        if not user_input.strip():
            return

        with output:
            print(f"You: {user_input}")

            # 显示“正在思考”提示
            print("Assistant: Thinking...", end="\r")

            # 生成回复
            start_time = time.time()
            try:
                response = generate_response(user_input, chat_history)
                end_time = time.time()

                # 清除“正在思考”的提示
                clear_output(wait=True)

                # 显示对话内容
                print(f"You: {user_input}")
                print(f"Assistant: {response}")
                print(f"\n(Response generated in {end_time - start_time:.2f} seconds)")

                # 更新聊天历史
                chat_history.append({"role": "user", "content": user_input})
                chat_history.append({"role": "assistant", "content": response})
            except Exception as e:
                clear_output(wait=True)
                print(f"You: {user_input}")
                print(f"Error generating response: {str(e)}")
                import traceback
                traceback.print_exc()

        # 清空输入框
        input_box.value = ''

    # 处理“清空聊天”按钮点击事件
    def on_clear_button_clicked(b):
        with output:
            clear_output()
            print("Chat cleared!")
        chat_history.clear()

    # 将按钮点击事件绑定到函数
    send_button.on_click(on_send_button_clicked)
    clear_button.on_click(on_clear_button_clicked)

    # 处理输入框中按下回车键的事件
    def on_enter(sender):
        on_send_button_clicked(None)
    input_box.on_submit(on_enter)

    # 布局界面组件
    input_row = widgets.HBox([input_box, send_button, clear_button])
    ui = widgets.VBox([output, input_row])

    return ui
我们还可以设置命令行接口(CLI)来实现聊天工作流:
# 使用模型的更简单方式示例(命令行接口)
def cli_chat():
    print("\n=== Starting CLI Chat (type 'exit' to quit) ===")
    chat_history = []

    while True:
        user_input = input("\nYou: ")
        if user_input.lower() in ['exit', 'quit', 'q']:
            print("Goodbye!")
            break

        print("Assistant: ", end="")
        try:
            start_time = time.time()
            response = generate_response(user_input, chat_history)
            end_time = time.time()

            print(f"{response}")
            print(f"(Generated in {end_time - start_time:.2f} seconds)")

            # 更新聊天历史
            chat_history.append({"role": "user", "content": user_input})
            chat_history.append({"role": "assistant", "content": response})
        except Exception as e:
            print(f"Error: {str(e)}")
            import traceback
            traceback.print_exc()
接下来是最后两步:
-
定义一个快速测试函数,用于确认模型和依赖项已正确安装并可正常运行。
-
定义一个总控函数,用于启动整个对话助手应用程序,并允许用户选择使用的接口类型(UI 或 CLI)。
# 尝试一个简单的测试查询以确保一切正常
def quick_test():
    test_question = "What can you help me with?"
    print(f"\nTest Question: {test_question}")

    start_time = time.time()
    try:
        response = generate_response(test_question)
        end_time = time.time()

        print(f"Response: {response}")
        print(f"Generation time: {end_time - start_time:.2f} seconds")
        return True
    except Exception as e:
        print(f"Test failed with error: {str(e)}")
        import traceback
        traceback.print_exc()  # 打印完整堆栈以便调试
        return False

# 应用程序的总控函数:在这里我们可以选择使用哪种界面
def run_assistant():
    print("\nRunning quick test...")
    test_success = quick_test()

    if test_success:
        # 询问用户选择哪种界面
        interface_choice = input("\nChoose interface (1 for UI, 2 for CLI): ")

        if interface_choice == "2":
            cli_chat()
        else:
            print("\nStarting the personal assistant UI...")
            assistant_ui = create_assistant_ui()
            display(assistant_ui)

            # 使用说明
            print("\n--- Instructions ---")
            print("1. 在文本框中输入你的问题")
            print("2. 按回车键或点击 'Send'")
            print("3. 等待助手的回复")
            print("4. 点击 'Clear Chat' 开始新的对话")
            print("----------------------")
    else:
        print("\n由于测试失败,跳过 UI 启动。")
        print("你可以直接调用 cli_chat() 尝试命令行界面")

# 运行对话助手
run_assistant()
试运行
如果一切设置成功,现在就可以与新构建的助手进行互动了。下面是一个对话流程示例片段:
Running quick test...
Test Question: What can you help me with?
Response:
1. General knowledge: I can provide information on a wide range of topics, from history and science to pop culture, current events, and more.
2. Problem-solving: Need help with a math problem, figuring out how to do something, or troubleshooting an issue? I'm here to guide you.
3. Research: If you have a specific topic or question in mind, I can help you find reliable sources and summarize the information for you.
4. Language assistance: Need help with writing, grammar, spelling, or translation? I can assist with that.
5. Fun facts and trivia: Want to impress your friends with interesting facts or just looking for a good laugh? I've got you covered!
6. Time management and organization: Strategies to help you stay on top of your tasks and projects.
7. Personal development: Tips for learning new skills, setting goals, or managing your emotions.

Just let me know what you need, and I'll do my best to assist you! Remember, I can't always give away all the answers, but I'll certainly try to make the process as enjoyable and informative as possible.
Generation time: 18.04 seconds

Choose interface (1 for UI, 2 for CLI):
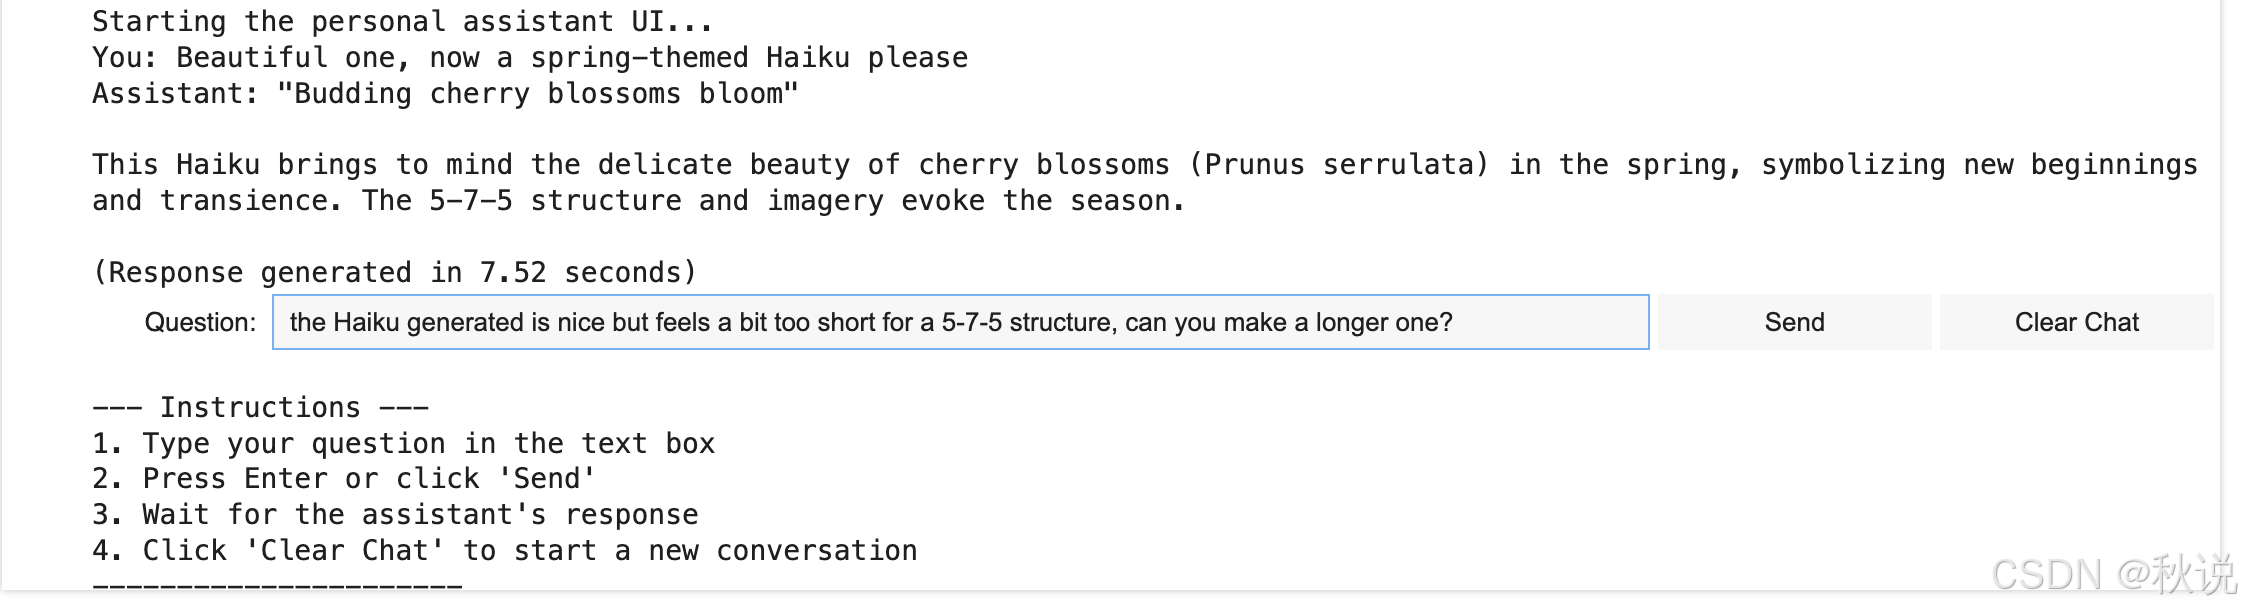
下面是通过 UI 实时交互的示例:
结论
本文演示了如何构建一个由轻量但功能强大的 Qwen 语言模型驱动的简单对话助手应用程序。
该应用程序设计为可在 GPU 环境中高效运行和测试,例如 Google Colab 笔记本提供的环境。

技术共进,成长同行——讯飞AI开发者社区
更多推荐
 8
8 0
0- 0


 已为社区贡献9条内容

所有评论(0)